VSA 10 On-Premises Guide
This topic provides background information, step‑by‑step installation instructions, and post‑installation guidance. This guide applies to new on-premises installations of VSA 10.
The process of installing VSA 10 begins with downloading an installation executable. You have the option to activate either a 30-day free trial license or a full production license. This topic provides background information, step-by-step instructions for installing VSA 10, and post-installation guidance.
This documentation pertains only to new on-prem installations of VSA 10. Kaseya executes provisioning for SaaS/cloud-based customers.
Background information
Expand the following sections to review details and specifications before you start the installation steps in this topic.
Trial (demo) license
You are not required to purchase a license to unlock the full experience VSA 10 offers. During the installation process, you have the opportunity to generate a license key that grants you a free 30-day trial of the product. For security reasons, Kaseya requires an installation code based on your Fully Qualified Domain Name (FQDN). Obtain the installation code as follows:
- If you are an existing Kaseya customer, contact your Kaseya account manager to request the installation code for VSA 10.
- If you are a new Kaseya customer, contact our Sales team to request the installation code for VSA 10.
NOTE Unofficial links pose a security risk and could point to outdated installers. If you are interested in other IT Complete modules integrated with VSA 10, contact our Sales team to obtain trial licenses.
Production license
Whether you are an existing or new Kaseya customer, your trial can be upgraded to a full production license without needing to reenter licensing information or a license file. To upgrade your trial license, contact your account manager or our Sales team.
IMPORTANT Do not run the VSA 10 installer on an existing VSA 9 server. VSA 10 is not designed for an in-place upgrade. This action will break both VSA 9 and VSA 10 functionality, requiring a restoration of your existing VSA instance.
To inquire about upgrading an existing VSA 9 on-prem account, reach out to your account manager.
VSA 10 can run on one Windows Server, or can be split into a single Application Server and Database Server for larger implementations. This guide will show both the Application Server and Database Server in one instance. Kaseya recommends running VSA 10 on the most recent operating system (OS) and DBMS possible.
Server requirements
- Windows Server 2016+
- SQL Server 2016+
- Minimum of 8 GB of RAM
- .NET Framework 4.8 (or higher)
- 1 SSL certificate or a wildcard certificate
NOTE Usage will vary with agent loads.
NOTE Self-signed certificates are not supported.
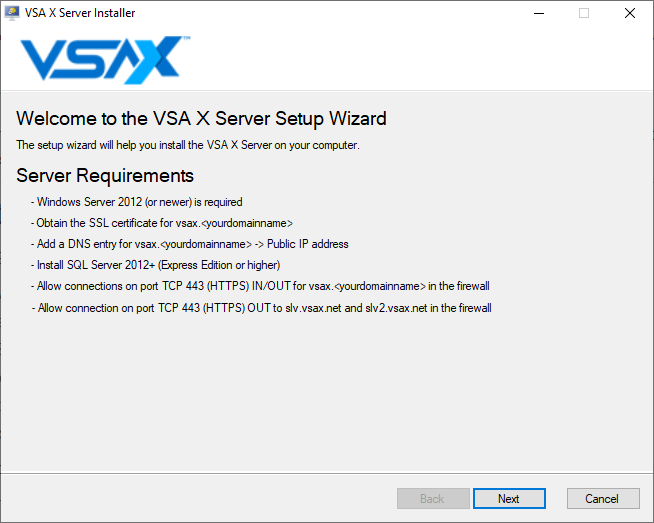
- The server needs to have an FQDN accessible from the outside that matches the URL you specified if you purchased a license.
- Make sure all patches have been applied to your server(s) so a reboot does not occur during the installation of VSA 10. You may wish to temporarily disable updates.
- VSA 10 installation requires access to the internet. Offline installation is not supported.
Split server configuration
VSA 10 supports a split server configuration. A split server configuration is a Windows Server running Microsoft IIS and another server running Microsoft SQL Server. The SQL Server can be shared with other databases; however, we recommend you give VSA 10 its own SQL Server instance and/or dedicated server.
Firewall port settings
Set up the following rules on your firewall:
- Allow both TCP and UDP connections on port 443(HTTPS) in/out for [VSA 10 domain] in the firewall.
NOTE Replace [VSA 10 domain] with your domain name (excluding the brackets).
- Allow both TCP and UDP connections on port 443(HTTPS) out to slv.vsax.net, slv2.vsax.net, and dispatcher.vsax.net in the firewall.
NOTE Agent traffic will no longer use port 5721, which was a requirement for previous VSA versions (9.5.x and earlier).
RAM
Sufficient memory is critical for the optimal performance of VSA 10 and SQL Server. Kaseya recommends starting with 8 GB of memory and assessing the memory consumption as database growth increases. Ensure you save at least 2 GB or more for the OS.
Microsoft SQL Server
You must install SQL Server before running the VSA 10 installer. This can be local on the Application Server or a remote instance. Only database services are required for VSA 10.
Installation instructions
Requirements
The installer will deploy VSA 10 via an easy-to-use wizard. The wizard will do the following:
- Run the Kaseya Server Setup step by step.
- Test and configure all prerequisites.
- Connect to an SQL Server, if already installed.
- Install the Kaseya Server and all features you are licensed to use.
- Prompt for information necessary to obtain a free trial license key.
- Set up your first account.
Steps
Perform the following steps to install VSA 10:
- Log in to the machine on which you want to install VSA 10 as an administrator.
- Download the installer to a temporary working directory.
- Right-click the Installer.exe file and select Run as administrator.

- In the VSA X Server Installer wizard that opens, click Next in the lower-right corner of the window.
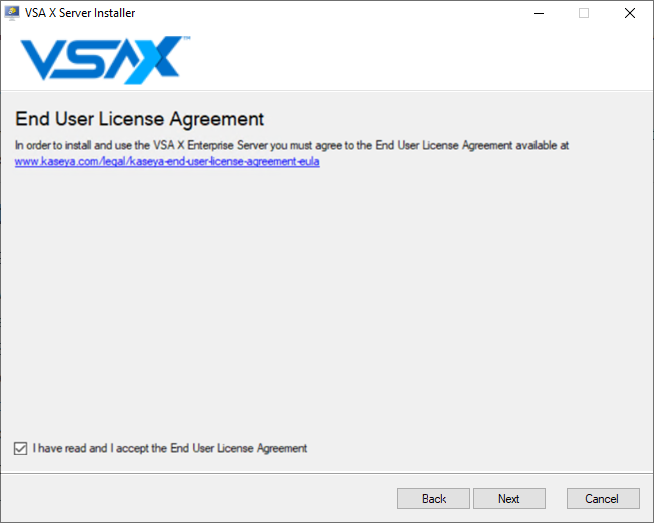
- End User License Agreement: Select the check box to confirm you have read and accept the agreement. Click Next.
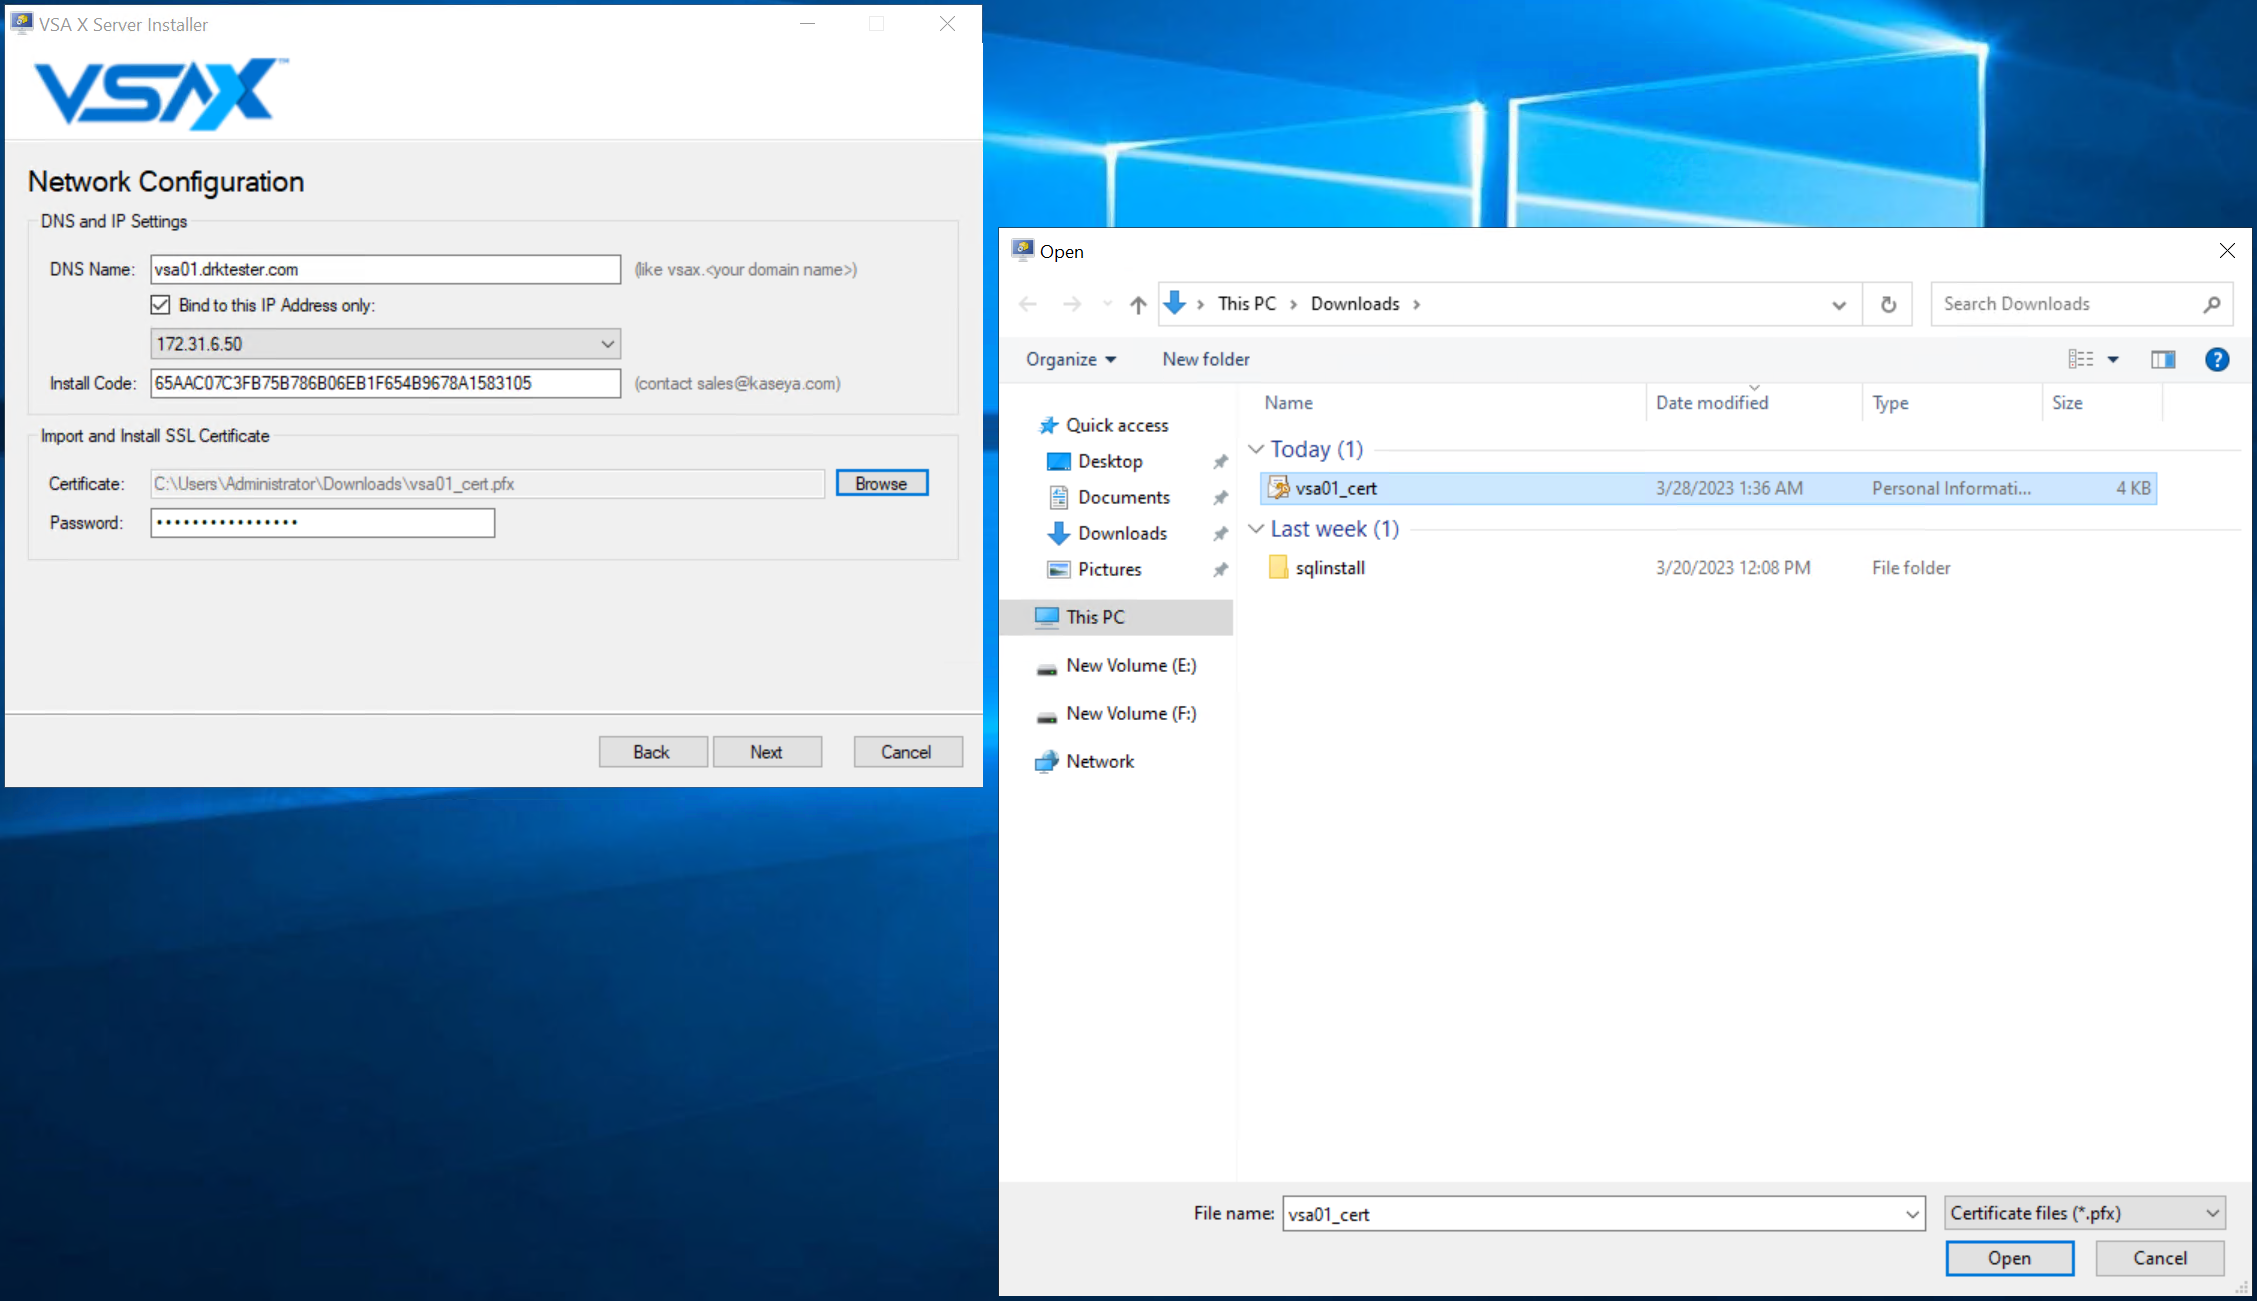
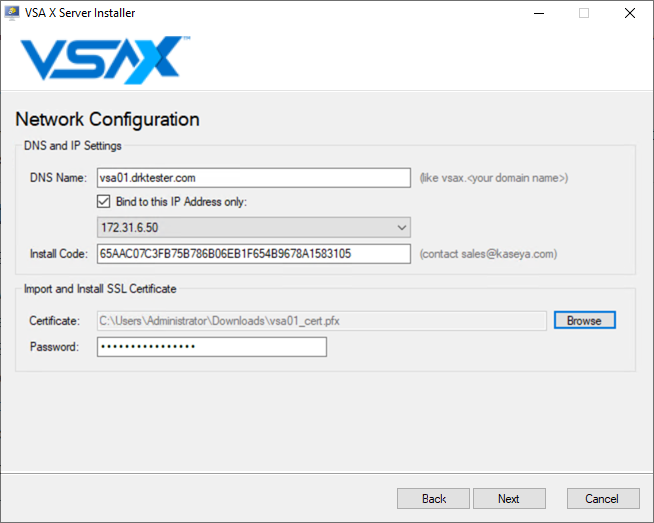
- Network Configuration:
- Enter the DNS Name, which the server will be known as externally.
- If you select the Bind to this IP Address only check box, select the IP address to bind only to this site.
- Enter the Install Code provided by the Kaseya Sales team or your account manager.
- For the Certificate field, click Browse. Select the .pfx certificate file on your device to upload it.
- Enter the certificate Password.
- Click Next.
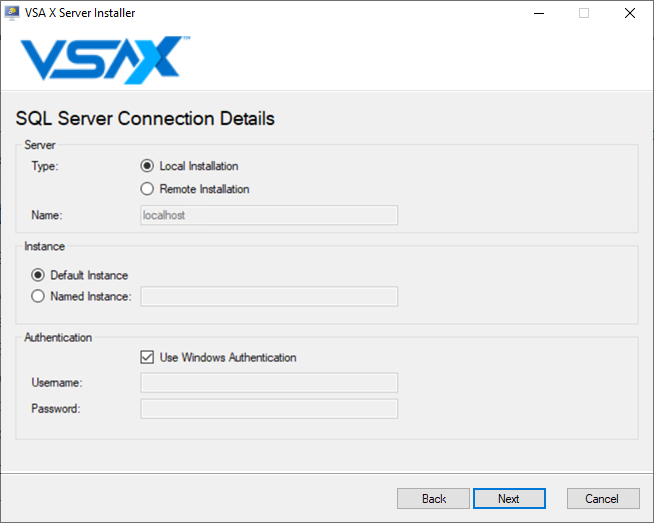
- SQL Server Connection Details:
- Select the server type:
- Local Installation: Connect to the local instance of SQL Server. This is same server you will be setting up the Application Server in later steps. This is the default setting.
- Remote Installation: If the SQL Server is on another server, enter the DNS or IP address in the Name field.
- Select the instance:
- Default Instance: The default value for SQL Server is usually used for a single instance of SQL Server.
- Named Instance: If the default instance name is not used for a SQL Server Installation or there are multiple instances of SQL Server Installed on one server, enter the instance name used for the SQL implementation. More information on instances can be found here on the Microsoft Website.
- Select the Use Windows Authentication check box if this is a local installation of SQL Server or if the server is part of a domain. If not selected, you will need to provide an SQL account that has System Administrator rights to create the database. Learn about Windows authentication for SQL Server in the Microsoft documentation.
- Click Next.
Learn about database engine instances in the Microsoft documentation.
- Select the server type:
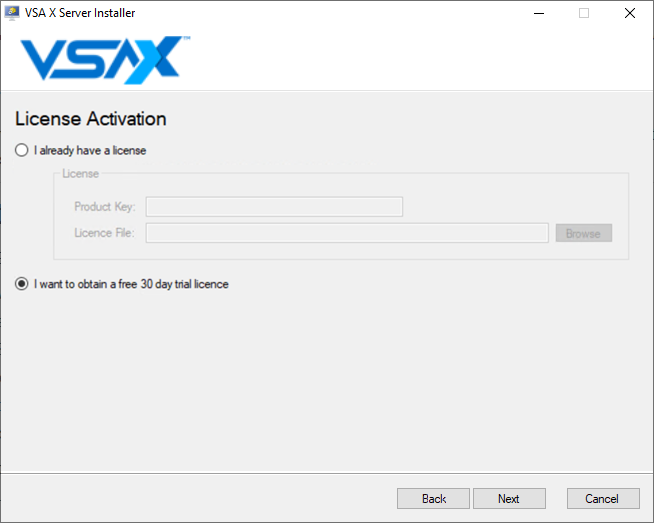
- License Activation:
- Select the type of license you are activating:
- I already have a license: Select this option if you were provided a product key and license file. Enter the product key and upload the file.
- I want to obtain a free 30-day trial license: Select this option to begin using VSA 10 on a free trial account for up to 30 days before activating a full production license. Some information is required to obtain this trial license. Proceed to the next steps for details.
- Click Next.
- Select the type of license you are activating:
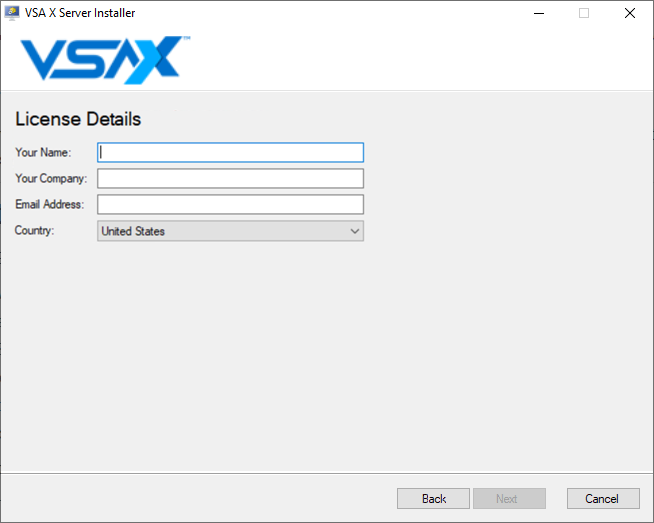
- License Details: This prompt is displayed only if you opted to obtain a trial license in step 8. Ensure you enter a valid email address to which you will receive the trial license key. This license key is required later in the installation. While the key is being generated, you can continue to the next step by clicking Next.
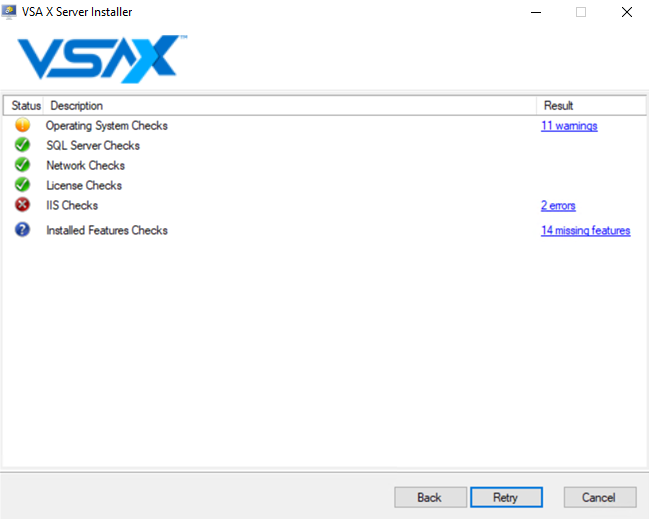
- The installer will perform a system check for all prerequisites required to complete the installation successfully. In most cases, the system check can fix a prerequisite for you. Click a link in the Result column to perform the fix.
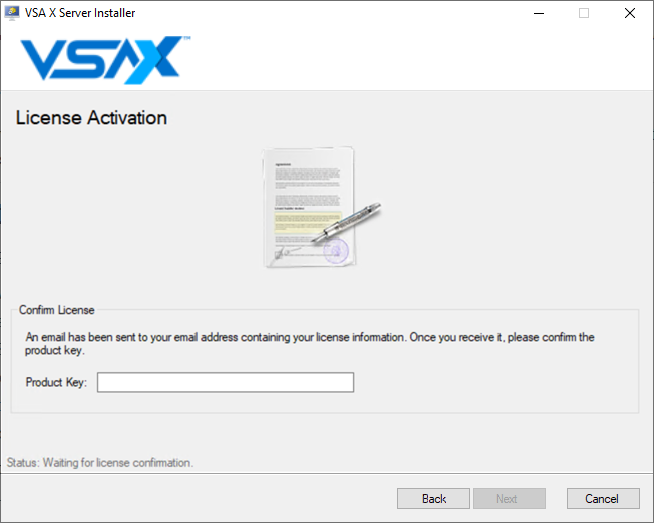
- After the system checks are completed, you will be prompted to enter your product key. If you have not received your product key, email Kaseya Support.
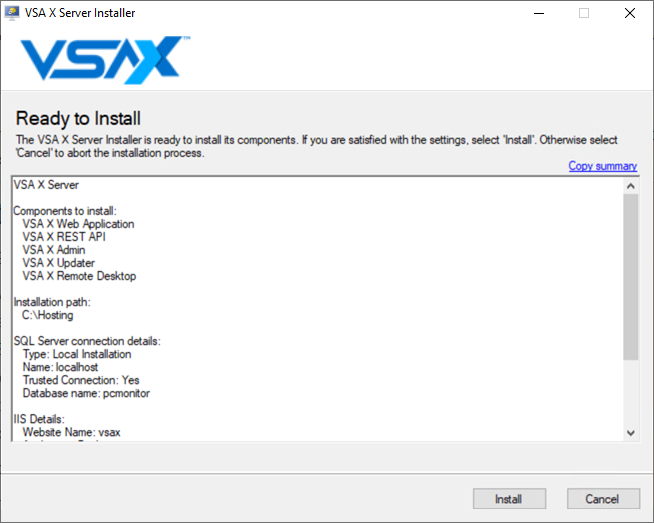
- This step creates a license file that can be upgraded to a full production license. Click Install to initiate the installation process.
- After a short time, the installation will finish. Your VSA 10 instance is now fully operational. Click Finish to exit the installer.
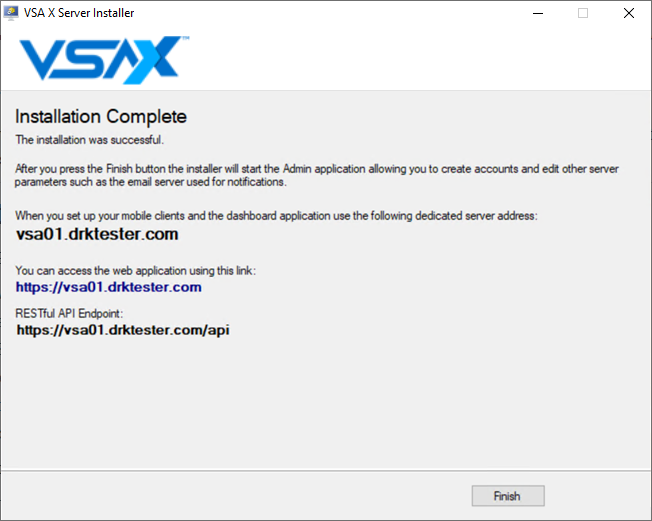
- Next, the VSA X Server Administrator tool launches automatically, allowing you to create your initial account.
NOTE If a connection error appears, verify that firewall settings are configured accordingly. Refer to Requirements. The server must have access to slv.vsax.net and slv2.vsax.net.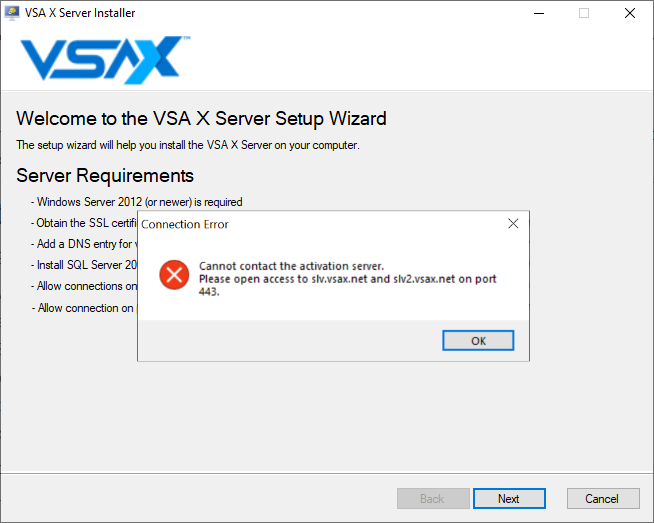
EXAMPLE In the preceding example, 11 operating system errors are displayed. By clicking the 11 warnings link, the Solution Explorer displays the following information.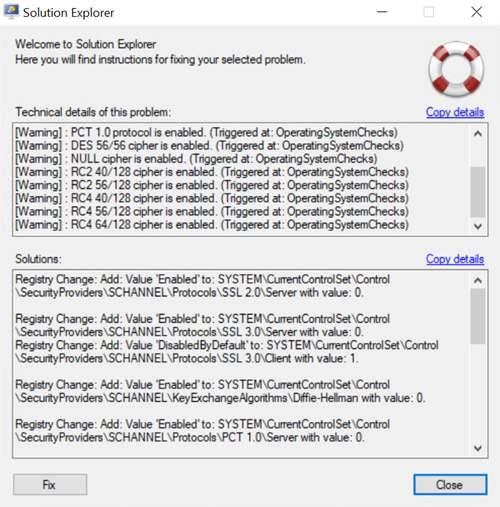
Click Fix to perform the fix(es).
If you wish to document the details, click the Copy details links to copy them to your clipboard and paste them into a text document for future reference or support.
After applying the fixes, you will be prompted one more time to continue modifications to the server. Click Yes to continue the installation.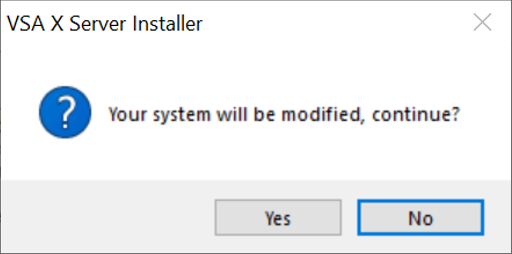
The installer will rerun the tests and display the next set of warnings, errors, or missing features, if applicable. Continue this process until all your status icons turn green as shown in the following example. At this point, the Next button will be available.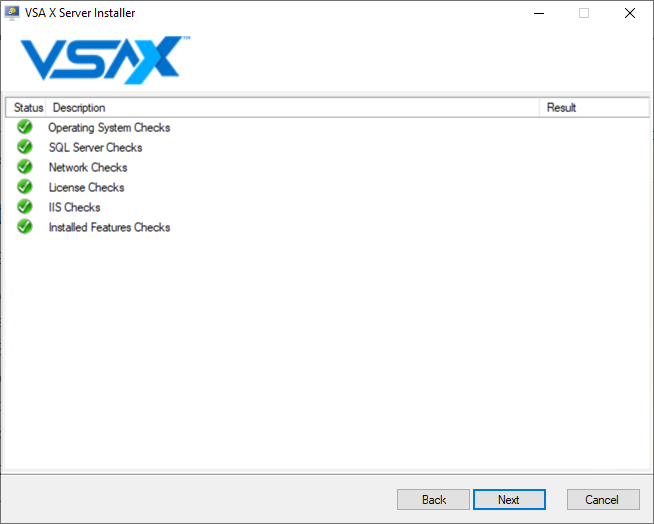
Click Next.
NOTE The subject line of the email containing your product key is VSA X Server License Key.
Copy the key and paste it into the Product Key field. Click Next.
NOTE Modification of the installation path is currently unsupported.
Creating an administrator account
To log in to the VSA 10 web application, you must first create a new administrator account in the VSA X Server Administrator.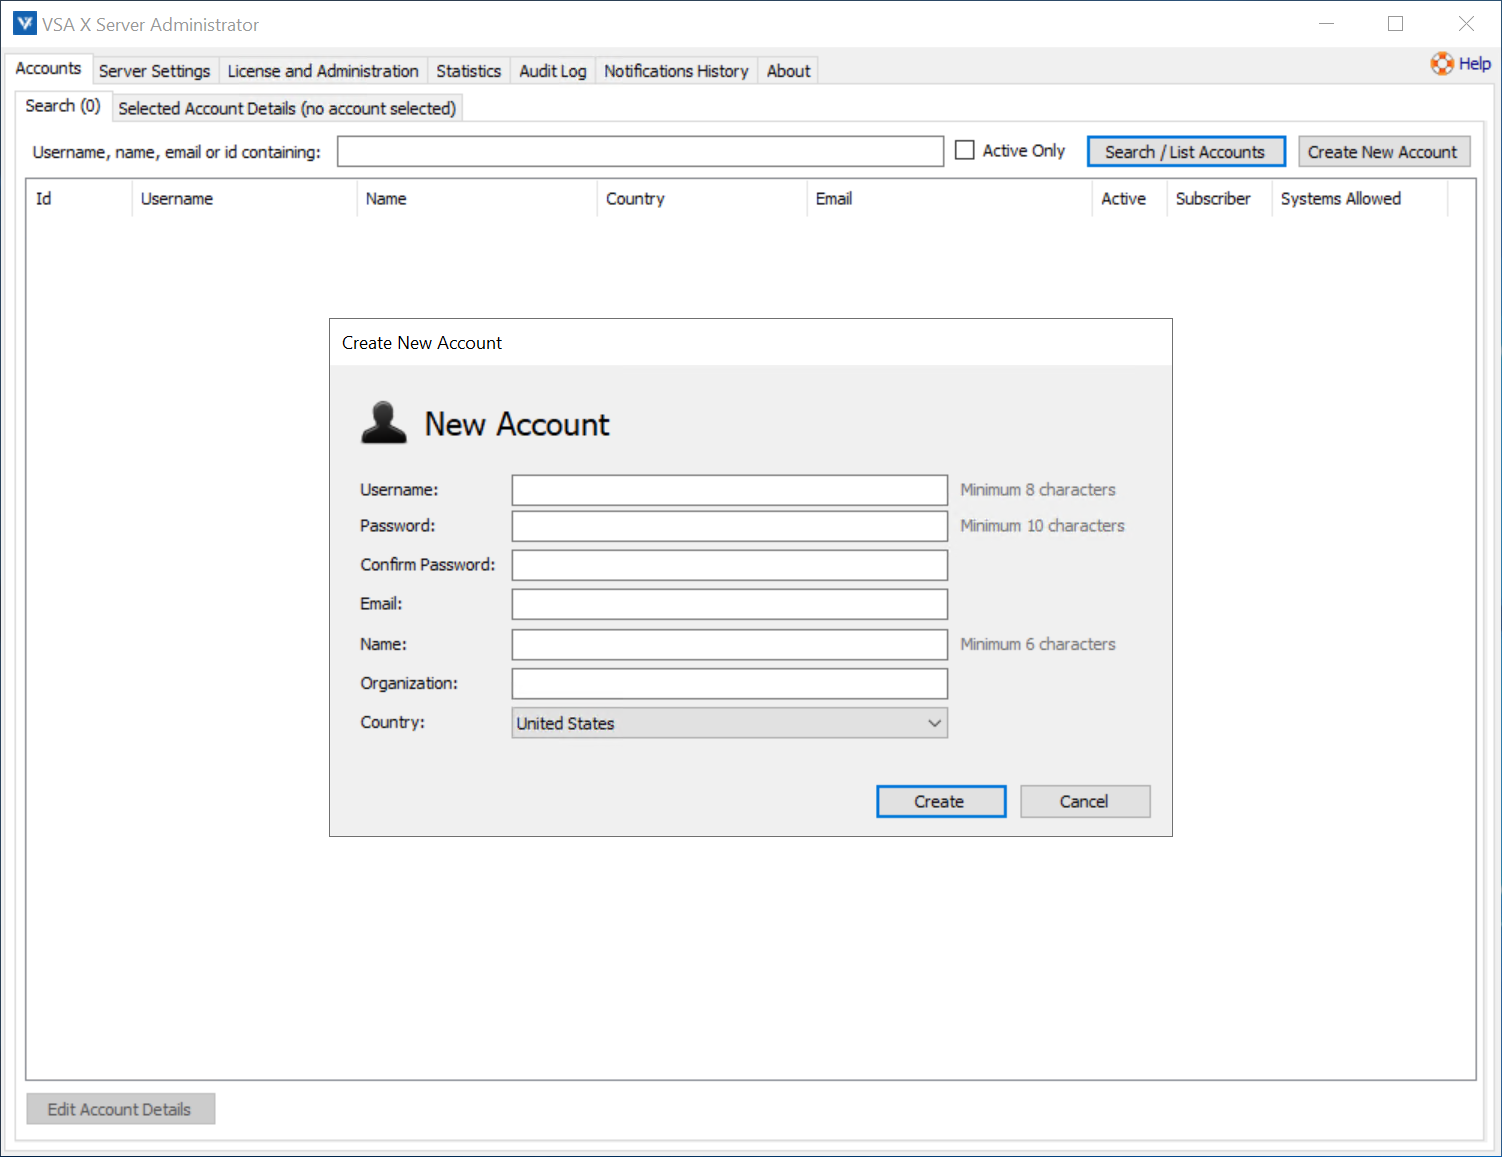
In the Accounts tab, enter the appropriate information and click Create.
Attempt to log in to the VSA 10 web application with the credentials created. You will be required to set up two-factor authentication and register your browser. Refer to Logging in, Two-factor authentication, and Managing user account device access.
Reporting installer problems
If you encounter installation issues, VSA 10 will report the error to Kaseya Support on your behalf. It is recommended to have the following information available:
- installation code
- a screenshot of the error
- system configuration details
- Windows operating system version and patch level
- SQL Server version and patch level
- CPU and RAM configuration
- current logs in c:\logs
NOTE If using a trial license, email Kaseya Support. Otherwise, as a Kaseya customer, you can create a Helpdesk ticket including the information. Refer to Kaseya Helpdesk.
Post-installation configuration and verification
Verify system functionality by performing the following tasks:
- Create additional user account(s). Refer to Creating user accounts.
- Test browser access.
- Test outbound email sending.
- Test installing an Agent. Refer to Discovering and deploying devices.
- Test Remote Control. Refer to Remote Control.
No two VSA 10 implementations are the same. Kaseya recommends that you engage with your Sales team, CSE, or account manager to leverage our professional services to keep you updated on the latest developments and best practices for large-scale VSA 10 environments.
VSA 10 does not require customers to run an installer to keep their environments updated. This process is done automatically in the background by a service called VSAXServerUpdate.
NOTE This service can be disabled to prevent updates from being applied.
To view if updates have been applied, navigate to the C:\Logs directory of the VSA 10 Application Server. You will see the logs starting with ServerUpdate.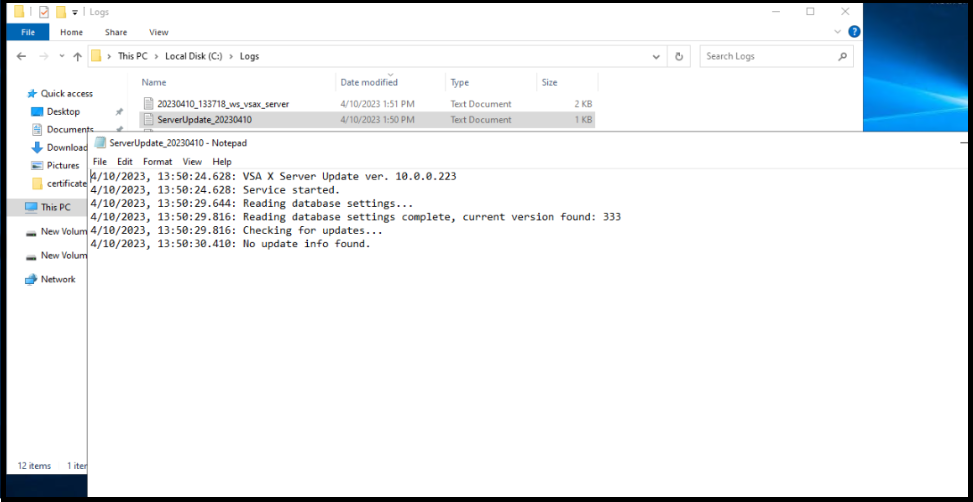
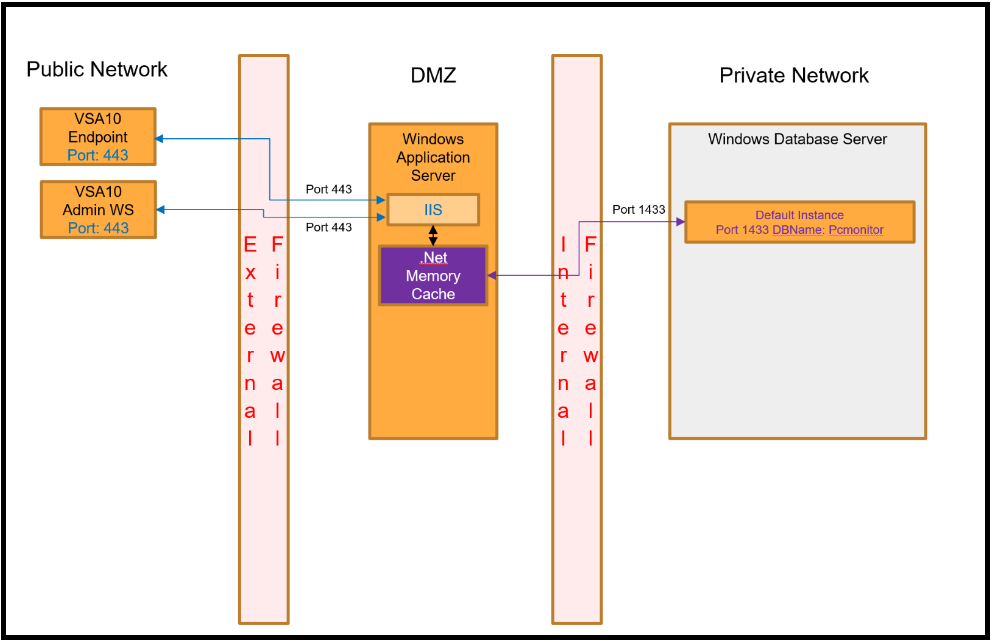
VSA 10 leverages a similar architecture as VSA 9. It uses Windows IIS for the Web Application Server and Microsoft SQL Server for the database. Some differences change how servers are configured in VSA 10.
Ports
All external traffic only requires port 443 to be open. There is no longer a need for a dedicated port for endpoints (5721).
.NET memory caching
VSA 10 leverages .NET MemoryCache, which substantially reduces the resource requirements for SQL Server. Most of the data used by VSA 10 is about 75% reads and 25% writes. This local cache improves web responsiveness by retrieving the data from memory on the Application Server instead of the original source.
Split configuration
VSA 10 can be configured for a separate SQL Server or split configuration. If using a split configuration, ensure that firewalls are set up to allow web traffic from agents and administrator machines through port 443. Additionally, ensure that IIS has access to SQL Server via port 1433.
A split configuration provides better performance than both the application and database on the same server. Because of the .NET MemoryCache, more emphasis on computing and memory resources is placed on the Application Server versus the SQL Server.
NOTE The following recommended server sizing assumes that all requirements are met. Refer to Requirements.
Up to 1,000 endpoints
Single server with both IIS and SQL Server installed
- 8 GB RAM
- 4 cores @ 2.1 GHz
1,000-5,000 endpoints
Single server with both IIS and SQL Server installed
- 24 GB RAM
- 8 cores @ 2.1 GHz
5,000-10,000 endpoints
Split configuration is recommended for this configuration to ensure optimal performance.
Application Server
- 24 GB RAM
- 8 cores @ 2.1 GHz
Database Server
- 16 GB RAM
- 4 cores @ 2.1 GHz
10,000-15,000 endpoints
Split configuration is highly recommended for this configuration to ensure optimal performance.
Application Server
- 32 GB RAM
- 8 cores @ 2.1 GHz
Database Server
- 24 GB RAM
- 4 cores @ 2.1 GHz
15,000-30,000 endpoints
This configuration uses two Application Servers and one Database Server. The Application Servers will connect to their respective named instances on the SQL Server.
Application Server 01
- 32 GB RAM
- 8 cores @ 2.1 GHz
Application Server 02
Database Server
Database Server is configured for multiple named instances. Each Application Server will point to a specific named instance on the SQL Server. This is typical for clustered SQL Servers.
- 32 GB RAM
- 8 cores @ 2.1 GHz
Additional SQL Server tunning
Memory on SQL Servers can vary depending on the size of the database and the types of transactions against the database. You can fine-tune the memory of the SQL Server by monitoring the cache hit ratio. Ideally, you would like to see a cache hit ratio of 98% or better. Memory can be adjusted for each named instance on the SQL Server to set optimal cache hit ratios. This will ensure you are using only the memory you need for the instances being supported. For example, we can change the maximum memory that is used for our VSA10_01 instance as shown in the following screenshot.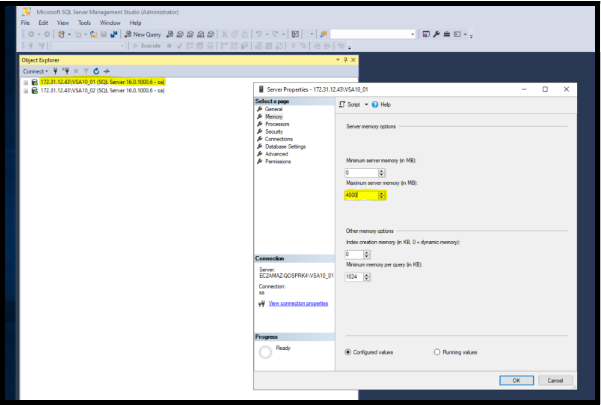
You also can adjust the amount of CPU resources that are associated with a SQL Server Instance. This can be done by setting processor affinity settings to each instance as shown in the following screenshot.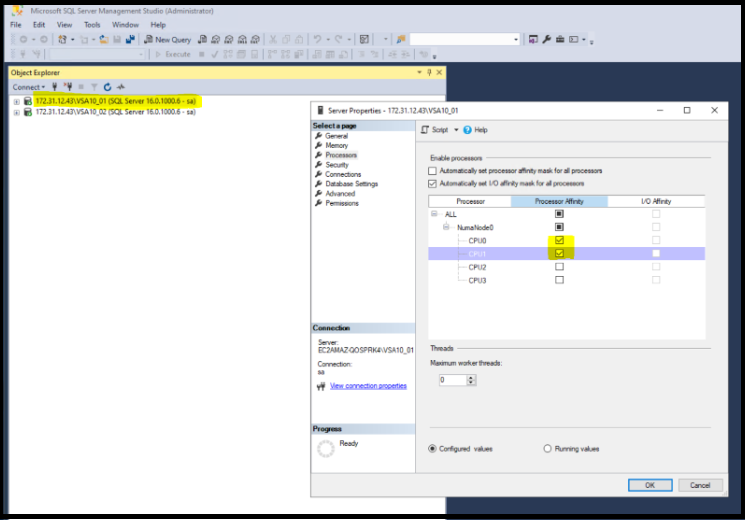
For VSA 10 on-premises installations, we recommend limiting access to the VSA 10 Web GUI to local IP addresses by blocking port 443 inbounds on your internet firewall. Some integrations may require inbound access to your VSA server on port 443.
If you are using any of the following integrations with your VSA 10 on-premises instance, you can allowlist the following IP addresses in your firewall (allow 443 inbound to <VSA Server> from <IP Allowlist>):
KaseyaOne
168.61.5.96/29
NOTE Allowlisting this IP address is required to use the integration.
BMS/Vorex
52.144.52.4
212.54.132.109
13.55.204.127
For the BMS nightly sync, allowlist the following IP addresses depending on the BMS location you are provisioned on:
BMS US or Vorex
34.220.45.225
APAC
13.210.44.220
UK
18.184.219.227
BitDefender
20.16.7.222
Cortado
20.113.8.104
IT Glue
35.166.176.46
35.166.188.224
35.166.165.157
52.58.202.194
52.58.86.10
35.158.246.53
3.24.149.213
13.239.103.155
54.79.148.183
23.22.162.216
3.211.77.167
44.194.200.185
54.83.201.13
Passly/AuthAnvil
104.45.228.63
13.69.244.245
RapidFire Tools
52.205.150.74
Spanning
54.85.147.121
54.82.105.63
54.82.147.169
52.201.118.87
52.20.80.168
34.200.61.161
34.192.63.110
34.202.125.15
Traverse
Allowlist the IP address you are using for your own Traverse instance.
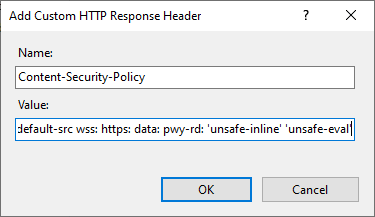
NOTE If implementation of a CSP is required to meet your security audit standards, you can create it via IIS. However, note that VSA 10 is already safeguarded against the types of attacks that CSP mitigates.
- Open the IIS Manager (inetmgr).
- Select the VSA 10 site.
- Double-click HTTP Response Headers.
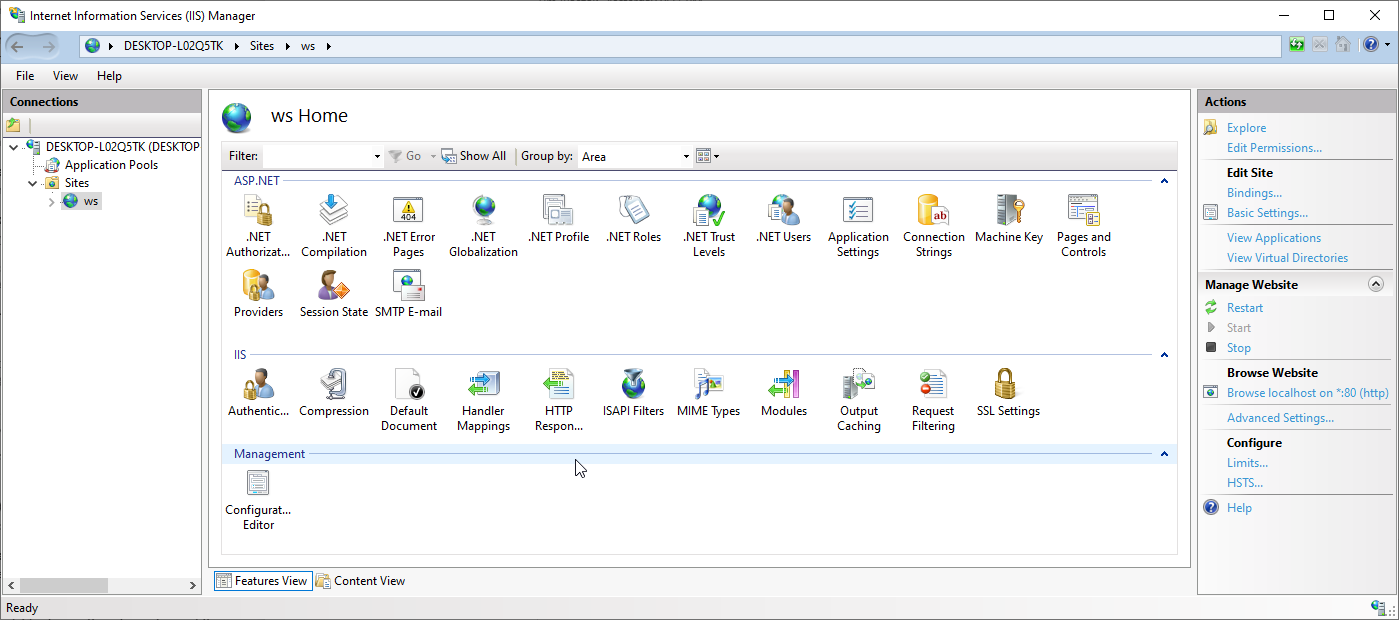
- Click Add in the Actions panel.
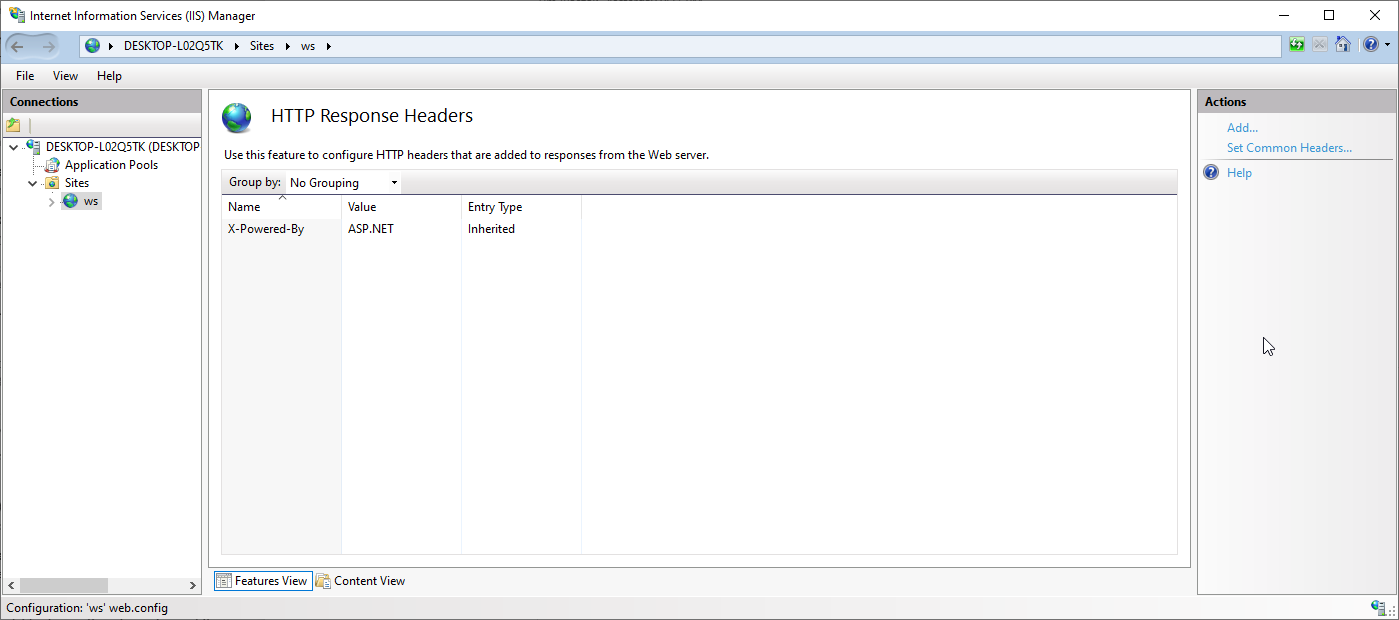
- Fill in the following values:
- Click OK.
NOTE Adding a custom HTTP response header will recycle the IIS app pool and will disconnect all active VSA 10 Remote Control sessions and log out all web application users.
Refer to KaseyaOne Integration.
You may see the error K1 Integration not provided when attempting to enable KaseyaOne.
To address this error, navigate to C:\Hosting\Service on your on-prem VSA server and open the Web.config file.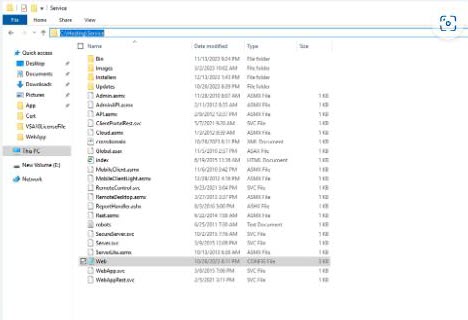
Add the line <add key="ITCompleteAppUrl" value="https://one.kaseya.com" /> to the location shown in the following screenshot and attempt to enable the KaseyaOne Integration again.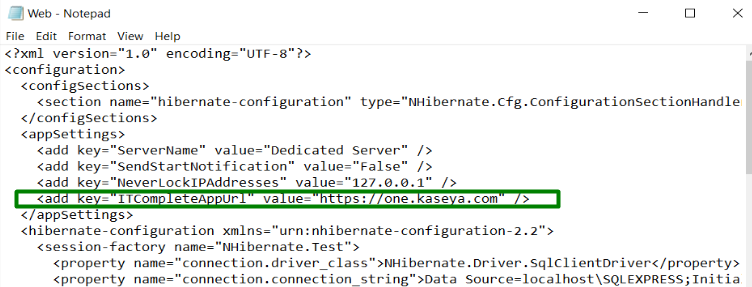
For this integration to work, add the following IP address to the allowlist: 168.61.5.96/29
