Automation module introduction
The Automation module in VSA 10 delivers a comprehensive set of features aimed at automating and standardizing numerous IT tasks across different device types. This capability greatly improves troubleshooting, boosts operational efficiency, ensures consistency, and strengthens security within an organization.
Our automation tools can be accessed from the Automation Hub, which is located at Modules > Automation > Automation Hub.
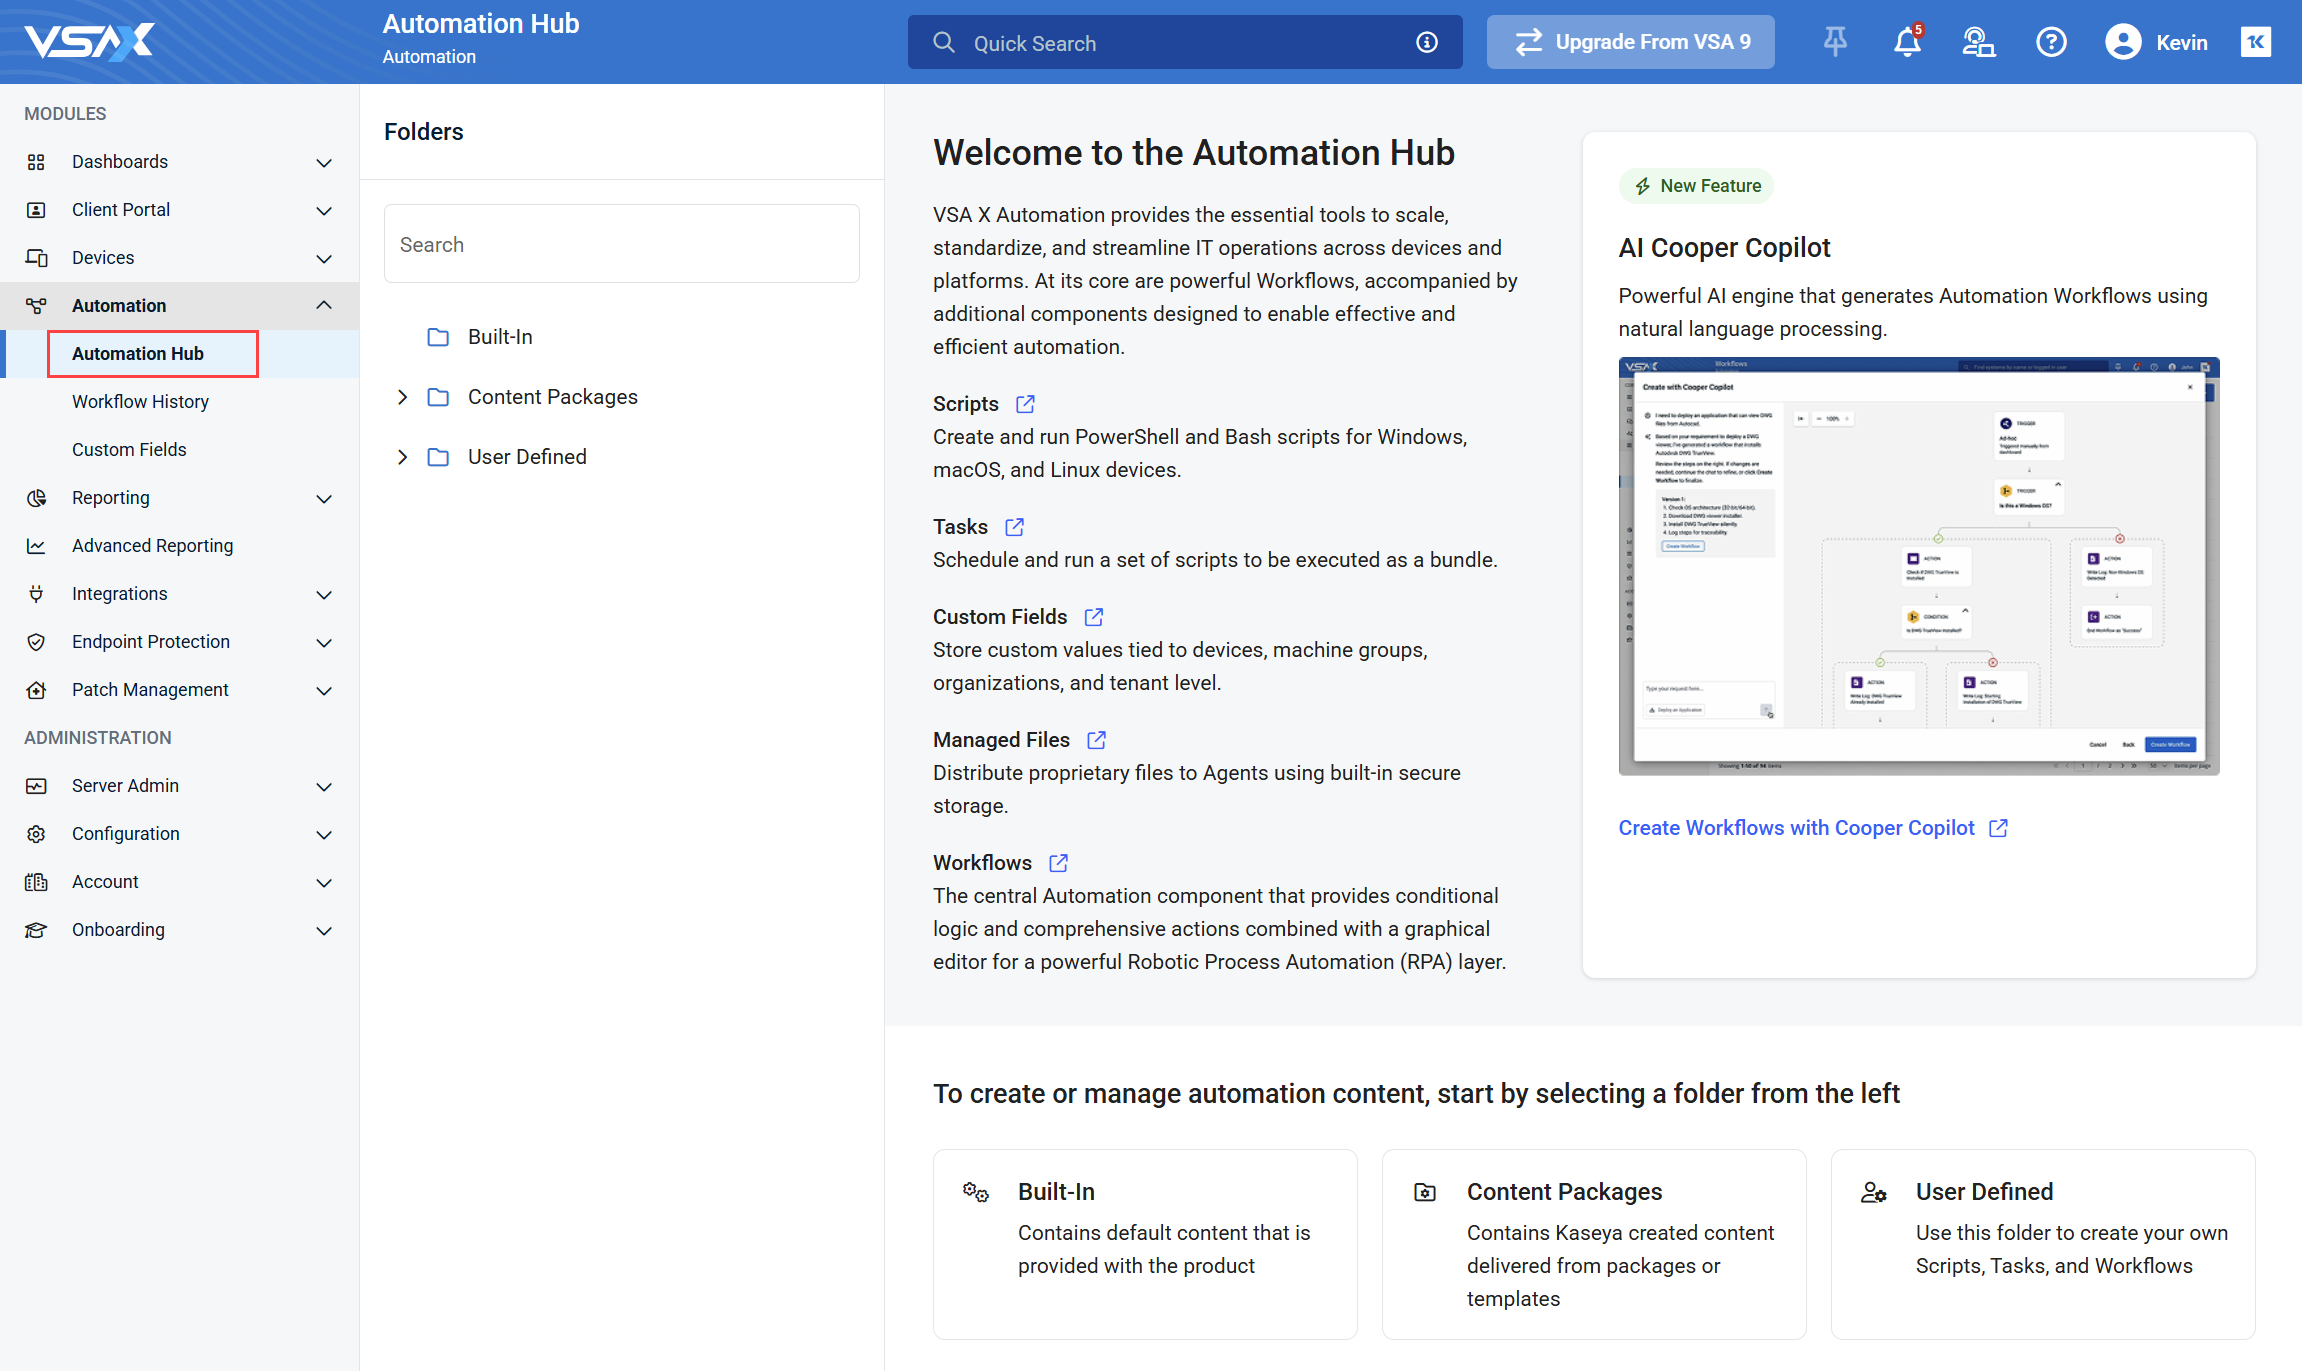
The Automation Hub organizes these five key building blocks under a common file structure, each playing a vital role in enhancing the platform’s automation capabilities, with workflows serving as the core element that links all the components together.
The automation components hosted in the Automation Hub are:
- Scripts: Create and run PowerShell and Bash scripts for Windows, macOS, and Linux devices.
- Tasks: Schedule and run a set of scripts to be executed as a bundle.
- Workflows: The central component of Automation with a powerful set of actions, conditional logic and user interaction capabilities. It seamlessly integrates with the features above, serving as the graphical RPA layer (Robotic Process Automation).
- Managed Files: Use the in-product file storage to distribute files to devices.
In addition to the tools located in the Automation Hub, the Automation module contains:
- Viewing workflow activity: View how and when workflows were triggered, and which devices they were executed on.
- Custom fields: Store custom values tied to devices, machine groups, organizations, and tenant level.
Explore each component in detail by visiting its dedicated section using the links above or using the table of contents.
Navigating the Automation Hub
Review the guides below to learn how to work within the Automation Hub.
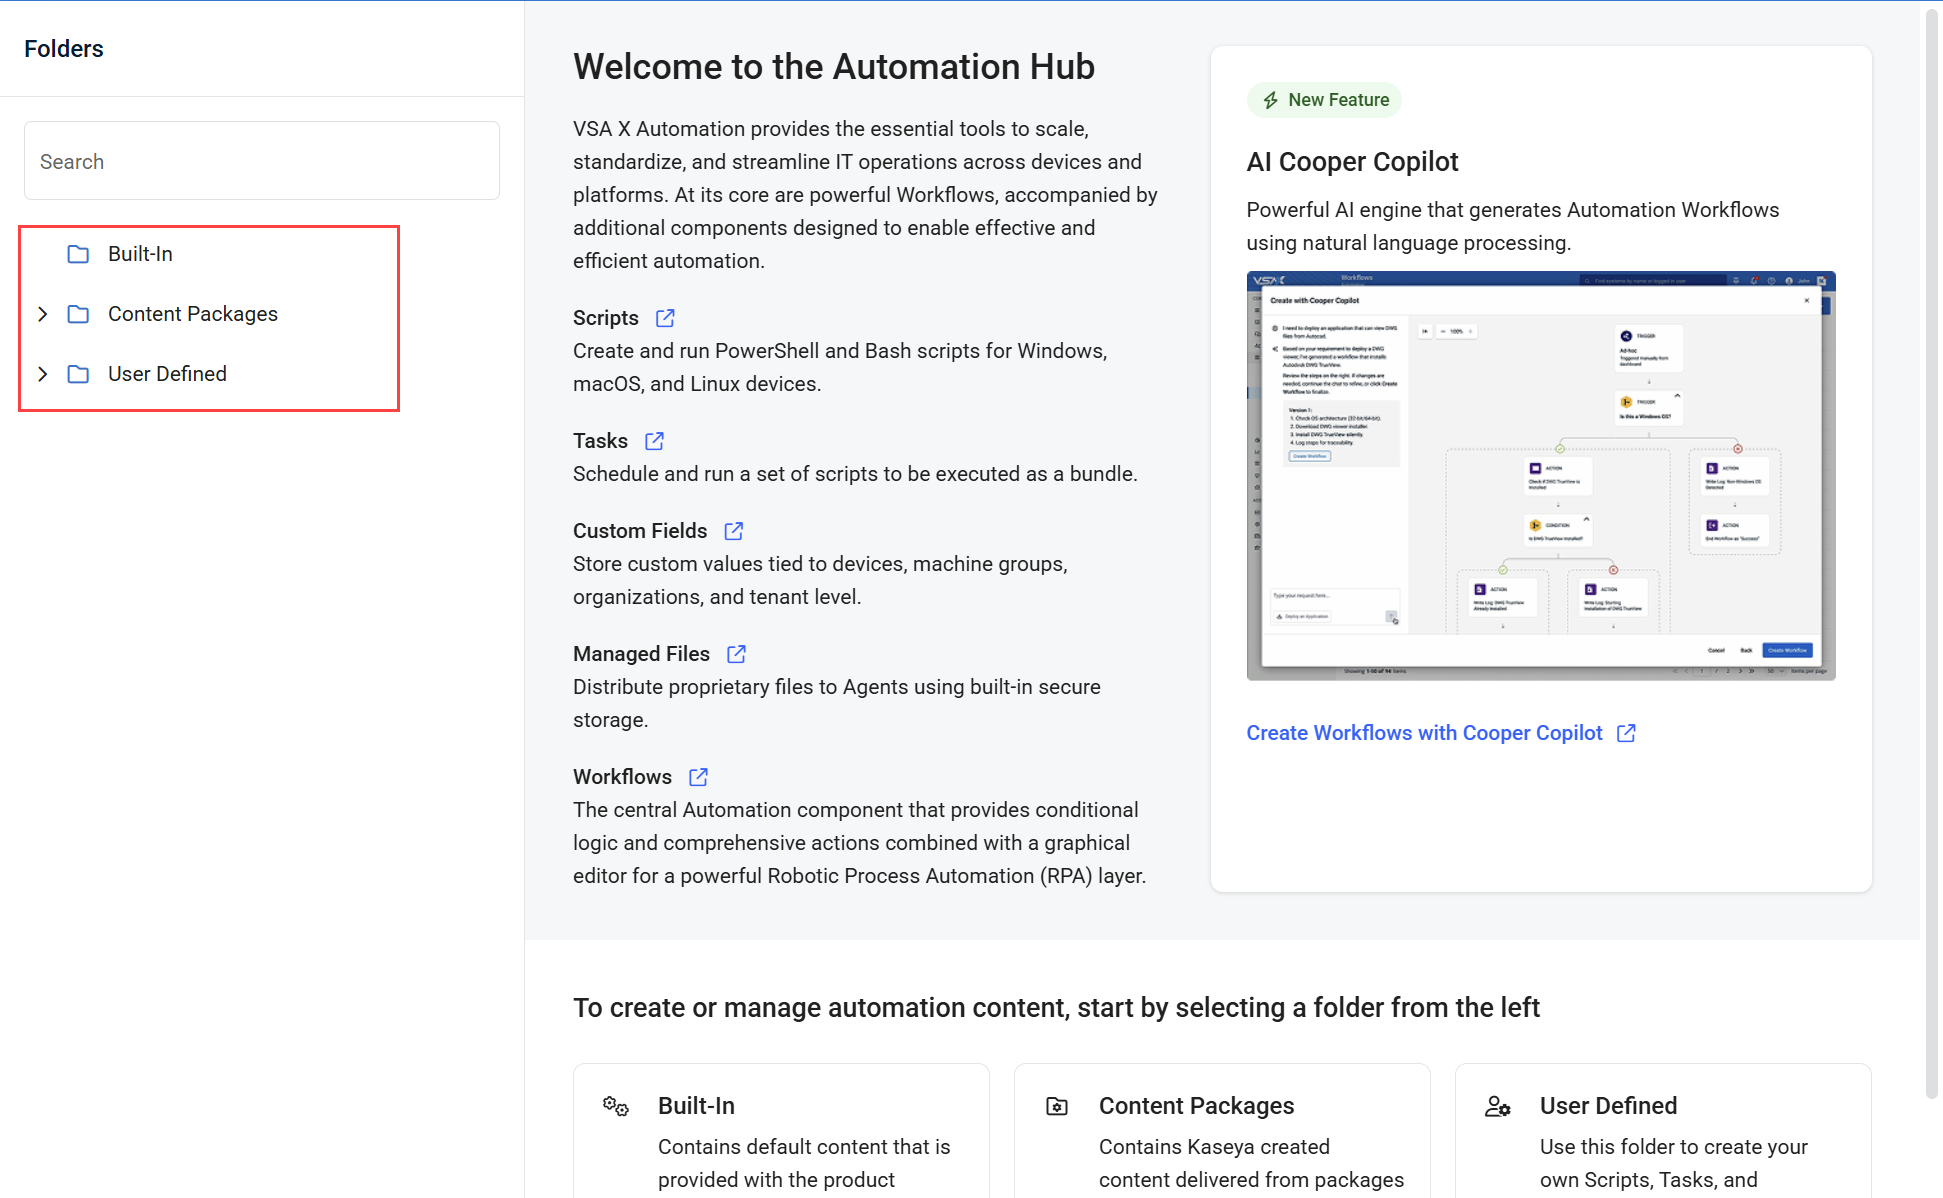
In the Automation Hub, there are three root folders that contain all automation components:
- Built-in (read-only): Contains default content that is provided with the product.
- Content Packages (read-only): Contains Kaseya created content delivered from packages or templates.
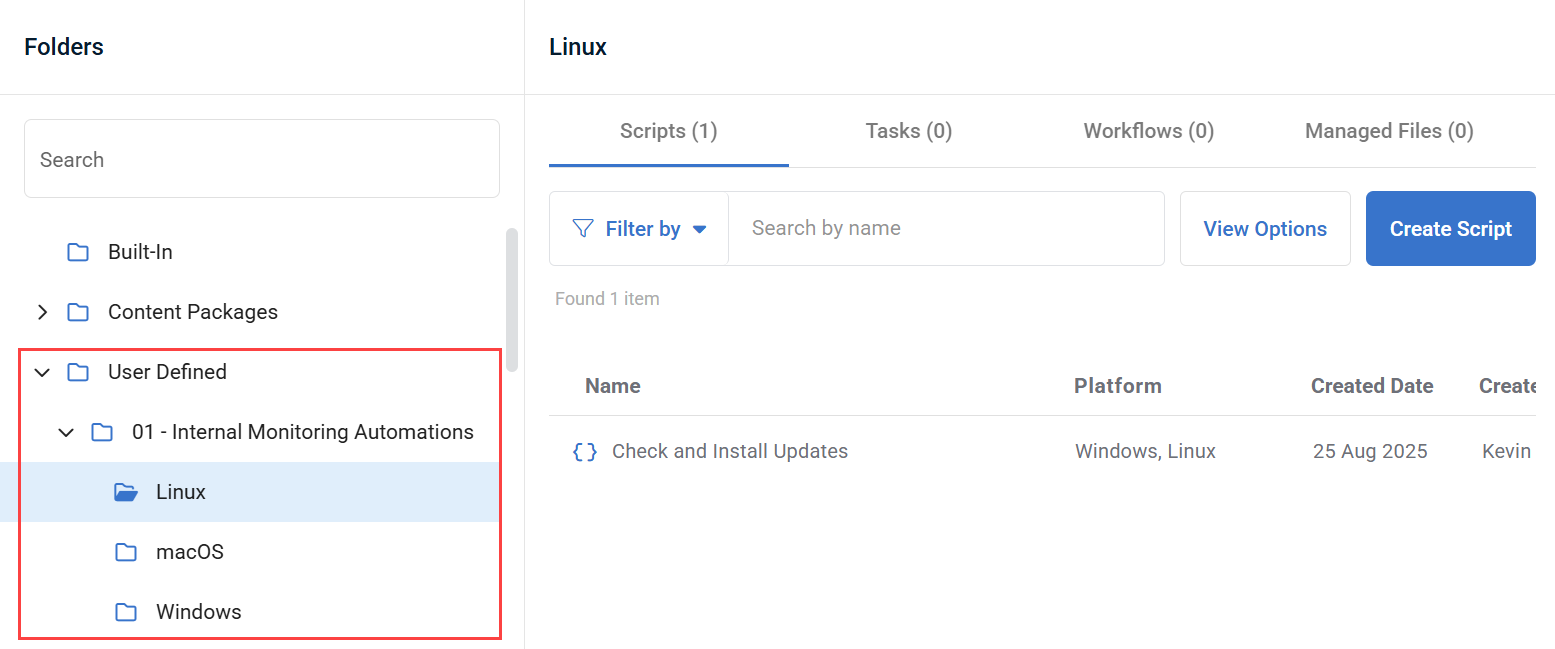
- User Defined: Contains custom content created by product users.
You can access these folders, and their subfolders, by using the navigation menu on the left side of the Automation Hub.
When a folder is selected, you can view it's contents. The contents of each folder are separated into four tabs: Scripts, Tasks, Workflows, and Managed Files. The number next to the name of each tab shows how many objects of that type are in that folder.

While you can't add or edit anything to the Built-In or Content Packages folders, you can copy items within these folders to a location within the User Defined folder.
Additionally, you can create additional folders within the User Defined folder. These folders can also contain additional subfolders.
Using the Search function will search all of the objects within the Automation Hub, and display all items that contain your search, separated by location, and labeled with their object type (Script, Task, Workflow, Workflow Template or Managed File)
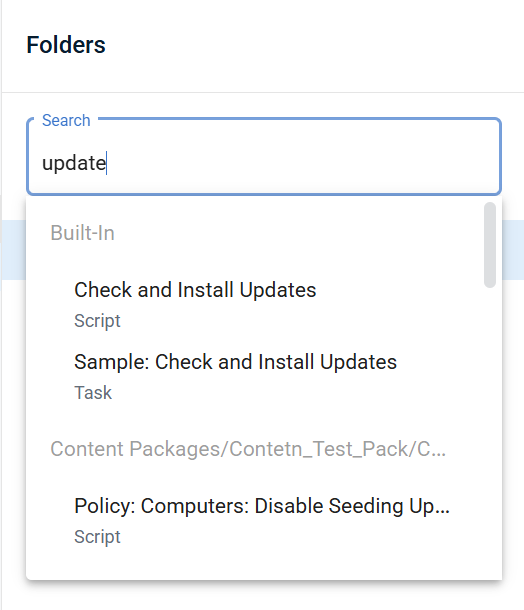
Select a search result to be taken to it's location.
To learn more about what you can do in the Automation Hub, refer to Managing Folders.
Several folder management tools are available in the Automation Hub to help you organize your automation components.
The following folder management tools are available:
- Creating a folder
- Editing a folder
- Deleting a folder
- Cloning a folder
- Copying a folder or Moving a folder another parent folder.
Click one of the tools above or expand a section below to learn more about that folder management tool.
NOTE New folders can only be created within the User Defined folder and it's root-level subfolders.
In order to create a folder, in the Automation Hub, hover over the User Defined folder, or over a root-level folder within User Defined, and click Create Folder.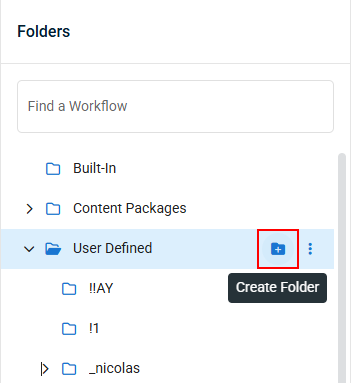
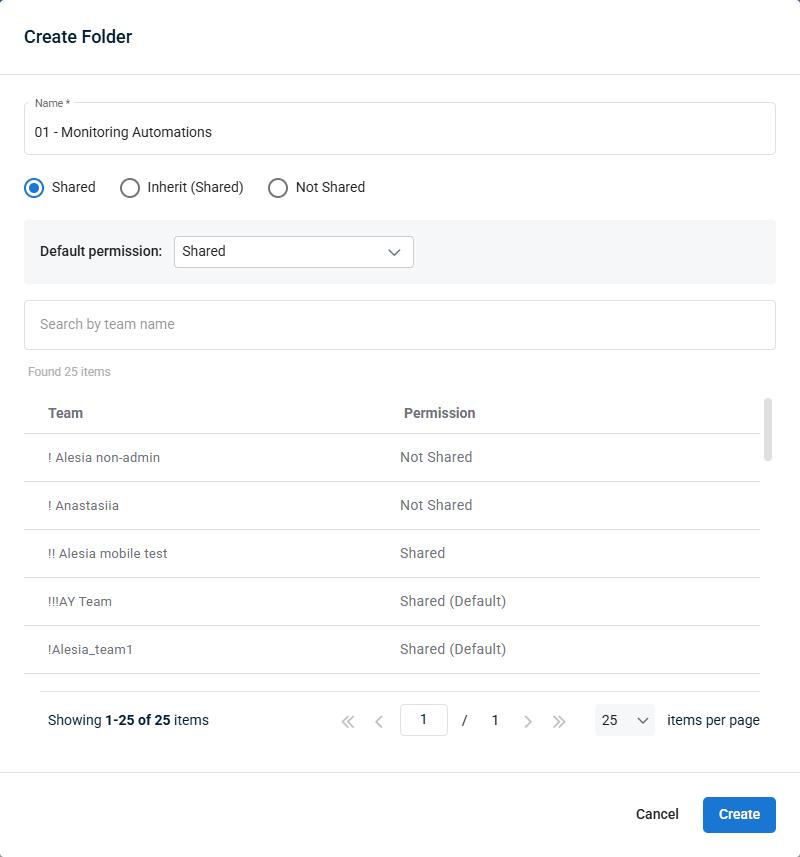
When creating a folder, the following options are available:
-
Name: Change the name of the folder here.
-
Default share permissions: Set the default permissions for the folder from the following options:
-
Shared: Allows you to share the folder with teams other than the Administrators team.
-
Inherit (Shared/Not Shared): Inherit sharing permissions from the folders parent. The value in the parenthesis indicates whether the folder will be shared or not.
NOTE Individual team share settings will not be configurable if this option is selected.
-
Not Shared: This folder will only be visible to Administrators.
-
-
Team share permissions: If folder sharing is enabled, choose the teams that can access that folder.
NOTE Only teams with at least View and Run Automation permissions are eligible for sharing.
When finished, click the Create button. The newly created folder will become active, and you will be able to start organizing automation within it. 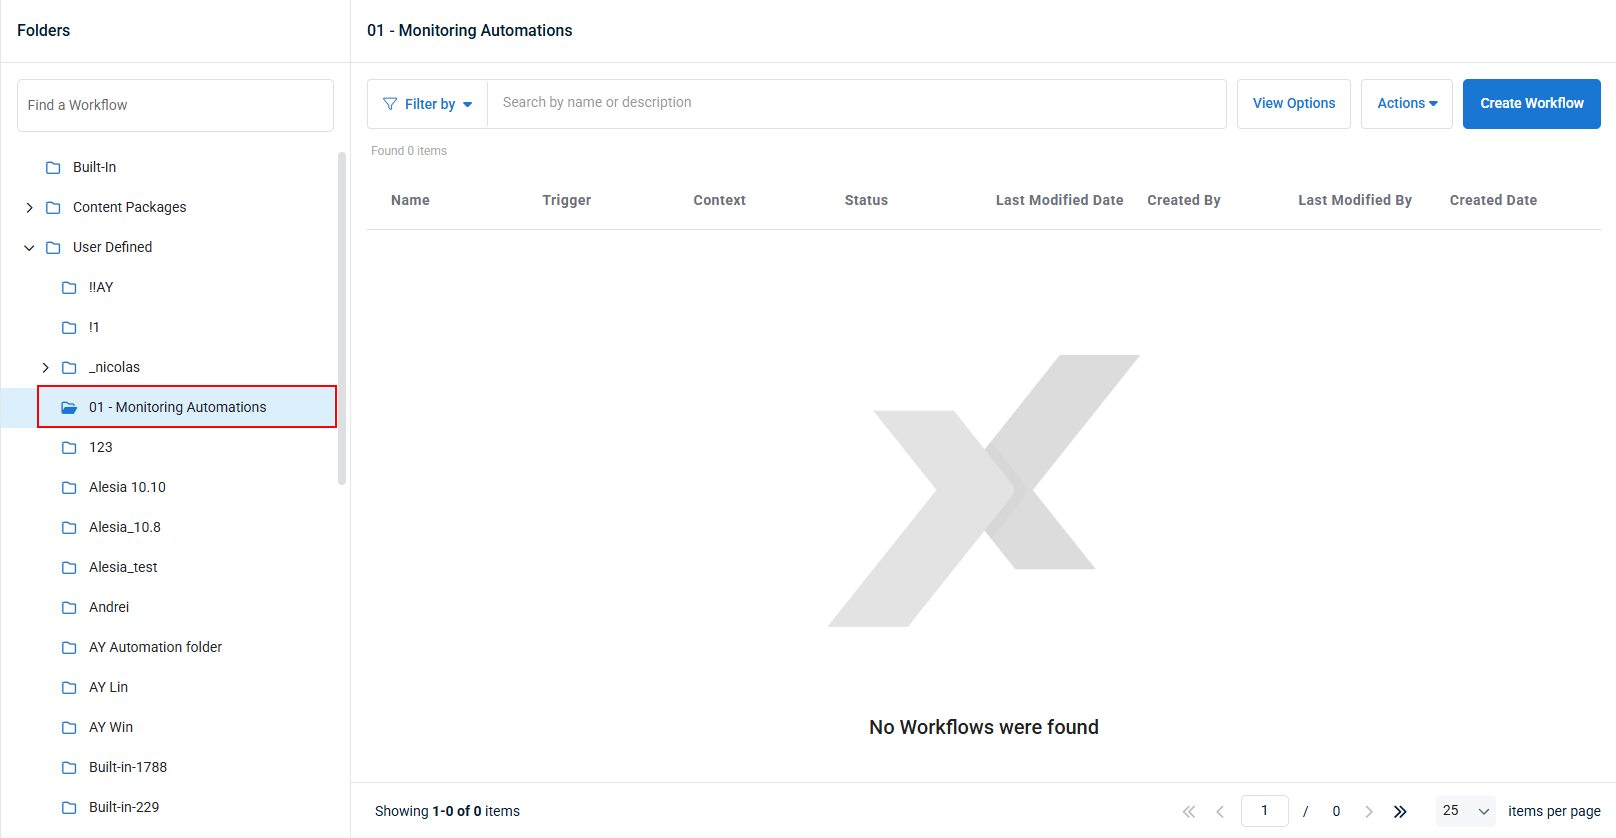
In the Automation Hub, you can edit a folder by hovering over the folder you wish to edit, and clicking Edit Folder.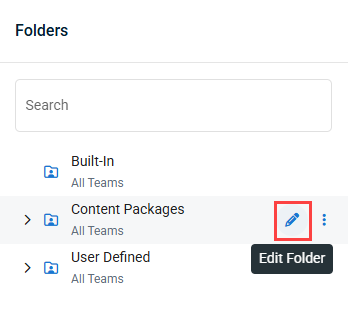
When editing a folder, the following configuration options are available:
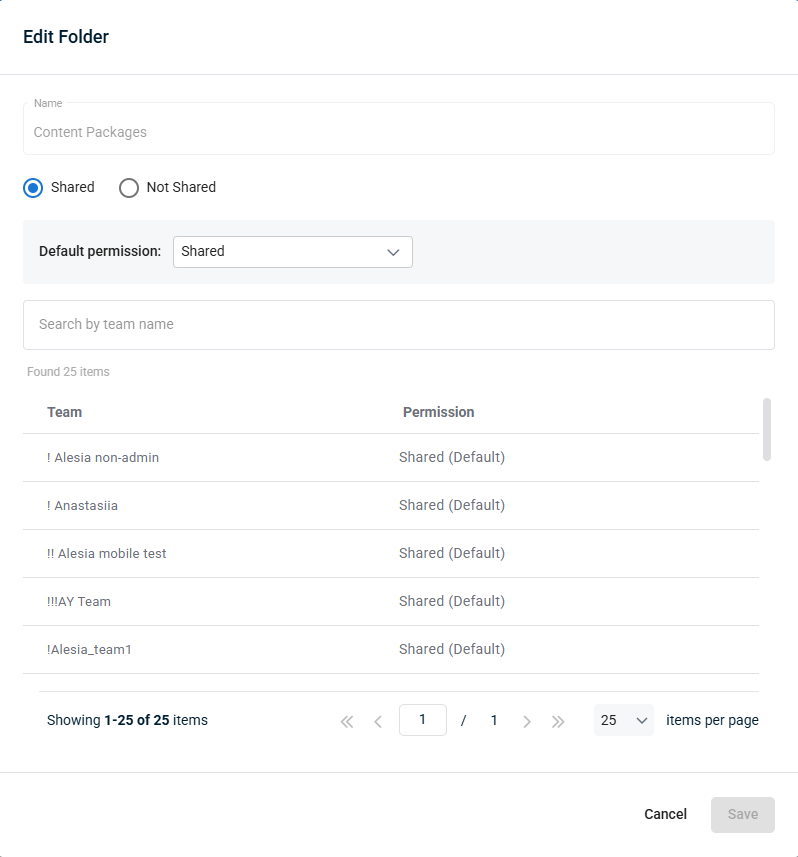
-
Name: Change the name of the folder here.
NOTE Only folders contained within the User Defined folder can be renamed. Otherwise, this field will be grayed out.
-
Default share permissions: Set the default permissions for the folder from the following options:
-
Shared: Allows you to share the folder with teams other than the Administrators team.
-
Inherit (Shared/Not Shared): Inherit sharing permissions from the folders parent. The value in the parenthesis indicates whether the folder will be shared or not.
NOTE Individual team share settings will not be configurable if this option is selected.
NOTE This option is only available for folders within the Built-In, Content Packages, and User Defined folders, not the named folders themselves, as they are at the top level.
-
Not Shared: This folder will only be visible to Administrators.
-
-
Team share permissions: If folder sharing is enabled, choose the teams that can access that folder.
NOTE Only teams with at least View and Run Automation permissions are eligible for sharing.
NOTE All changes to folder sharing and permissions are recorded in the Server Audit log for traceability, compliance and troubleshooting.
When finished, click the Save button. A confirmation message will appear at the bottom of the page when the edited folder has been successfully saved. 
NOTE Folders can only be deleted from within the User Defined folder and it's subfolders.
In order to delete a folder, complete the following steps:
- In the Automation Hub, hover over the folder you wish to delete and click Delete.
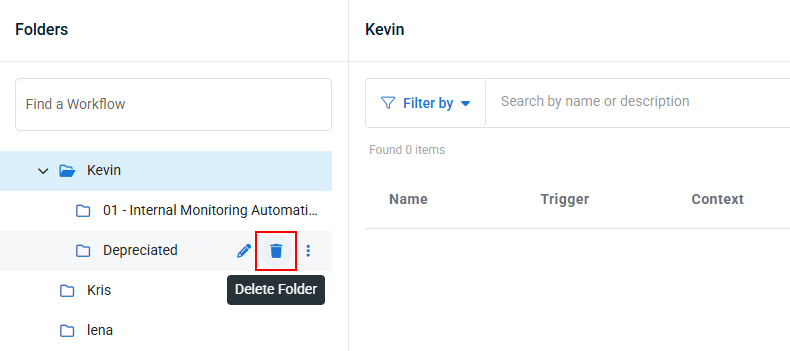
- In the pop-up that appears, confirm that you want to delete the folder, then click Delete.

- A confirmation message will appear at the bottom of the page when the folder has been successfully deleted.

The Clone tool allows you to create a copy of a folder with a new name in the same location the original folder is located.
NOTE Folders can only be cloned from within the User Defined folder and it's subfolders.
In order to clone a folder, complete the following steps:
- In the Automation Hub, hover over the folder you wish to copy, click the action menu, and click Clone.
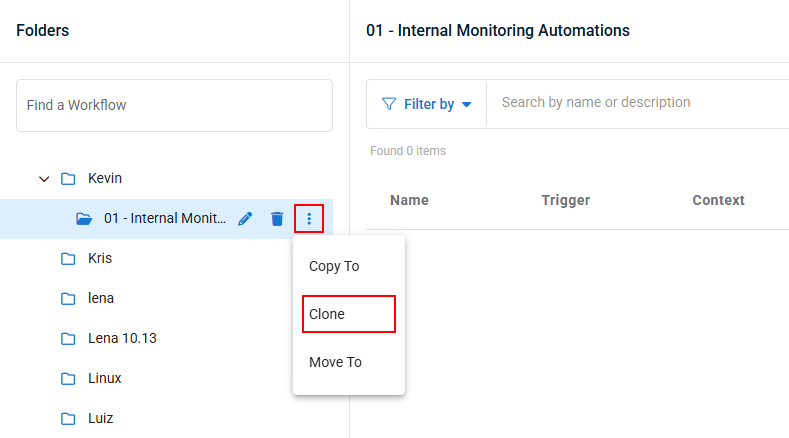
- In the pop-up that appears, create a new name for the cloned folder, then click Clone.

- A confirmation message will appear at the bottom of the page when the folder has been successfully cloned.

The Copy To tool allows you to copy a folder from anywhere in the Automation Hub and save it to anywhere within the User Defined folder. This is useful if you want to modify any built-in workflows to better suit your needs.
NOTE Folders can be copied from the Built-In, Content Packages, or User Defined folders, but the copies can only be added to a location within the User Defined folder.
NOTE Folders that have nested subfolders can not be copied to any location except the root of the User Defined folder.
In order to copy a folder to a new location , complete the following steps:
- In the Automation Hub, hover over the folder you wish to copy, click the action menu, and click Copy To.

- In the pop-up that appears, select the location where you want to save the copy, then click Copy.
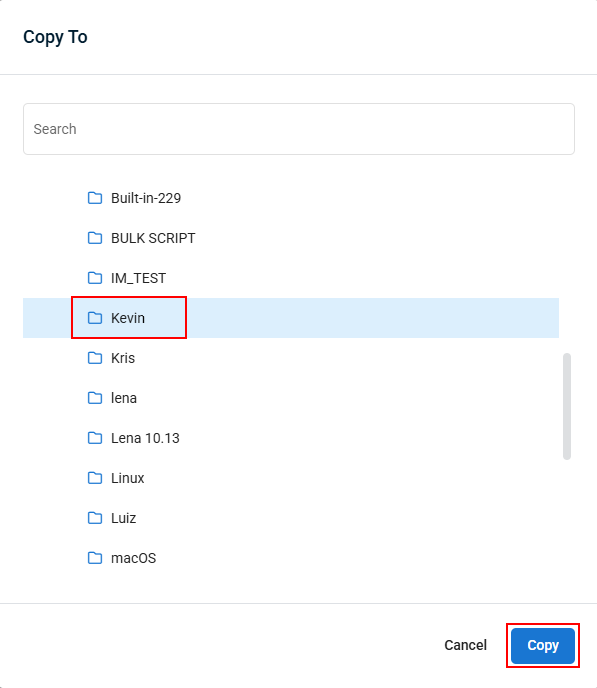
- A confirmation message will appear at the bottom of the page when the folder has been successfully copied.

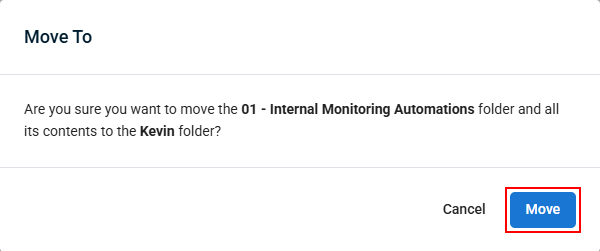
The Move To tool allows you to move a folder to a new location.
NOTE Folders can only be moved to and from locations within the User Defined folder.
NOTE Folders that have nested subfolders can not be moved to any location except within the root of the User Defined folder.
In order to move a folder, complete the following steps:
- In the Automation Hub, hover over the folder you wish to move, click the action menu, and click Move To.

- In the pop-up that appears, select the location you want to move the folder to, then click Next.

- Click Move in the confirmation pop-up that appears to complete the move. If a folder of the same name exists in that location, you will be prompted to rename the folder you are moving.
- A confirmation message will appear at the bottom of the page when the folder has been successfully moved.


