Workflows
NAVIGATION Modules > Automation > Automation Hub
PERMISSIONS Automation > View Tasks & Scripts
PERMISSIONS Automation > Run Tasks & Scripts
PERMISSIONS Automation > Edit Tasks & Scripts
VSA 10 facilitates automated workflows, which automatically remediate problems on your endpoints. You can set triggers and configure actions to bring back services, run scripts, alert on conditions, and much more. The built-in workflow automation is triggered when a certain event occurs from your monitored devices, which triggers notifications that share information about how to fix issues automatically.
This article describes the process to create, view, and manage your workflows.
Overview
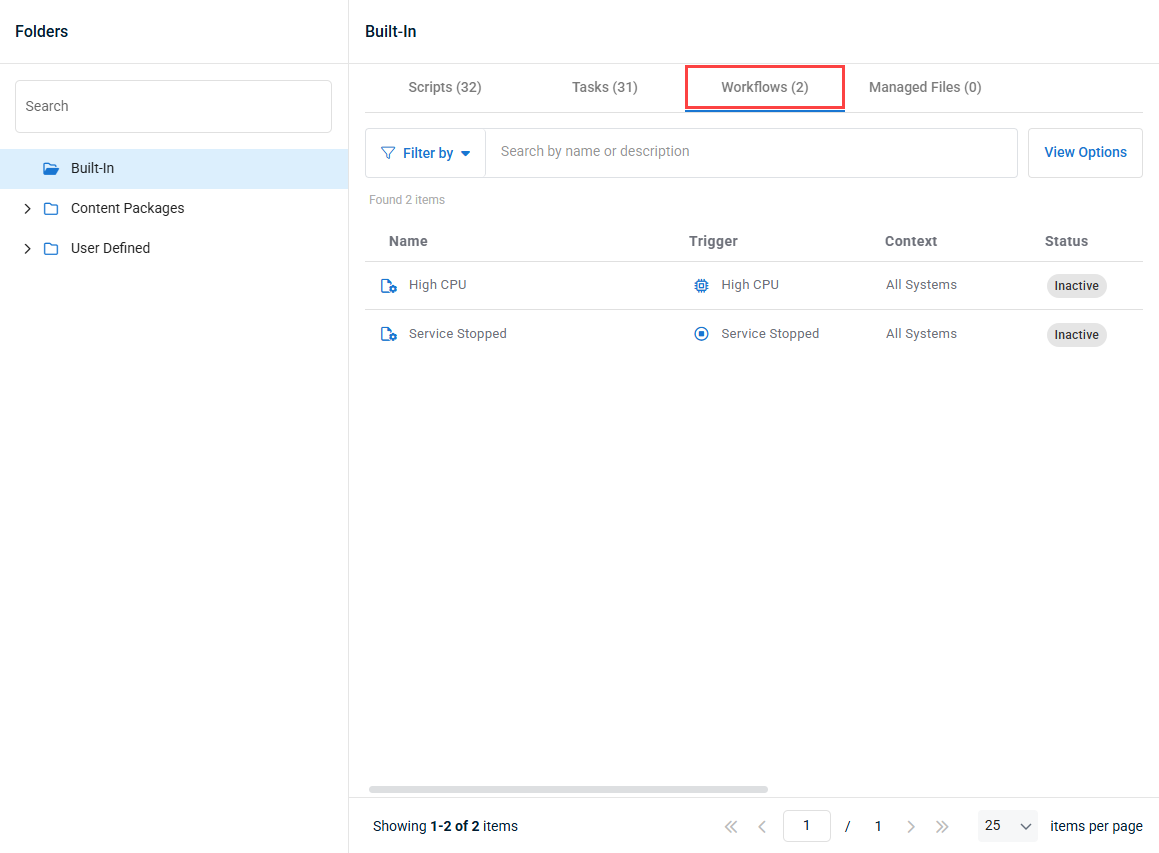
Workflows can be accessed in the Automation Hub.
From the left navigation menu in VSA 10, navigate to Automation > Automation Hub.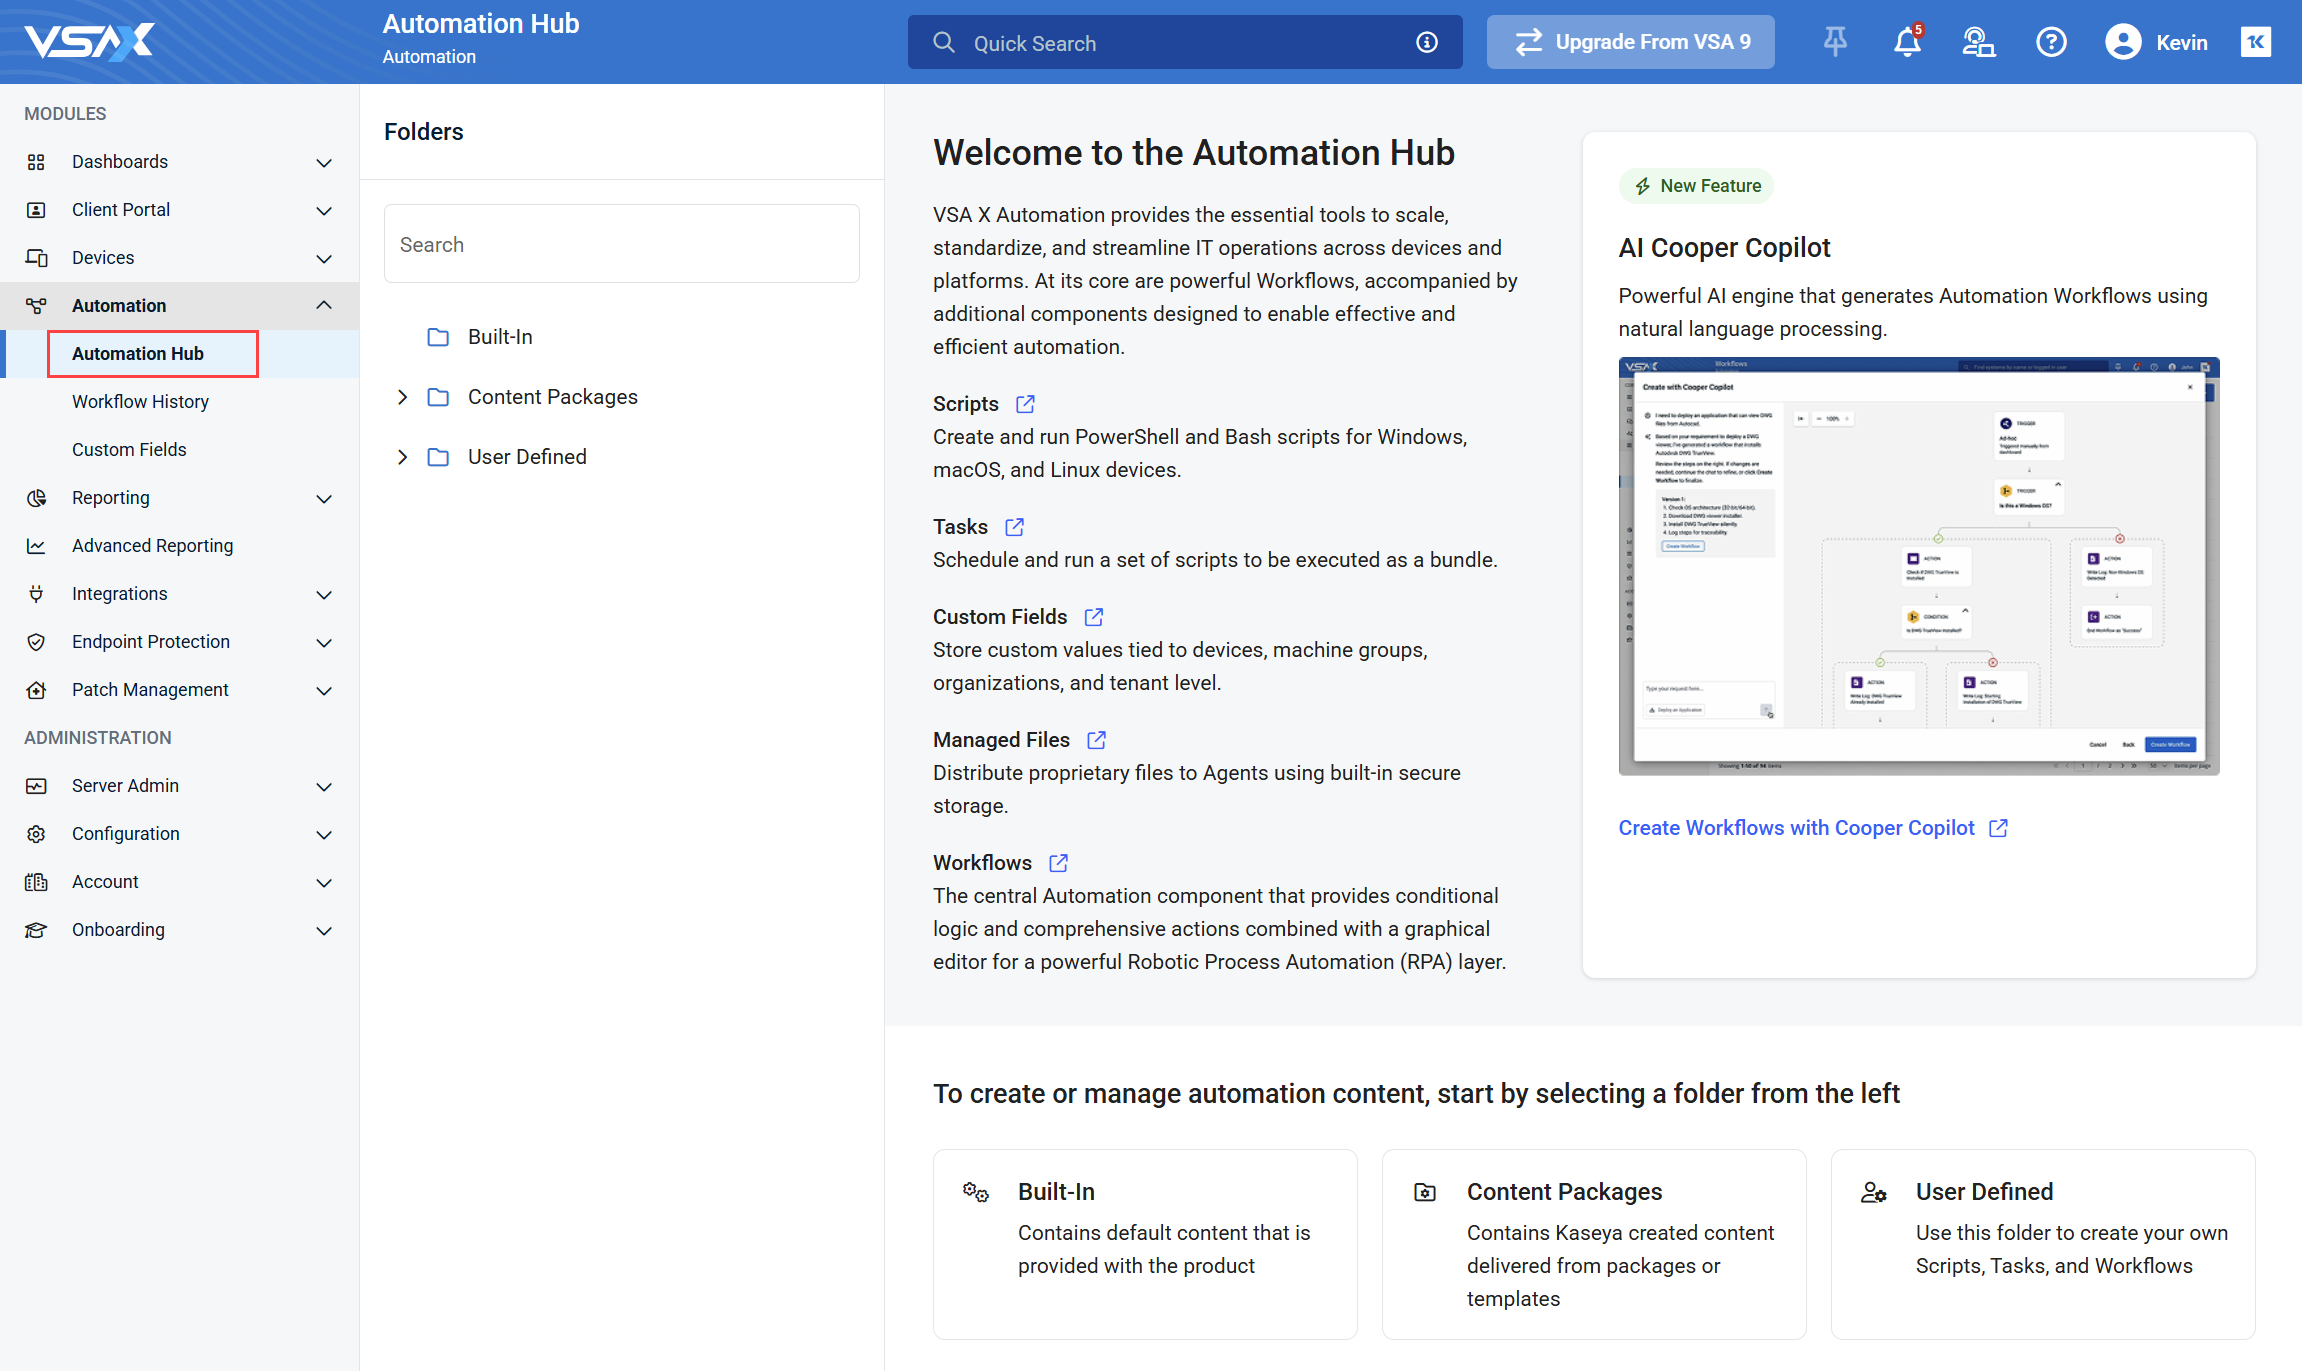
The Automation Hub contains all scripts, tasks, workflows, and managed files in one location, and organized into three folders:
- Built-In (read-only): Default content that is provided with the product.
- Content Packages (read-only): Kaseya created content delivered from packages or templates.
- User Defined: Custom content created by users.
To access workflows in the Automation Hub, open a folder and select the Workflows tab. You can also use the Search function to search for a workflow by name.
For more information on the Automation Hub, including folder management, refer to Navigating the Automation Hub.
NOTE The Built-In and Content Packages > VSAX_Starter_Pack folders contain Kaseya provided workflows by default to help you get started.
Click any header to sort the displayed records in ascending or descending order by the column's value.
| Field | Description |
|---|---|
| Name | Displays the name of the workflow. |
| Description | Displays the workflow description, if added. |
| Trigger type | Displays the workflow trigger type: Notification or Ad-hoc and Scheduled. |
| Trigger | Displays the trigger of the workflow execution. |
| Context | Displays which devices are affected by the workflow execution. NOTE Workflows of the Notification trigger type automatically apply to all devices. |
| Status | Displays the status of the workflow: Active, meaning the workflow is monitoring for changes, or Inactive. |
| Last modified date | Displays when the workflow configuration was last modified by a user. |
| Last executed date | Displays when the workflow was last triggered and executed. |
| Next execution date | Displays when the workflow is scheduled to next be triggered automatically, if configured. |
| Execution time |
Displays the length of the execution. |
Hover over any item in the list to access its management options.
| Action | Description |
|---|---|
| Export the workflow. This will download the workflow in the .wfl format. | |
| Clone the workflow. Refer to Creating and editing a workflow. | |
|
|
Run the workflow. Refer to Run a workflow against all devices in it's assigned context. NOTE This action will only show for Active workflows. |
| Move the workflow to a different location within the User Defined folder. | |
| Create a copy of the workflow and choose where you want to save the copy within the User Defined folder. | |
|
|
Edit the workflow. Refer to Creating and editing a workflow. |
|
|
Delete the workflow. |
Page features
NOTE These features are only available when the Workflows tab of selected folder is active.
| Feature | Description |
|---|---|
| Filter by | Enables you to filter the list. Refer to Applying filters. |
| View Options | Enables you to show/hide one or more columns in the list. |
| Create from Template | Enables you to create a workflow from a template. Refer to Workflow Templates. |
| Create | The Create menu contains the following options:
|
You can filter the workflows by the following criteria using the Filter by drop-down menu:
| Filter | Description |
|---|---|
| All statuses | Displays all the active and inactive workflows. |
| Active | Displays only the active workflows. |
| Inactive | Displays only the inactive workflows. |
| Trigger type | Filters the workflows list based on the trigger type selected. |
| Trigger | Filters the workflows list based on the sub-trigger type if Notification is selected as Trigger type. |
| Context | Filters the workflows list based on the selected context. After selecting the type of context, select the context in the second drop-down menu. |
| Last modified | Filters the workflows list based on when the workflows were last modified. |
| Last executed | Filters the workflows list based on when the workflows were last executed. |
| Next execution | Filters the workflows list based on when the workflows are scheduled to be executed. |
| Execution time | Filters the workflows list based on execution times. |
Click the Filter by drop-dow menu and select the appropriate filters.
Click Apply to filter the workflows list by the selected criteria, or click Cancel to close out of the filter drop-down menu.
You can also enter keywords in the search bar to search for specific workflows. Press Enter on your keyboard to execute the search and narrow the list of results.
The Import from VSA 9 tool gives VSA 9 users transitioning to VSA 10 a better understanding of how any agent procedures will be represented as workflows, allowing you to import and evaluate existing agent procedures from VSA 9.
In VSA 9, right-click any specific agent procedure or folder containing multiple agent procedures and choose Export Procedure. Save the file to the suggested XML format.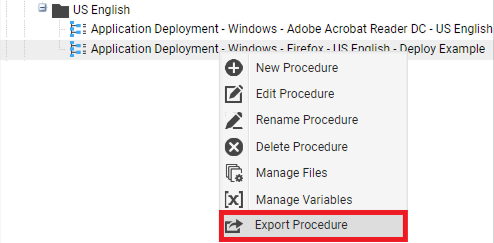
When importing any agent procedure XML file into VSA 10, the translator tool will parse the file content and present the agent procedures available for import in a list. The tool analyzes how compatible the agent procedure is with VSA 10 and displays a compatibility score of 1 through 5. This information provides an overview and understanding of what specific agent procedure features are currently available in workflow actions and conditions. Select the agent procedures you wish to import and click Continue.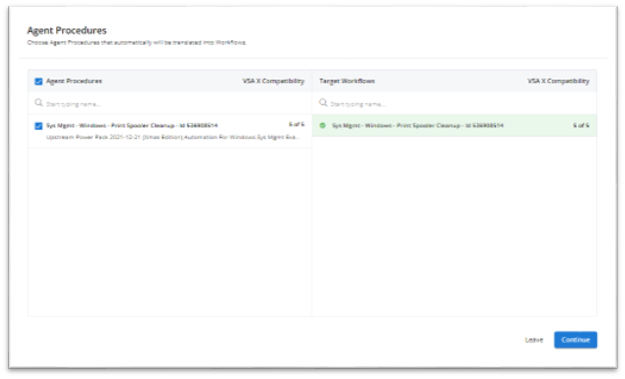
Any selected agent procedure within the imported XML file will generate a workflow to be reviewed. The tool can be used to evaluate the currently supported actions and conditions translated from the agent procedures. The tool will also show any action or condition not yet supported by denoting it in red and rendering the workflow as inactive, unable to be activated. The workflow can, however, be edited or modified to achieve compatibility.
NOTE Workflows can only be created or edited from within the User Defined folder and it's subfolders.
Complete the following steps:
- In the Automation Hub, in a location within the User Defined folder, navigate to the Workflows tab, click Create and select Create New. Or, click an existing workflow to open the editor.
NOTE You can also automate workflow creation with Kaseya Assist. For more information, refer to Create workflows with Kaseya Assist.
- On the Details page, enter a name (required) and description (optional).
- If you turn on the Active toggle in the Status section, the workflow will be ready to trigger as soon as it is created. If you want to disable the workflow, turn the toggle off.
- Select which Trigger Type you want to apply to the workflow from the following options:
- Notification: Select this trigger if you want the workflow to trigger automatically when a notification type of your choice is triggered for that device. Workflows with the Notification trigger will automatically apply to all devices when active.
- Ad-hoc and Scheduled: Select this trigger if you want to schedule the workflow to run at a specific time, optionally setting a distribution window, or you want to be able to trigger the workflow against devices manually. Workflows with the Ad-hoc and Scheduled trigger will need you to set the context where they can be applied. For more information on setting a workflow schedule, refer to Scheduling a workflow.
- Select the Context that the workflow will apply to. This will affect which devices the workflow will be run against when triggered as part of a schedule or manually executed from the Workflows page.
NOTE Step 5 only applies if creating a workflow with the Ad-hoc and Scheduled trigger type.
- In the Maximum execution time section, enter how many hours the workflow should take to execute its steps before it is forced to stop.
- Click Next to start defining or editing the workflow.
- If creating a new workflow, you'll be prompted to establish which trigger will activate this workflow. Each individual trigger can activate one workflow.
- If creating a workflow of the Ad-hoc and Scheduled trigger type, you will have the option to set the trigger as Ad-hoc for manual execution, or Scheduled if you want to set a recurring execution schedule.
- If creating a workflow of the Notification trigger rype, you will have the option to select which notification type will trigger the workflow.
EXAMPLE For example, the Stop Service trigger will be activated when VSA 10 receives any notification that the services are stopped. The notifications are defined by endpoint policies. If no policy is defined, no notification will appear, and no workflow will be triggered.
- If you wish to take additional actions when the trigger occurs, click the New Step button at the bottom of the workflow canvas as required.
- Ending the workflow as a Success or Failure allows you to utilize the action for the purpose of error handling.
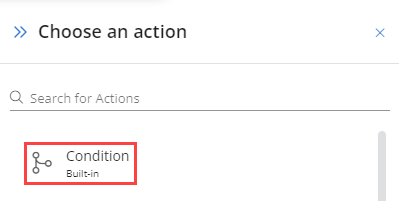
- All available actions are meant to perform a task or run a script on the endpoint with the exception of the condition action. A condition allows you to add rules to the target or filter out specific services, organizations, devices, or custom fields. This special step allows you to define who or what the workflow will target in a more granular manner (if/then route). To apply a condition and configure its rules, click Condition at the top of the Choose an action pane.
- When finished configuring the workflow, click Save to create the workflow.
IMPORTANT All workflow actions have an individual timeout of 30 minutes. This means that if a workflow is performing one of it's actions for more than 30 minutes, it will time out and stop the workflow from completing.
There are several options for scheduling a workflow that has the ad-hoc and scheduled trigger type, explained below.
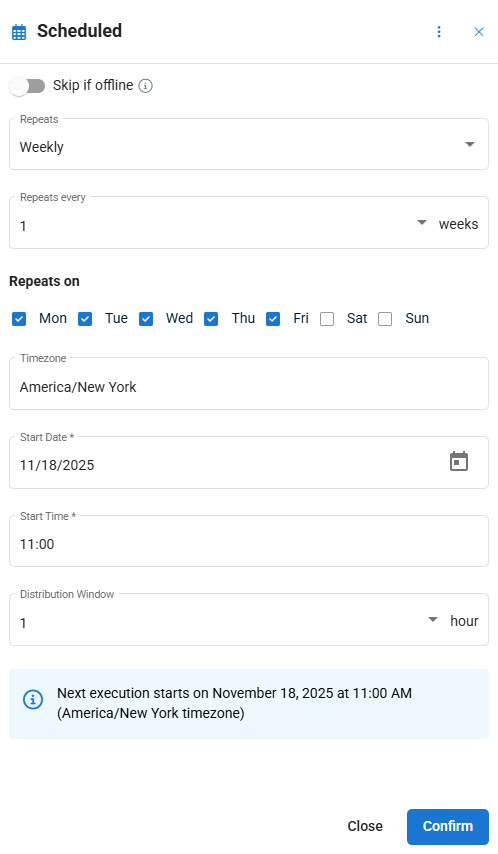
- Skip if offline: Enable this toggle if you want to skip execution of the workflow at the scheduled time/during the distribution window if the device is offline at that time.
- Repeats: Set how often the workflow execution will repeat, choosing from the following options:
- Hourly
- Daily
- Every Weekday (Monday to Friday)
- Every Monday, Wednesday and Friday
- Every Tuesday and Thursday
- Weekly
- Monthly
- Repeats every (Hourly, Daily, Weekly and Monthly only): Set how often your daily, weekly or monthly schedule repeats.
EXAMPLE If Repeats is set to Daily, you can then select if you want to repeat the schedule every day, or every 2 days, every 3 days, etc.
NOTE If selecting Hourly, you will have the option to select repetition between every 3 hours and every 12 hours, in one hour increments.
- Repeats by (Monthly only): Set when during the month you want to repeat a monthly scheduled workflow from the following options:
- Day of the month: Uses the Start Date to select which day of the month the workflow will trigger on.
EXAMPLE If you start your workflow schedule on the 15th of the month, it will trigger on the 15th of the month for every month it is scheduled to run.
- Day of the week: Uses the Start Date to select which day of the week the workflow will be triggered on.
EXAMPLE If you start your workflow schedule on the second Wednesday of the month, it will trigger on the second Wednesday for every month it is scheduled to run.
- Last day of the month: Runs the workflow on the last day of the month for every month it is scheduled to run.
- Second to last day of the month: Runs the workflow on the second to last day of the month for every month it is scheduled to run.
- Day of the month: Uses the Start Date to select which day of the month the workflow will trigger on.
- Timezone: Select the time zone for your scheduled workflow's Start Time.
- Start Date: Select the date you want the scheduled workflow to begin triggering.
- Start Time: Select the time that the scheduled workflow will trigger.
- Distribution Window: Select a window of time to allow for a flexible start time for the scheduled workflow between 1 and 12 hours. Alternately, select None to only trigger the workflow on devices that are online at the exact Start Time.
Configuration page indicators
At the bottom of configuration pages, the indicators display the configuration statuses, as follows:
| Indicator | Status |
|---|---|
| This configuration page is currently open for the first time. | |
| This configuration page is not currently open and has not been configured yet. | |
| This configuration page is currently open, and all required fields are complete. | |
| This configuration page is not currently open, and all required fields are complete. | |
| This configuration page is currently open, and required fields must be populated before saving. | |
| This configuration page is not currently open, and required fields must be populated before saving. |
NOTE This section only applies to Active workflows with the Ad-hoc and Scheduled trigger type.
While workflows of the Notification trigger type will only execute when their notification triggers are met, workflows with the Ad-hoc and Scheduled trigger type can be triggered manually at any time.
There are two ways in which a workflow can be manually executed against devices. Please review the applicable sections below:
If you need to run a workflow against all devices within it's assigned context quickly, this is the quickest option.
This method of running a workflow is most likely going to apply to workflows that already have an established recurring schedule, where you need to run the workflow against all applicable devices outside of the normal schedule.
- Navigate to Automation > Automation Hub.
- Navigate to the folder where the workflow you want to run is located, and select the Workflows tab.
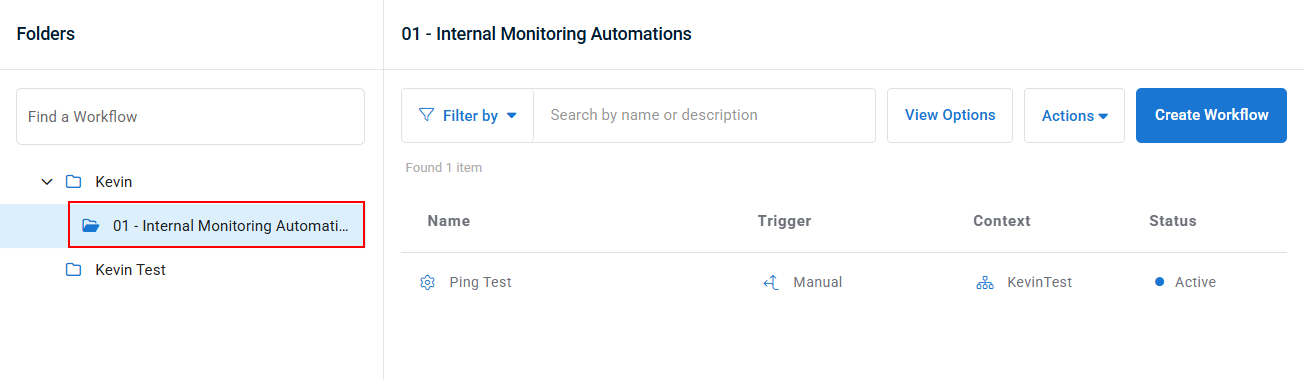
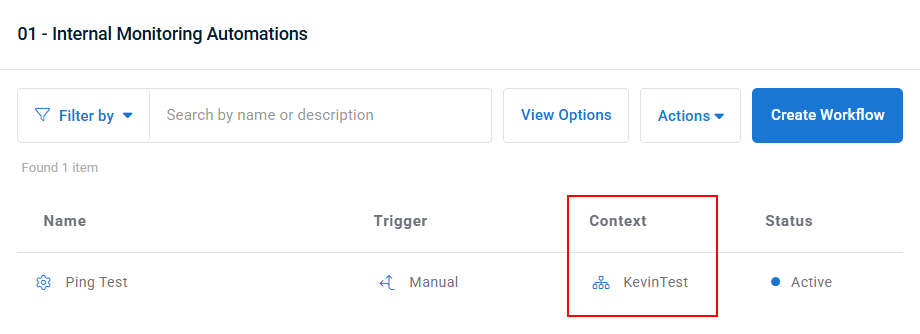
NOTE Review the Context column to make sure it's accurate, as the workflow will attempt to run against all devices in that context when triggered.
- Hover over the workflow and click the Run button.
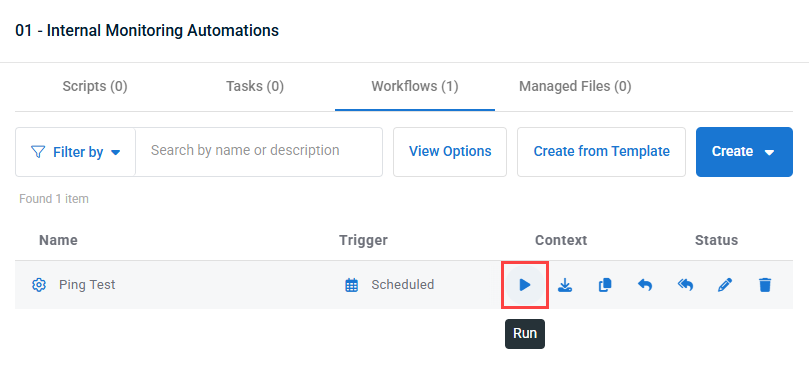
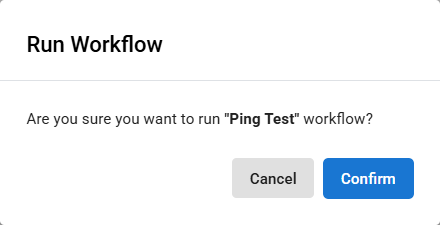
- In the Run Workflow confirmation pop-up, click Confirm.
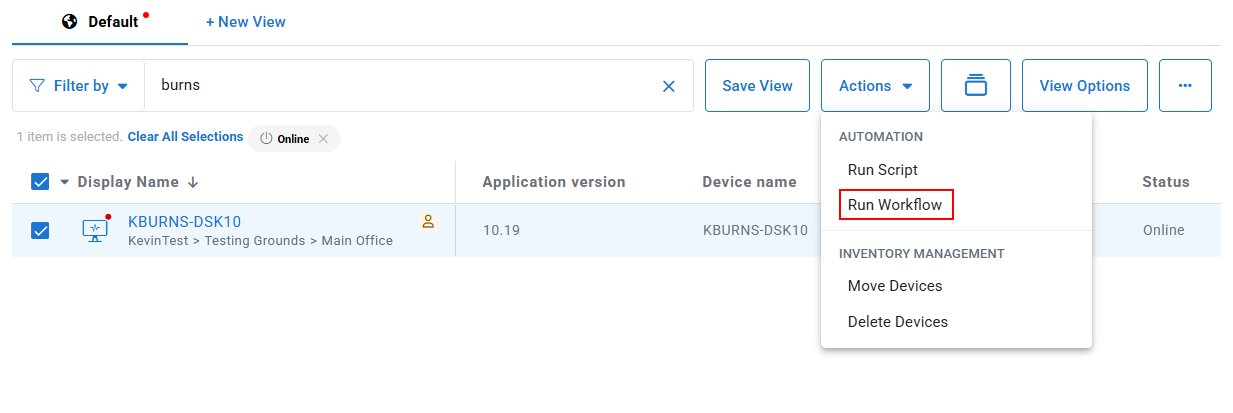
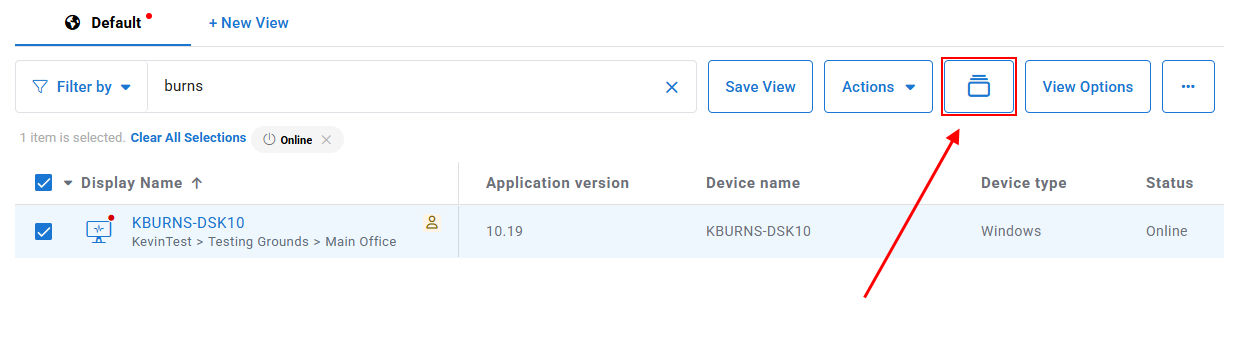
If you need to run a workflow against one or more select devices, and not everything that a workflow would apply to, this is the best option.
Using this method, you can individually select which devices you wish to run a workflow against, and even choose a future date and time for the workflow to trigger, if desired.
- Navigate to Devices > Device Management.
- Select one or more devices.
- In the Actions menu at the top of the page, select Run Workflow.
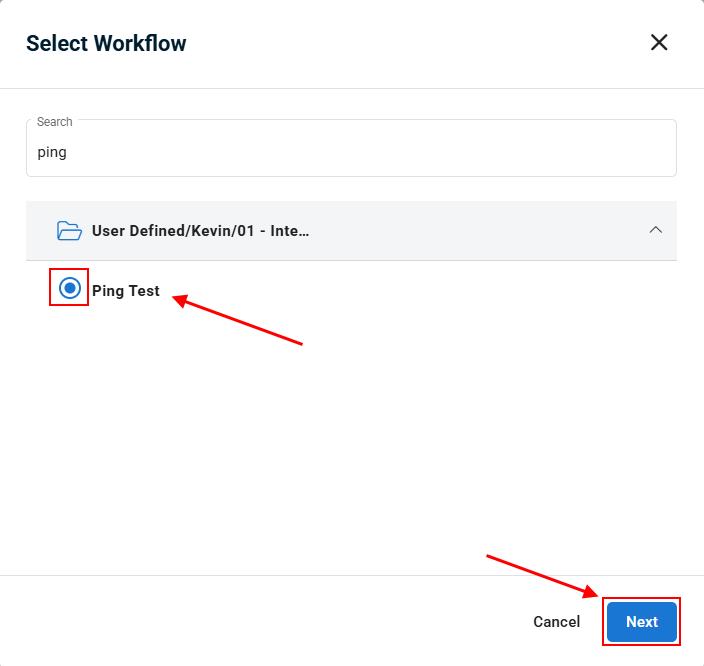
- Select the workflow you wish to run from the pop-up window. Use the search bar at the top of the window to filter the list. Click Next.
- In the next window that appears, select whether you want the workflow to Run now or Run later.
- If Run Now is selected, when you click Run in the next step, the workflow will trigger immediately.
- If Run later is selected, you will be prompted to select the Timezone, Start Date, and Start Time of the workflow's next one-time execution trigger.
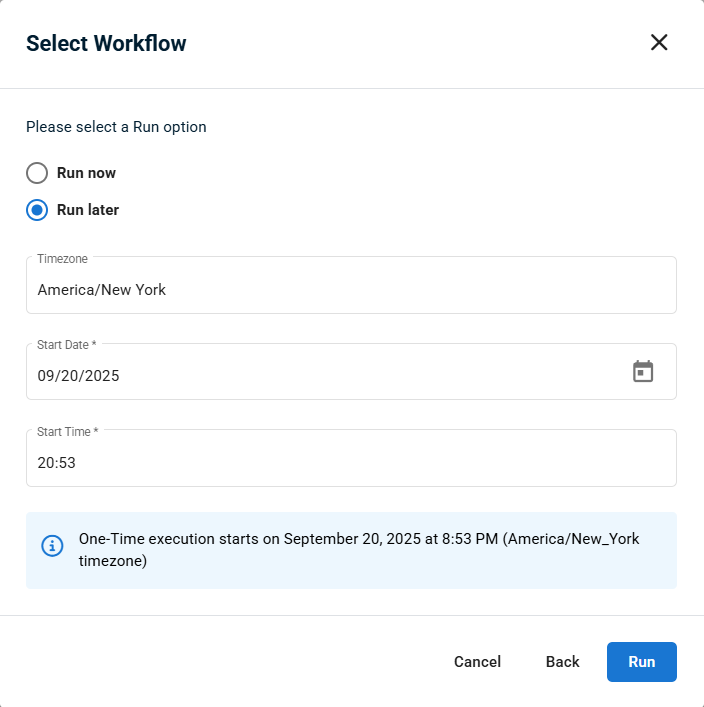
- Click Run.
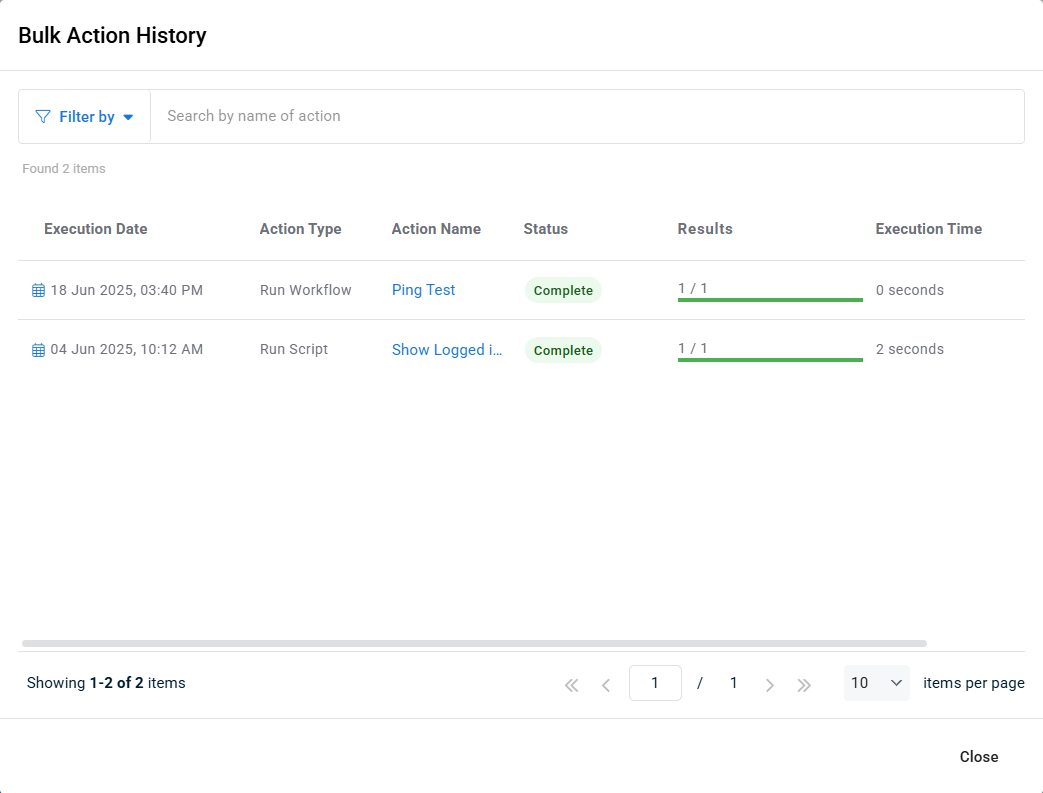
To check the status of workflows executed from the Actions menu, click the Bulk Action History button at the top of the page:
This will pop open the Bulk Action History window, which tracks the status of automations triggered via the Actions menu.
- Navigate to Automation > Automation Hub.
- Open the folder containing the workflow, and click the Workflows tab.
- Hover over a workflow in the list, and click Edit.
- Click New Step.
- In the System section, click Set Custom Field Value.
- From the Custom Field drop-down menu, select a custom field.
- From the Context drop-down menu, select System, Organization, or Global.
NOTE The context option will change based on the custom field selected.
- From the Operation drop-down menu, select Set Value, Set to empty, or Reset to default value.
- Click Confirm. The custom field is added to your workflow.
NOTE You will need to navigate to the bottom of the workflow canvas to see the New Step button. In a long workflow canvas, zooming out may be useful.
The Choose an action pane will open on the right side of the page.
Workflow examples
In this example, we'll set up a workflow that downloads a file from a URL to a location on targeted devices. When running this workflow, the technician will be prompted to enter in the values for both the URL of the file to download, and the download location of the targeted file.
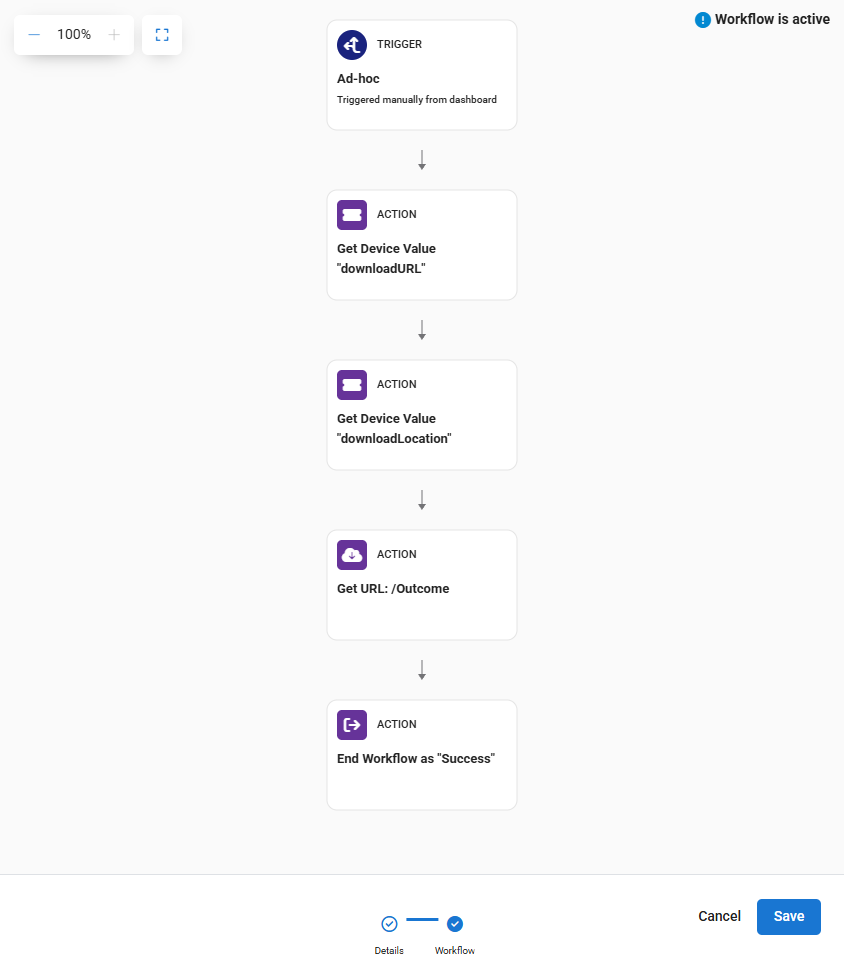
When creating the workflow, we can have it prompt a technician to enter values for any Constant Value variables by enabling Prompt Technician For Value. When enabling this, you can enter in a description of what is required so technicians know what kind of data they need to enter when prompted. If no custom prompt is set, a default one will be created for you.
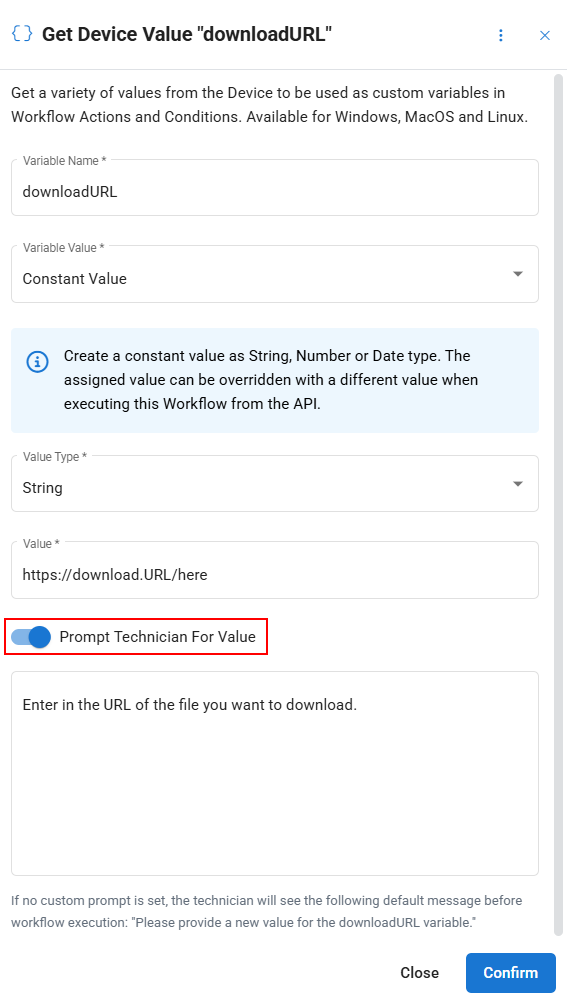
When running the workflow, the technician will be prompted to enter in values for all variables that have Prompt Technician For Value enabled before the workflow runs.
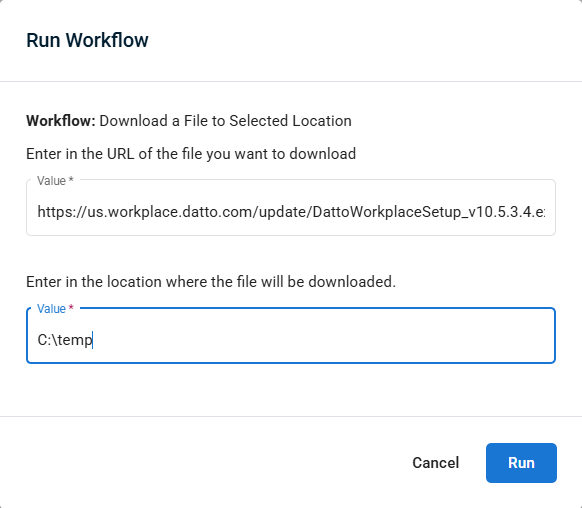
Once the variable values are entered, the technician can click Run and the workflow will run using the entered variable values.
In this example, we are using a workflow to check and see if the VSA 10 trace.log file exists on a device, and send an email if it is missing.
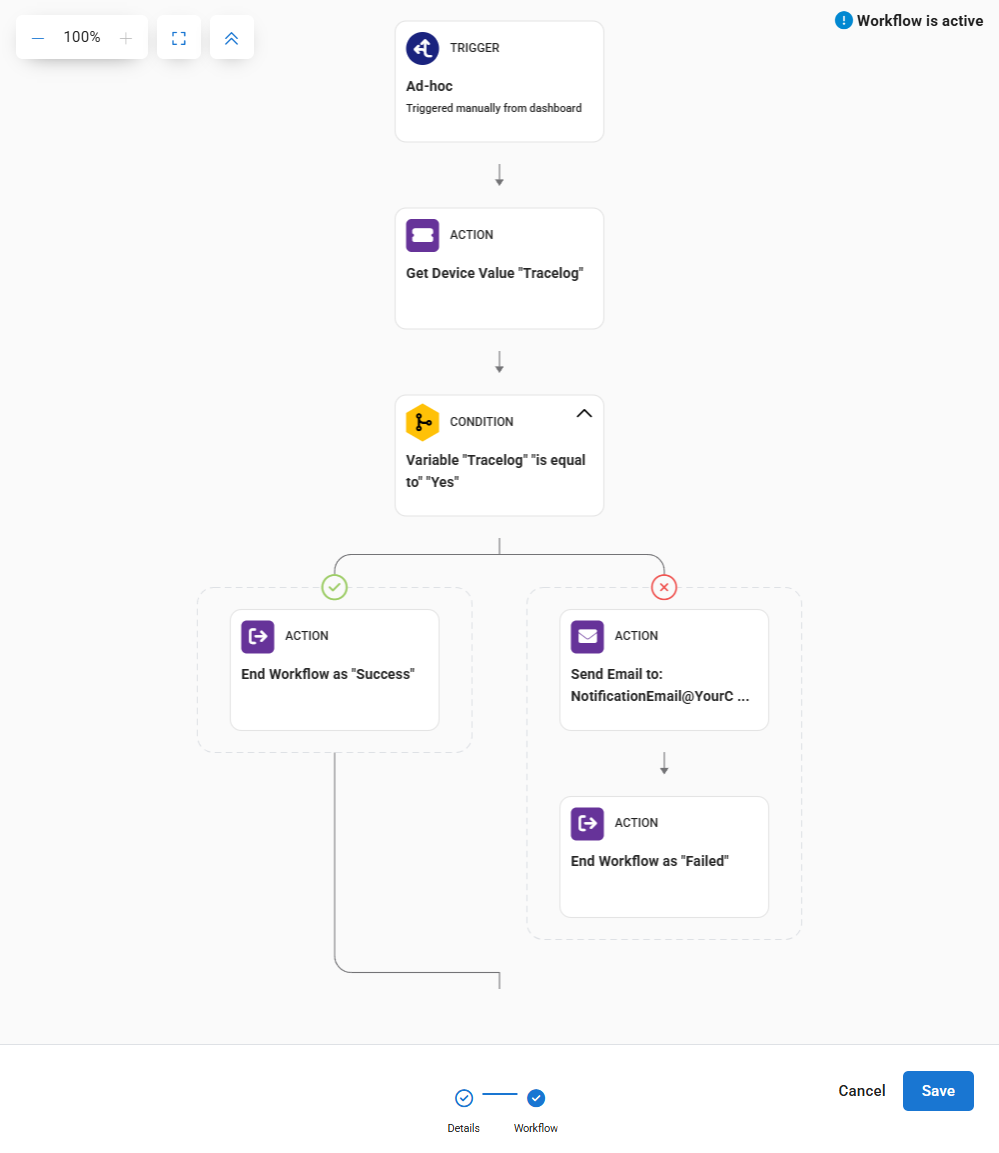
We can check if the file exists using the Get Device Value action, configured with the File Exists variable value option, then setting where it should look for the file, and what the file should be called.

Then, after adding a condition to check the value of the variable, the workflow is split based on if the file exists. If it exists, the workflow ends as a success. If it doesn't exist, it will send an email:
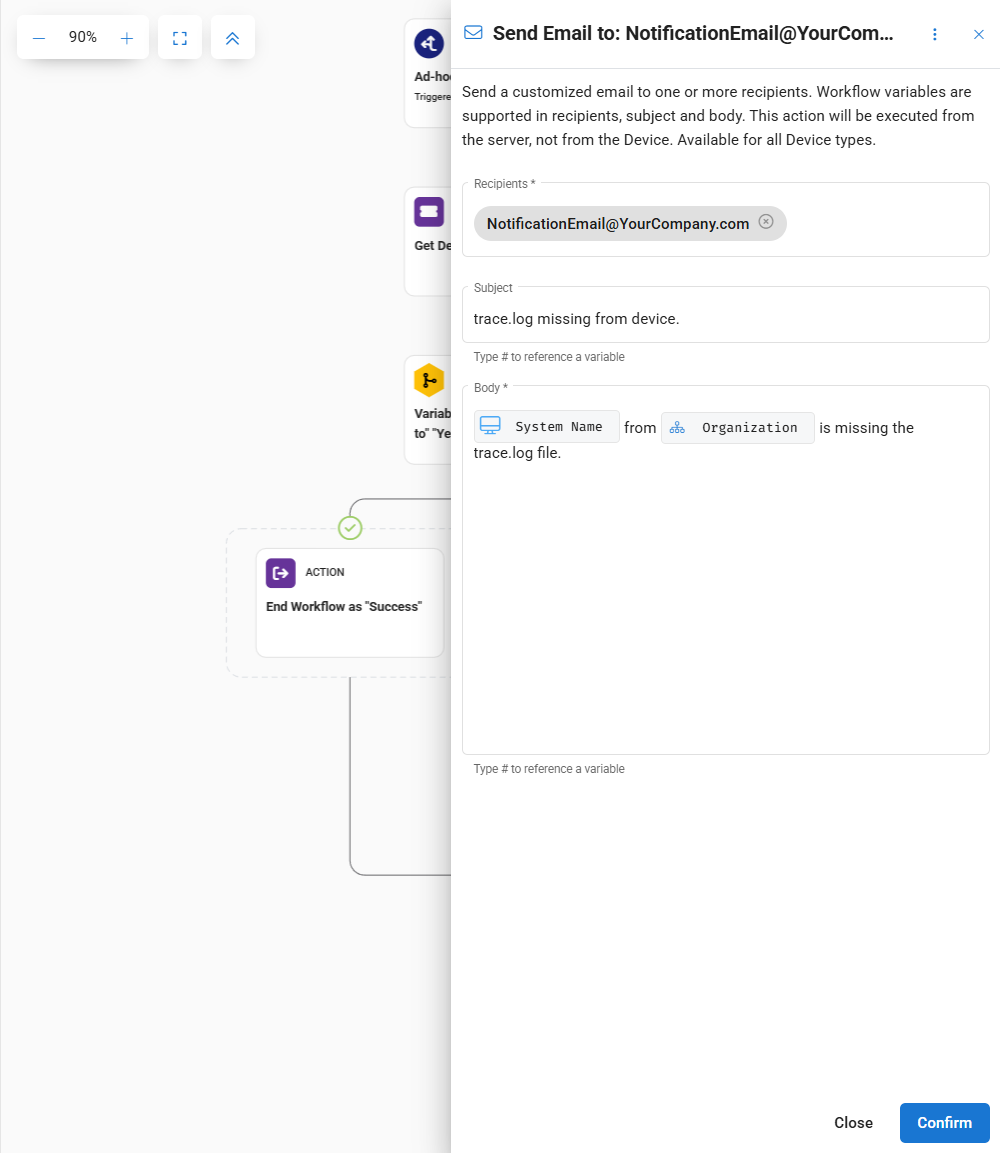
Of course, this workflow can be reconfigured to check for other files, or take other actions upon finding or not finding the file.
In this example, a High CPU usage notification will trigger the workflow when it exceeds preset limits.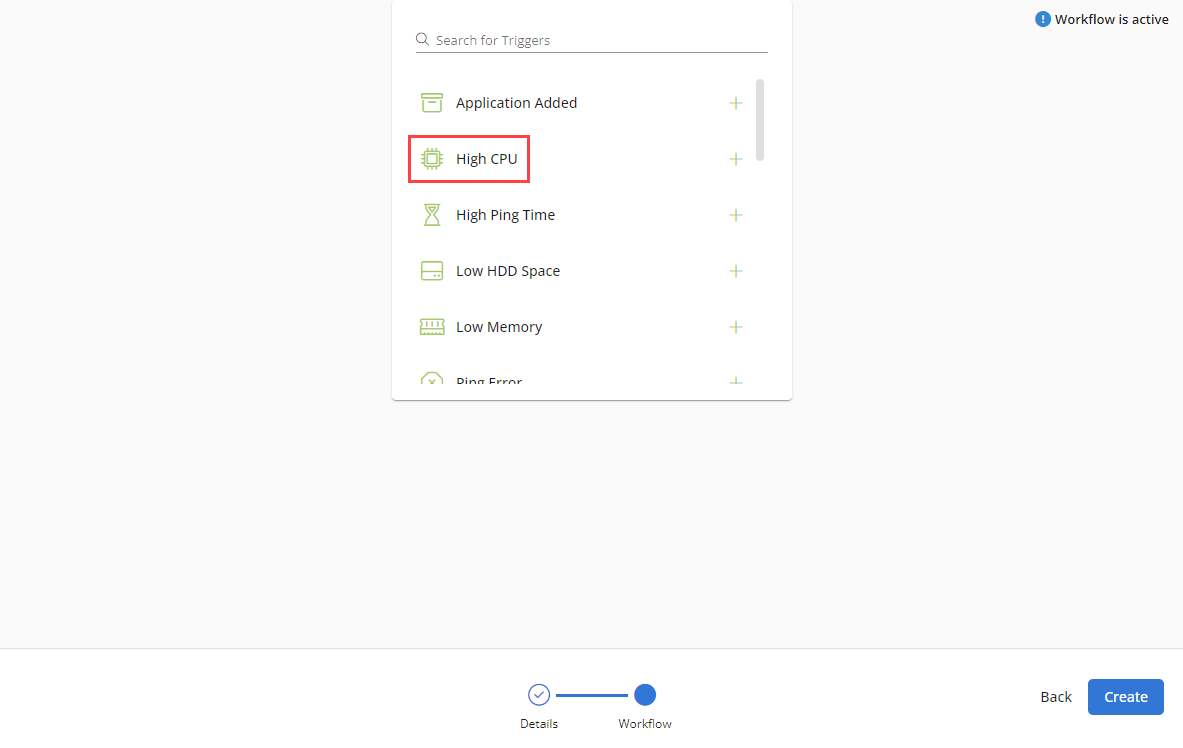
Once a trigger is added, it is displayed as part of the workflow schema. You will see the option to add a step in the chain of actions. Click New Step to proceed.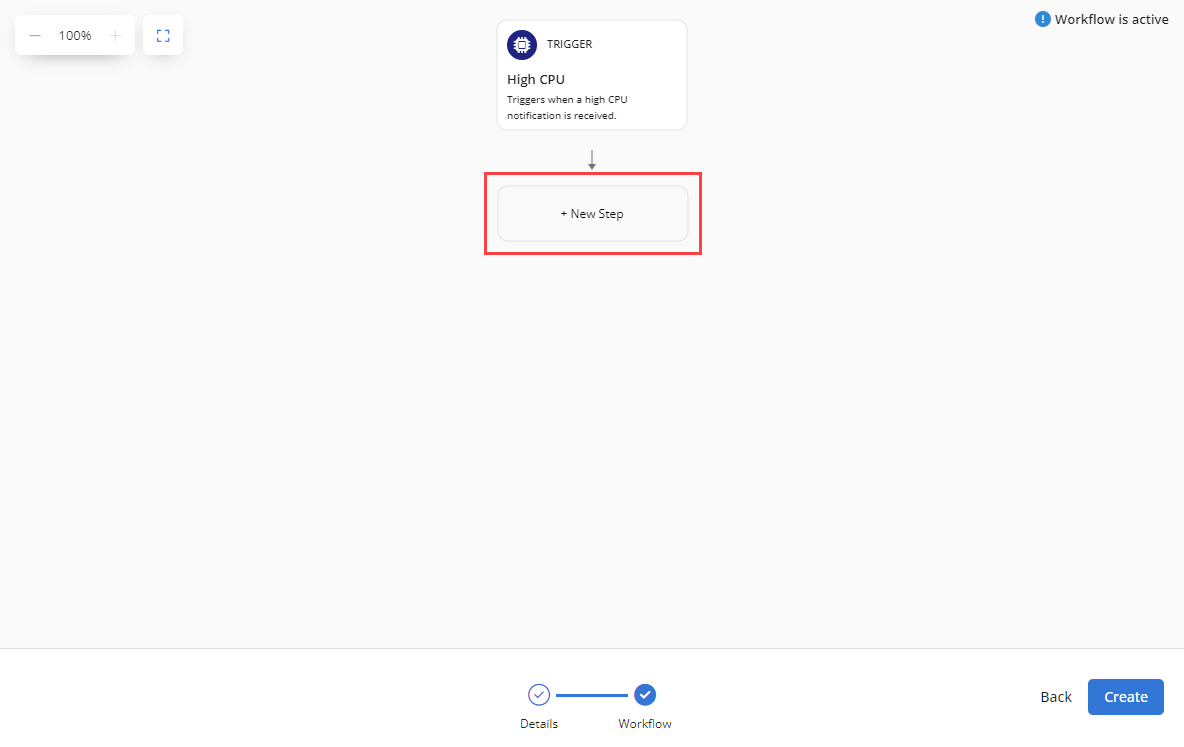
The Choose an action pane on the right side of the page displays available actions for the selected trigger type. You can make use of condition steps to execute different actions based on the outcome of your logical statements.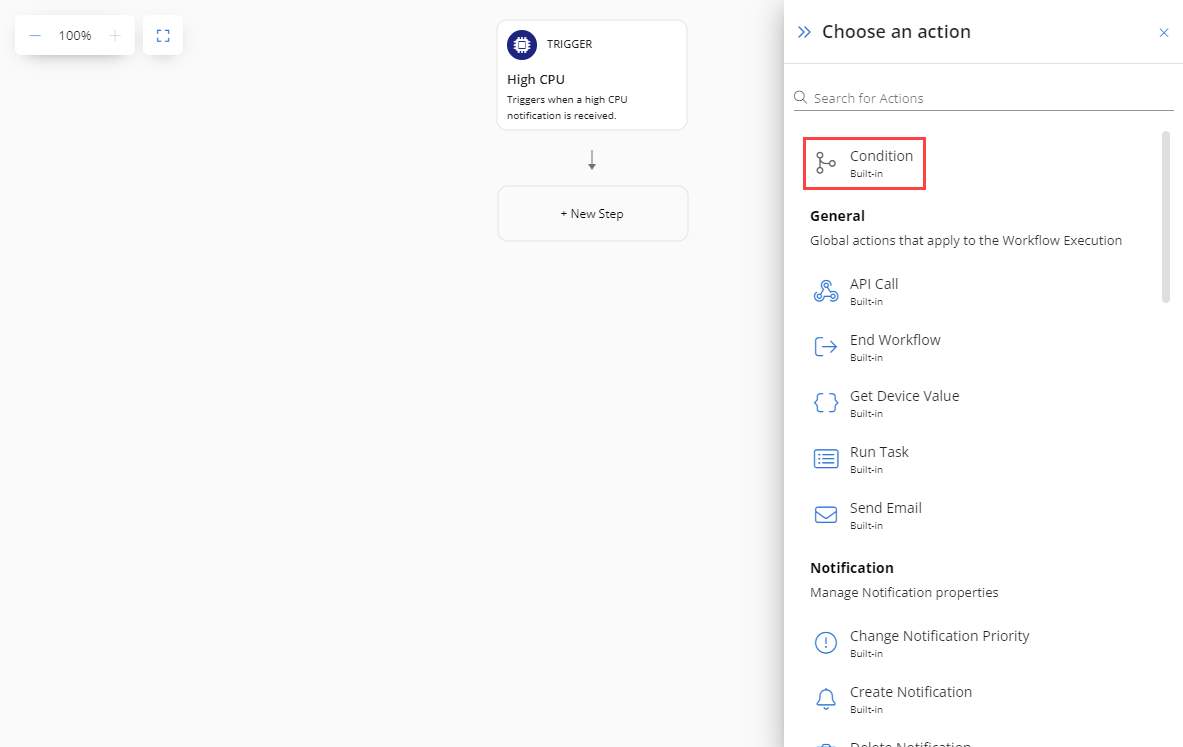
In this example, because of the configured condition, if a high CPU usage notification on the device is triggered and the name for the top process is Sublime, then the process should be killed.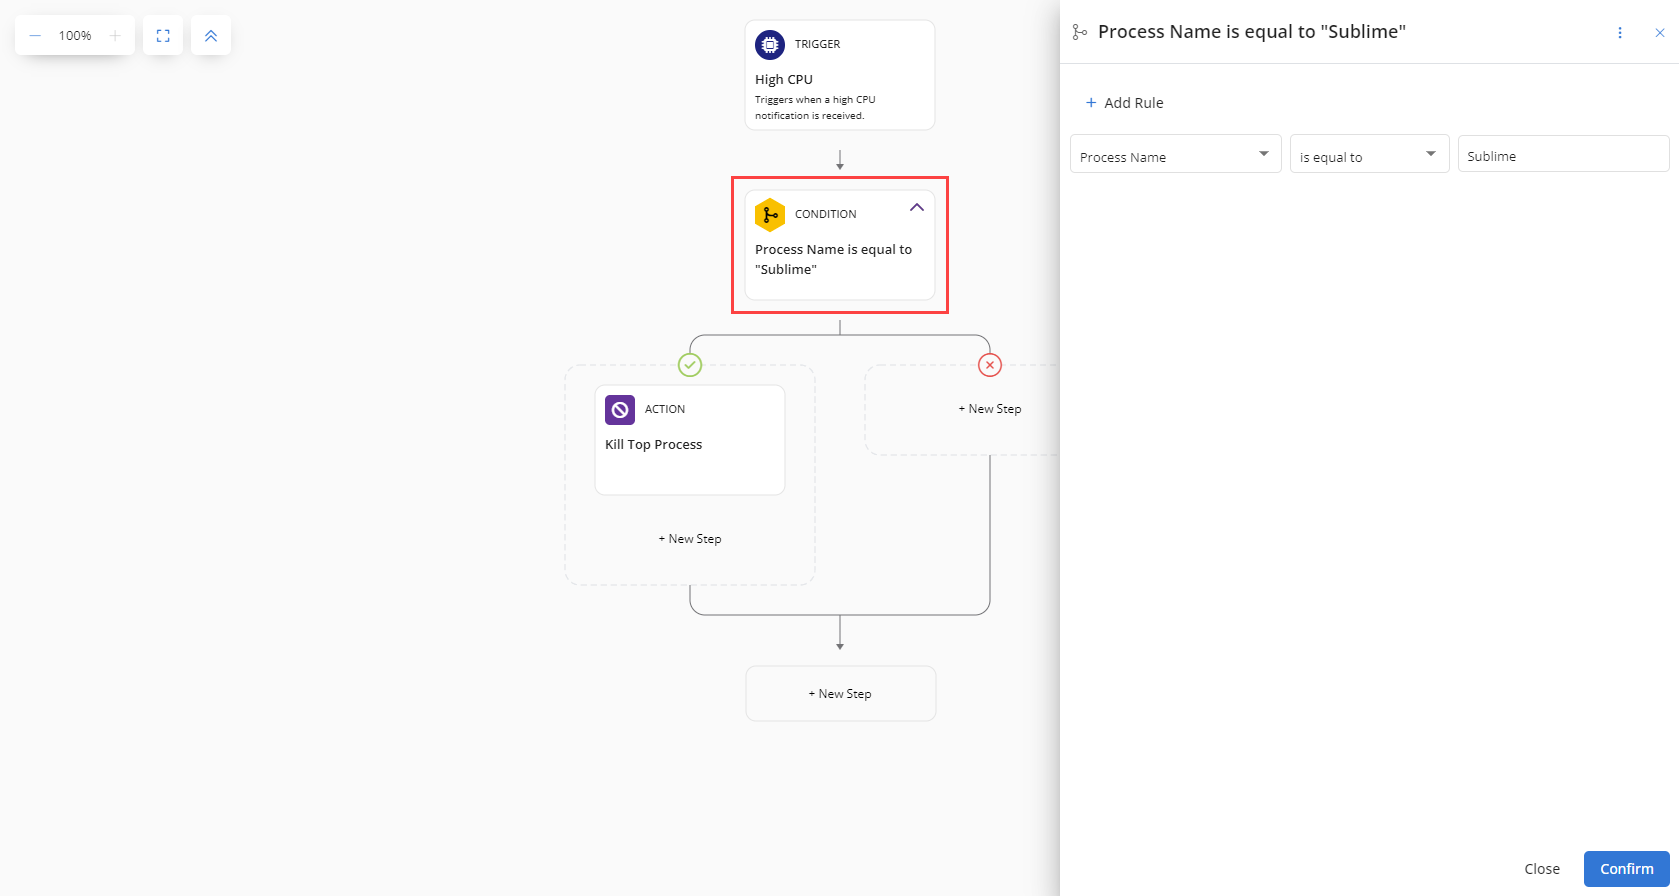
You can add more actions based on the outcome that results from the first action, either successful or unsuccessful.
In this example, conditions are set to restart certain service on one particular device. If the condition Service Name equal to btserv is removed, then the action to start service will be executed on all devices in the group ESXi.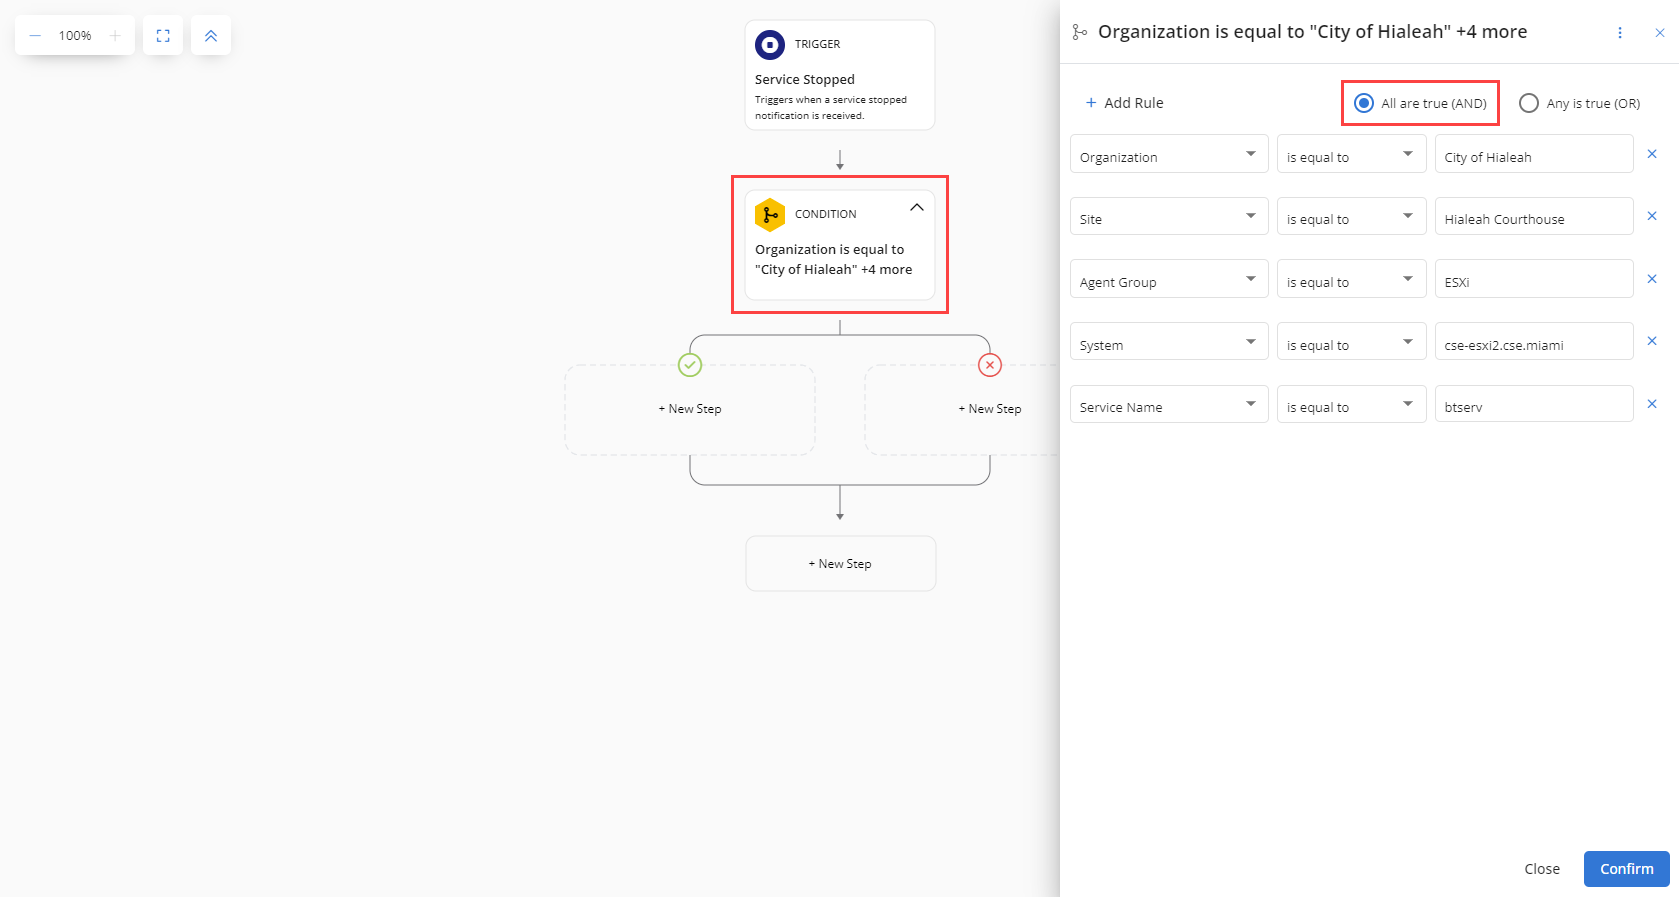
NOTE To start required services in required groups, these blocks with conditions should be chained as IF statements.
As in the preceding example, once the conditions are configured, you can configure the actions: action to be performed when the condition is true (Start Service in this example) and action to be performed when the condition is false. To define these actions, click New Step underneath the green circle (the condition is true) and New Step under the red circle (the condition is false).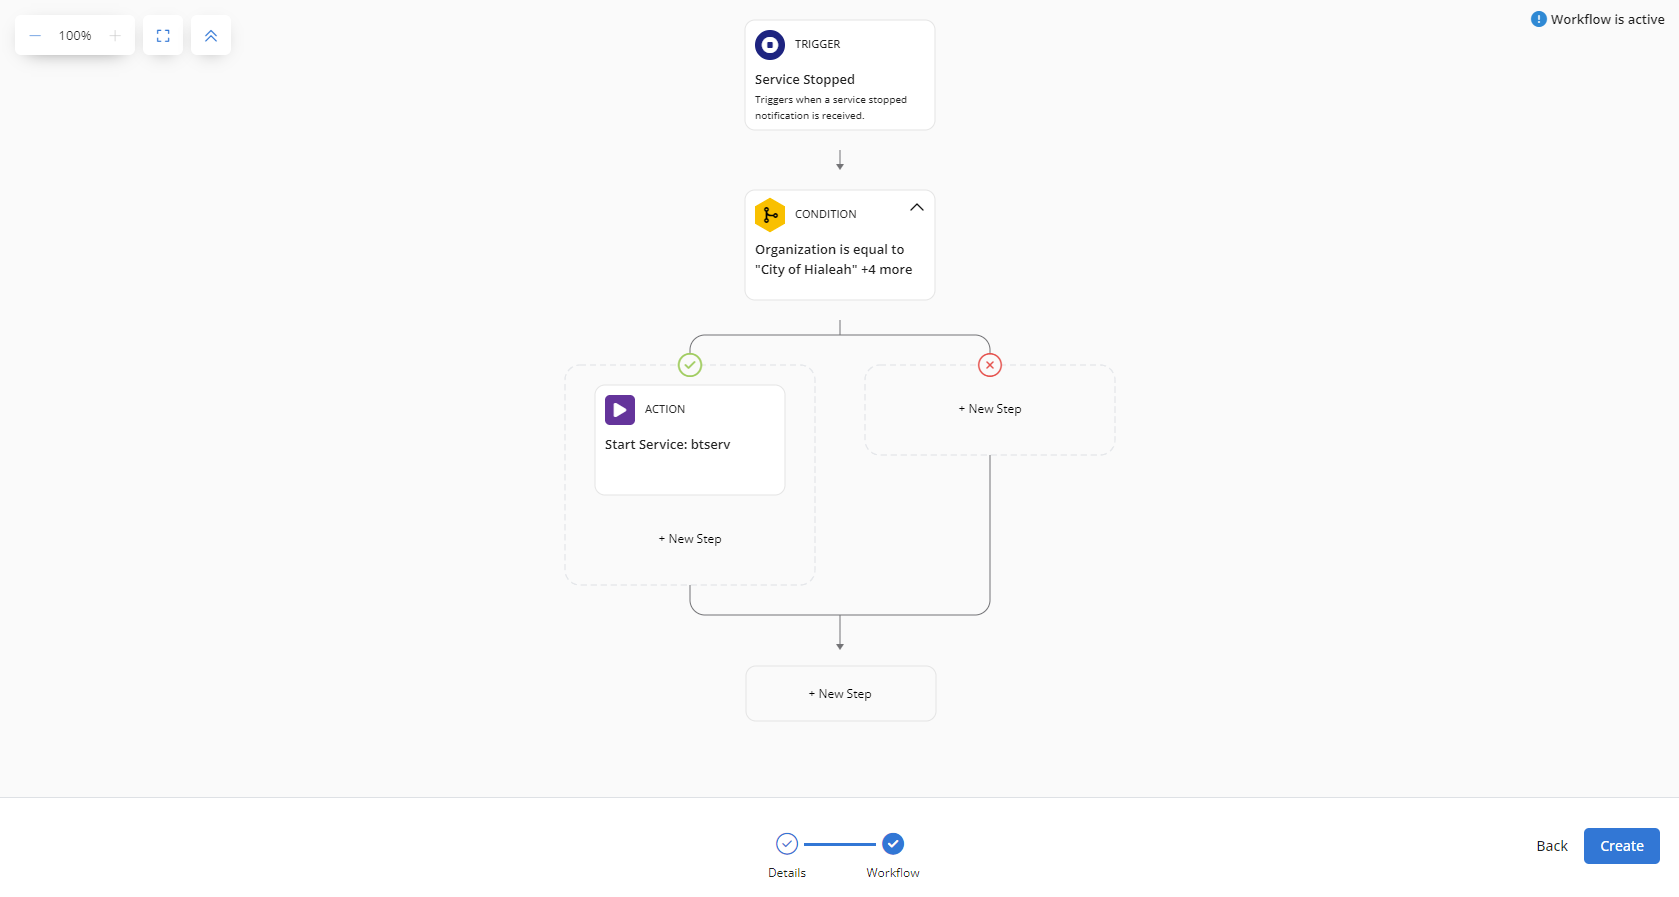
The below video goes over a workflow that, when new devices are added to VSA 10, it will trigger a notification, automate initial setup, patching, and software installation, effectively automating the onboarding of a new device. Please watch the below video for details on how to set this up.


