Tasks
NAVIGATION Modules > Automation > Automation Hub
PERMISSIONS Automation > View Tasks & Scripts
PERMISSIONS Automation > Edit Tasks & Scripts
Tasks in VSA 10 enable you to run your own scripts and deploy them to endpoints as automation tasks. Tasks are a list of scripts that can be executed either ad hoc, as a scheduled task, or in a workflow with the Run Task action. Refer to Scripts and Workflows.
At any time, you can automate anything from backup jobs to security checks on schedule or on demand from the device closest to you.
This article describes the process to create, view, and manage your tasks.
Overview
Tasks can be accessed in the Automation Hub.
From the left navigation menu in VSA 10, navigate to Automation > Automation Hub.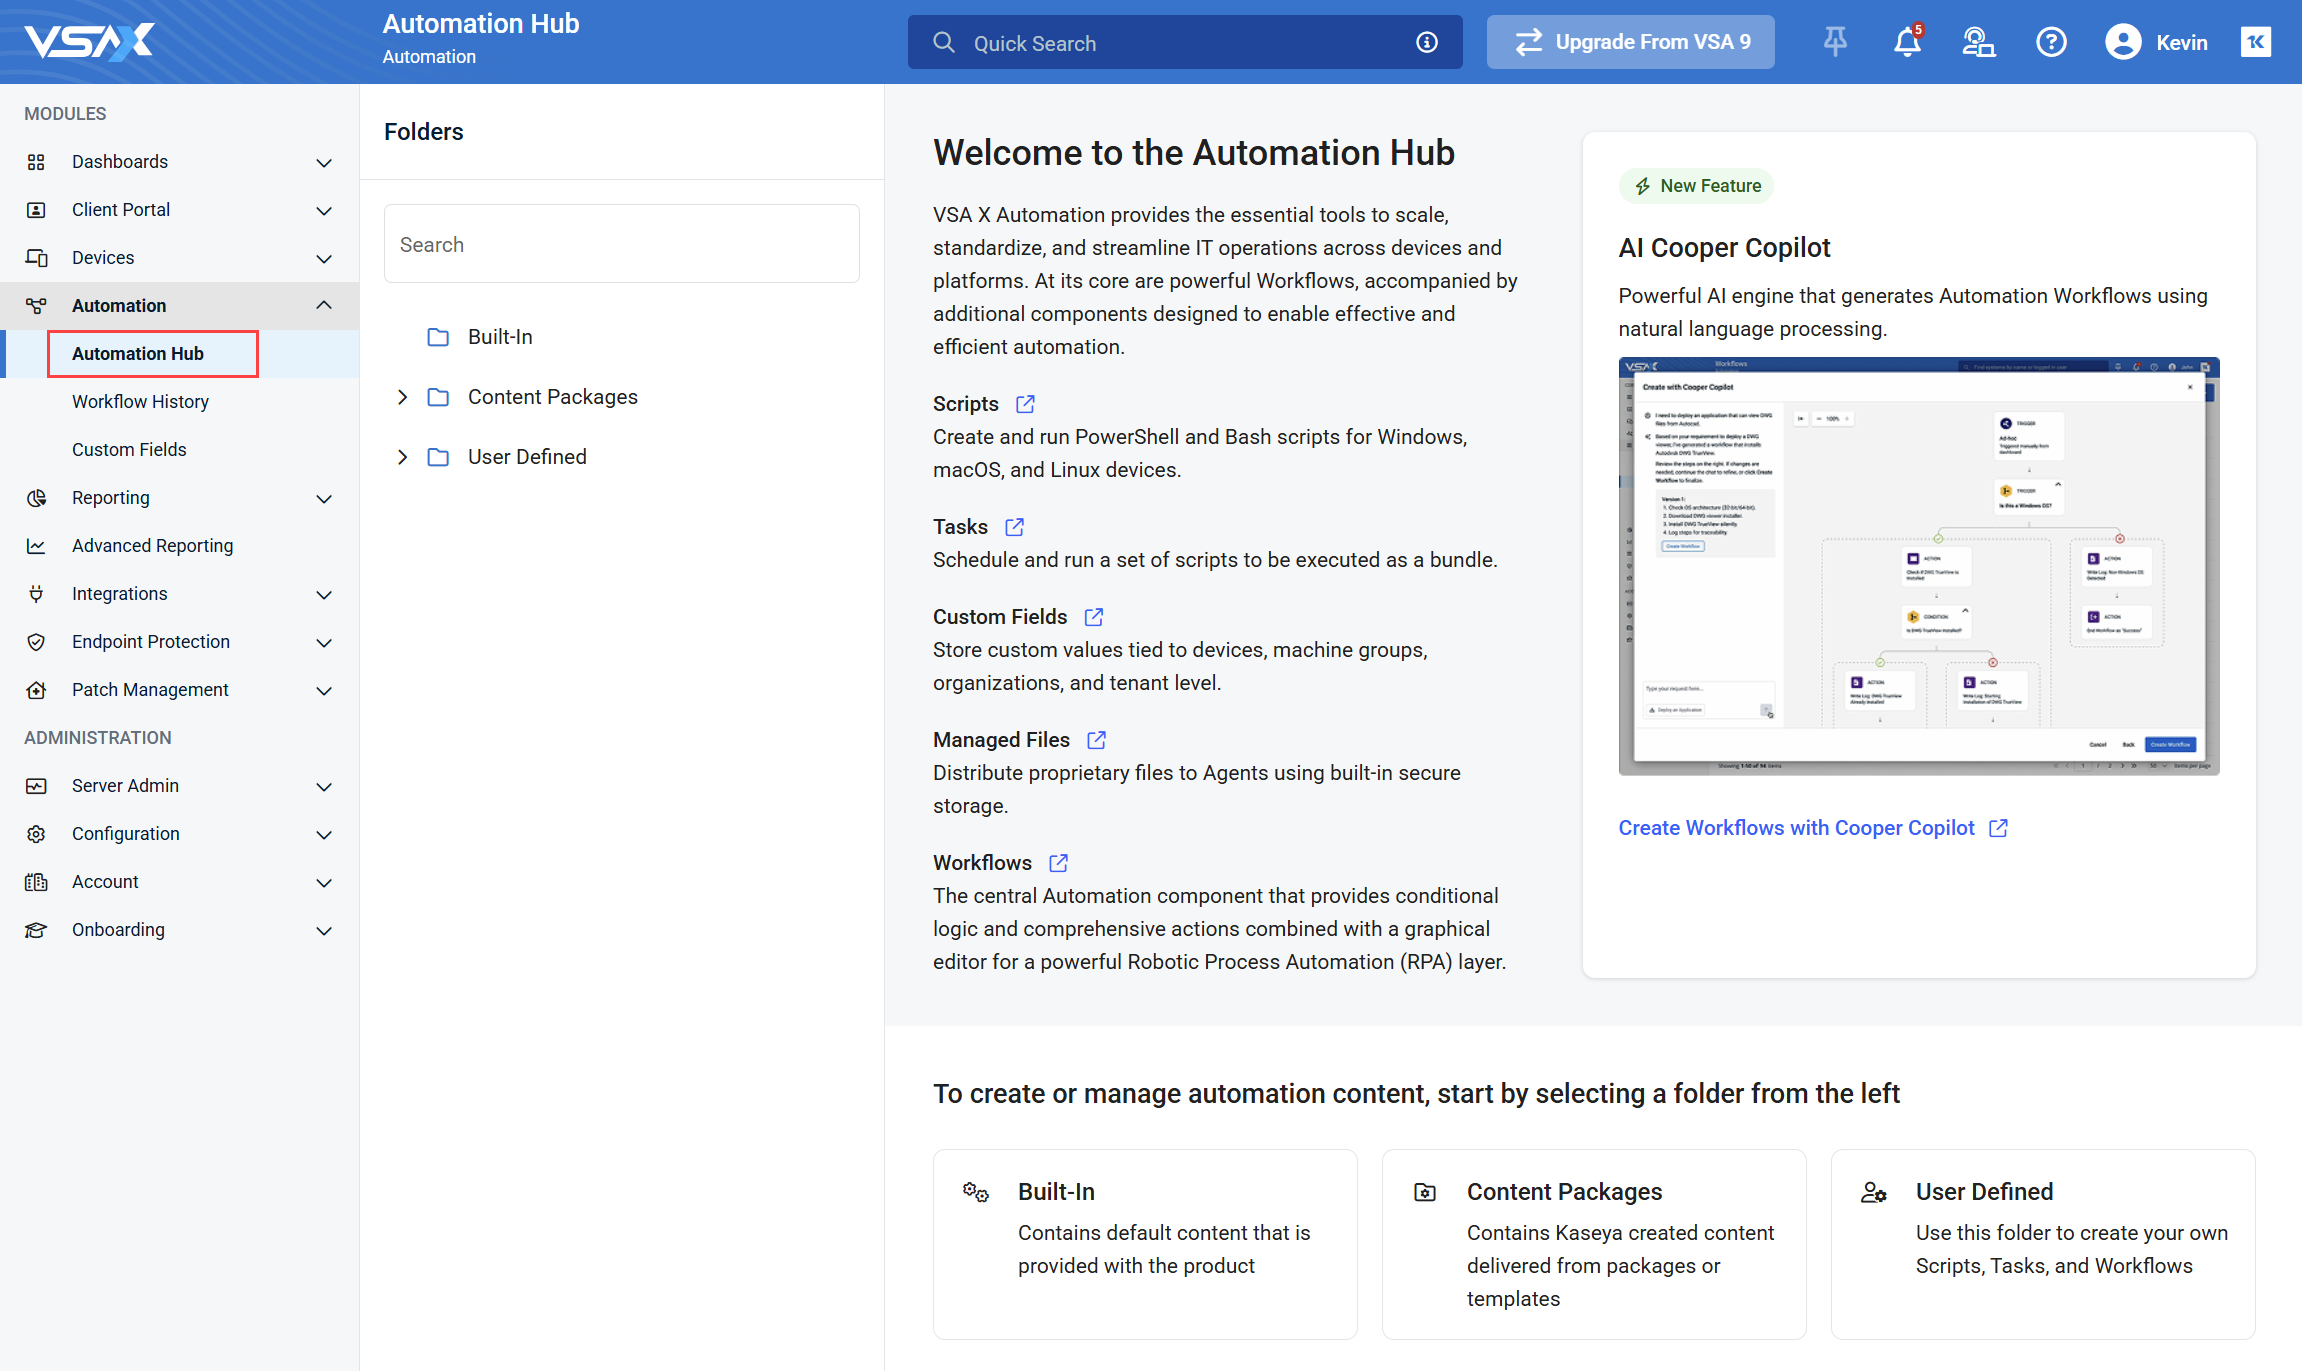
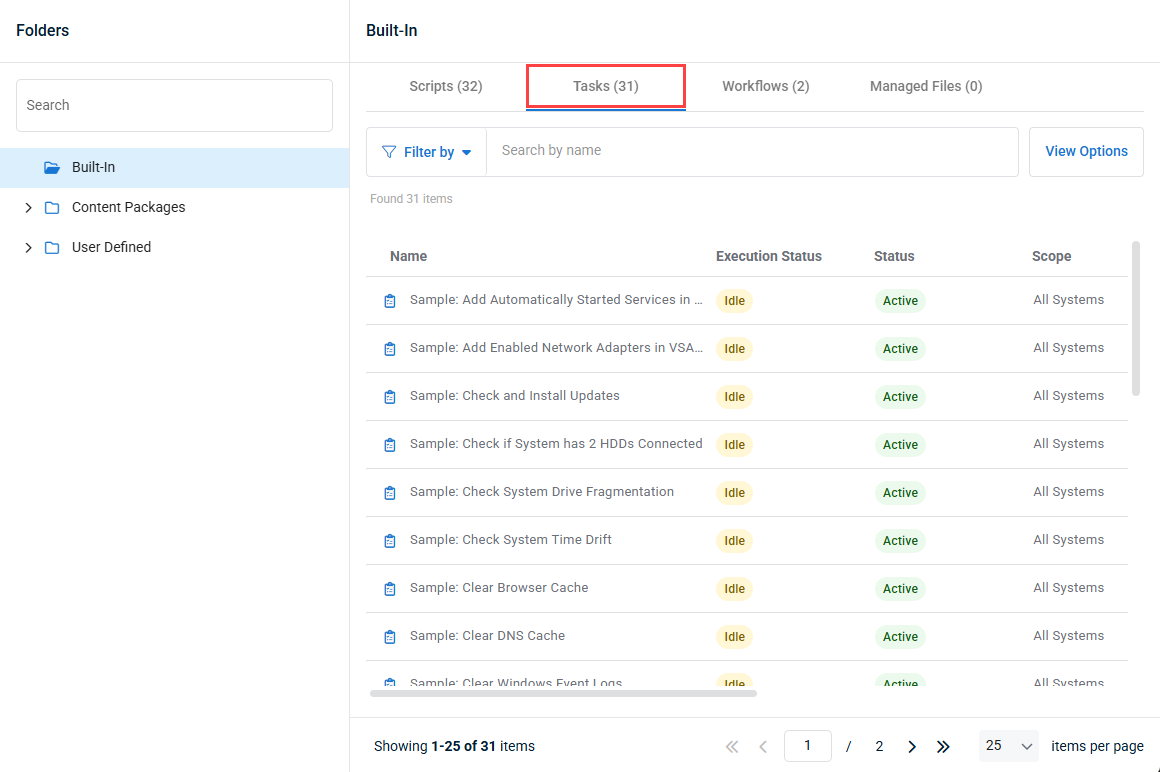
The Automation Hub contains all scripts, tasks, workflows, and managed files in one location, and organized into three folders:
- Built-In (read-only): Contains default content that is provided with the product.
- Content Packages (read-only): Contains Kaseya created content delivered from packages or templates.
- User Defined: Contains custom content created by product users.
To access tasks in the Automation Hub, click a folder to view it's contents, and select the Tasks tab to show all tasks within that folder. You can also use the Search function to search for a task by name.
For more information on the Automation Hub, including folder management, refer to Navigating the Automation Hub.
Tasks content packs
VSA 10 is provisioned with a set of standard task content to be used as feature enhancements, templates, and best practices for automating IT operations and device management. The content is frequently updated by a dedicated team based on industry standards and customer feedback.
- Content Packages > Extended_Audit_Script_Pack: This folder contains the Extended Audit For Computers and Extended Audit For Serverstasks. These tasks extend the audit capabilities for Windows servers and computers. The tasks are write protected and executed automatically in product on Windows servers and Windows 10/11 computers. The extended audit information is available as custom files to be used in daily operations, troubleshooting, and compliance investigations.
- Built-In: This folder contains additional sample tasks for you to review, copy and modify.
Navigating the Tasks tab
Click any header to sort the displayed records in ascending or descending order by the column's value.
| Field | Description |
|---|---|
| Name | Name of the task. |
| Execution Status | Displays the current execution status of the task, as follows:
|
| State | Displays the current state of the task, as follows:
Refer to Enabled/Disabled in Create or edit a task. |
| Last Modified Date | Displays the date on which the task was last modified by a user. |
Hover over any item in the list to access its management options.
| Action | Description |
|---|---|
| View the task. Alternatively, you can click a task to view it. Refer to View and run a task. | |
|
|
Run the task. Refer to View and run a task. |
| Move the workflow to a different location within the User Defined folder. | |
| Create a copy of the Task and choose where you want to save the copy within the User Defined folder. | |
|
|
Edit the task. Refer to Create or edit a task. |
|
|
Delete the task. Refer to Delete a task. |
How to...
NOTE Tasks can only be created within the User Defined folder and it's subfolders.
To create a new task, navigate to Automation > Automation Hub, navigate to a location within in the User Defined folder, select the Tasks tab, and click Create Task.
To edit an existing task, navigate to Automation > Automation Hub, navigate to a location within the User Defined folder, hover over the task you want to edit, and click the Edit icon ![]() .
.
| Field | Description |
|---|---|
| Overview | |
| Enabled/Disabled | Turn the toggle on or off to enable or disable the task, respectively. Enabling allows you to execute the task ad hoc by clicking the Run icon |
| Name | Enter a name for the task. This field is required. |
| Description | Optionally, enter a brief description for the task. |
| Notifications | Select the Send a notification when the task fails check box to trigger a notification when the task fails. Refer to Device notifications and Receiving account notifications. Select the level of priority from the drop-down list. Select the Send a notification when the task completes successfully check box to trigger a notification when the task succeeds. Refer to Device notifications and Receiving account notifications. Select the level of priority from the drop-down list. |
| Execution Settings | Select the Continue on errors check box to allow the script to run with errors. Clearing the check box stops the task once a failed script is recognized. |
| Current Scope | From the Select a scope drop-down menu, select the scope of devices in the VSA 10 account for the task to target. Refer to Device scopes. |
| Enable Scheduling | Allows you to configure how often and when the task will be triggered to run. Define the schedule by selecting the Enable Scheduling check box, or edit a preconfigured schedule by clicking Edit Schedule. The Edit Schedule window will automatically open.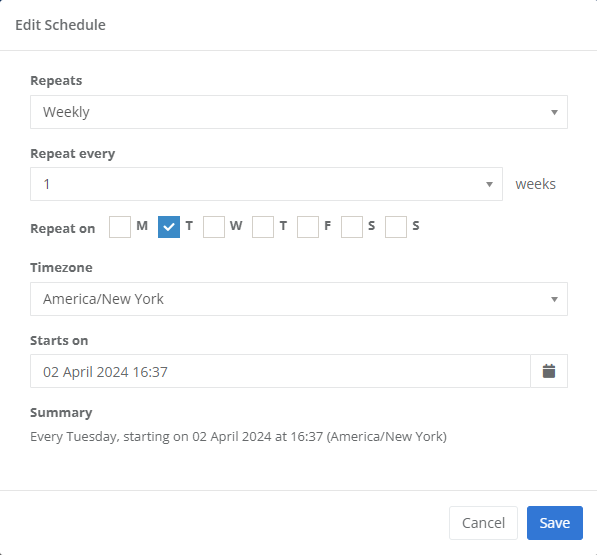 A schedule summary is displayed at the bottom of the window. Click Save to set the schedule or Cancel to close out of the window. |
| Scripts | |
| Tasks Scripts | The left side of the page displays any scripts that have been added to the task and will be executed when the task is run. Refer to the next section for details on how to add scripts to the task. When a task runs, scripts will be executed in the order in which they are displayed in this list. You can reorder the scripts by dragging and dropping the entries. To remove an added script from the task, click the Remove the script from the task icon (-). |
| Available Scripts | The right side of the page allows you to add scripts to the task. From the Categories drop-down menu in the upper-right corner of the page, select a configured collection of scripts. Refer to Scripts in Scripts. NOTE VSA 10 offers some preconfigured scripts, which are present within the Built-in category. The scripts present in the selected category are displayed in the Available Scripts pane on the right side of the page. Click the Add the script in the task icon (+) to add the script to the task. You can add a single script from a single category, multiple scripts from a single category, or multiple scripts from multiple categories. The added scripts will move to the Task Scripts pane on the left side of the page. |
Click Save Task to create the task or save the changes to the task.
Click a task or hover over a task and click the View icon. ![]()
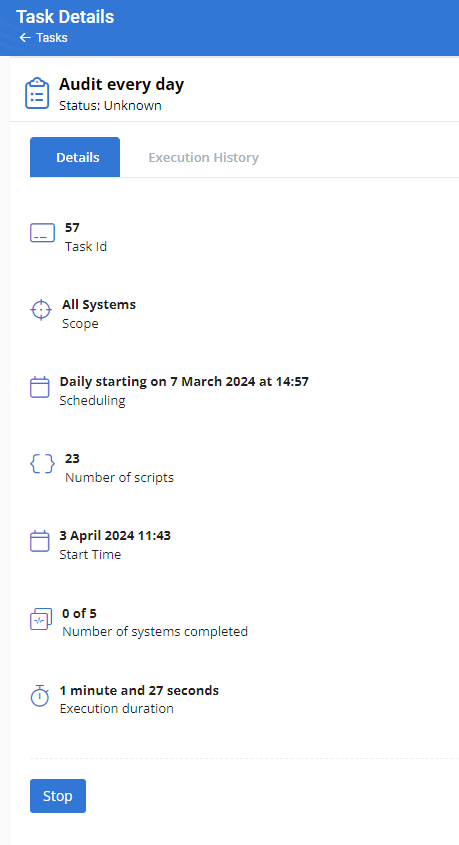
The Task Details page is displayed.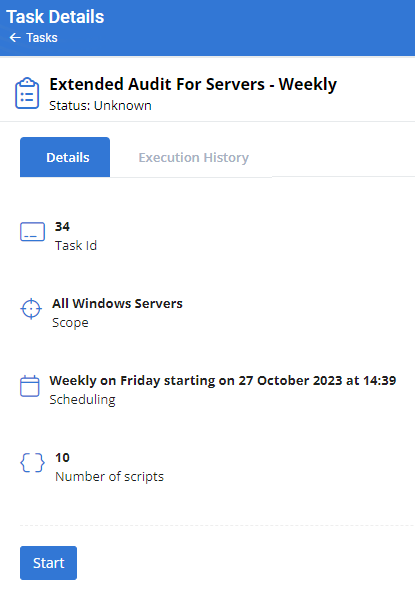
| Field | Description |
|---|---|
| Details | |
| Task Id | Displays the task ID. |
| Scope | Displays the operating systems the task will target upon execution. Refer to Current Scope in Create or edit a task. |
| Scheduling | Displays the task schedule. Refer to Enable Scheduling in Create or edit a task. |
| Number of scripts | Displays the number of scripts associated with the task. Refer to Scripts in Create or edit a task. |
|
Description |
Displays the task description, if added. Refer to Description in Create or edit a task. |
| Start/Stop | Click the Start button to run the task immediately outside of any configured schedule. The following additional fields will appear:
If you wish to end the task before it finishes running, click the Stop button. This action will be reflected in the Execution History tab. Refer to the next section, Execution History. NOTE You can also run a task ad hoc from the Tasks page by hovering over a task in the list and clicking the Run icon NOTE In the list of tasks on the Tasks page, the Execution Status for the running task changes to Running and displays a spinner. Refer to Execution Status. |
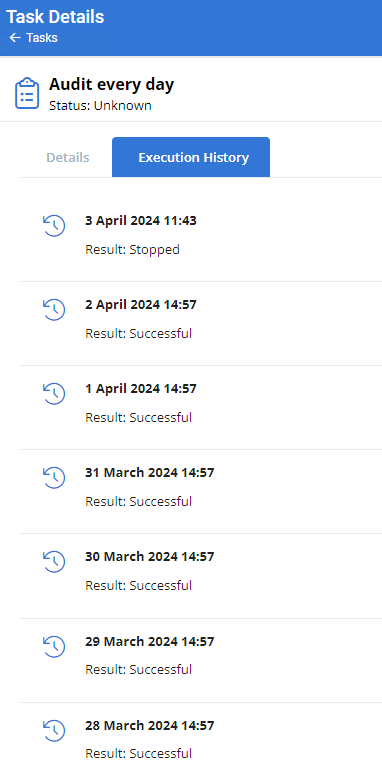
| Execution History | |
| An Execution History tab is available for any task that ran or attempted to run at least once. The tab displays a list of each run attempt, including the date and time when the task ran and whether or not the task ran successfully or was manually stopped (Result). You can review the details of a specific instance by clicking the entry. Refer to View the results of a task. |
|

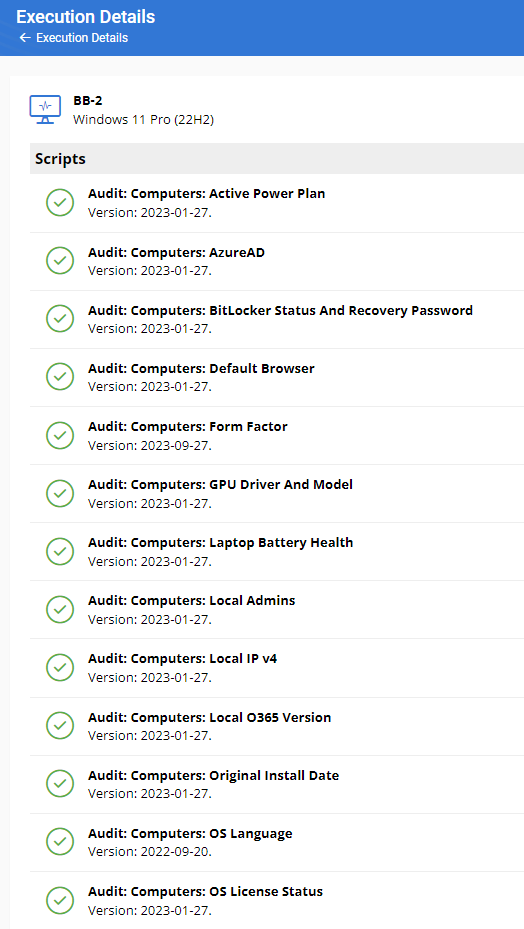
When viewing a task, you can click an entry in the list on the Execution History tab to view the results of that run, which may or may not have been successful or fully executed. The icon next to the task name and the Result value indicate the status of the run.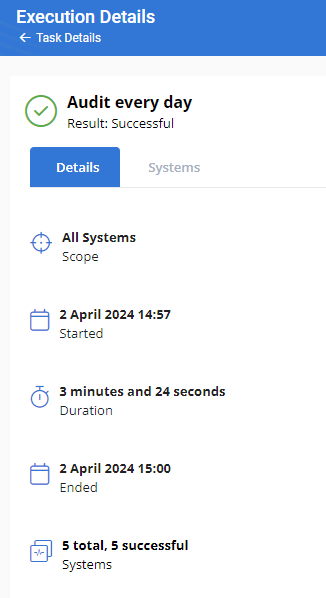
| Field | Description |
|---|---|
| Details | |
| Scope | Displays the operating systems the task targeted upon execution. Refer to Current Scope in Create or edit a task. |
| Started | Displays the date and time when the task began to run. Refer to Enable Scheduling in Create or edit a task or Start/Stop in View and run a task. |
| Duration | Displays the length of time the task ran for. |
| Ended | Displays the date and time when the task finished running. |
| Systems | As long as the task was not skipped, this field displays the number of individual devices the task targeted and whether the task ran on them successfully or failed. You can drill down by clicking this field to proceed to the Systems tab. Refer to the next section for details. |
| Systems | |
A Systems tab is available for any task that ran and was not skipped, whether or not it ran successfully. Use the drop-down menu in the upper-right corner of the page to filter the list of targeted devices by those the task ran on successfully or those the task failed to run on successfully. The icon next to the device name indicates the status of the run on that device.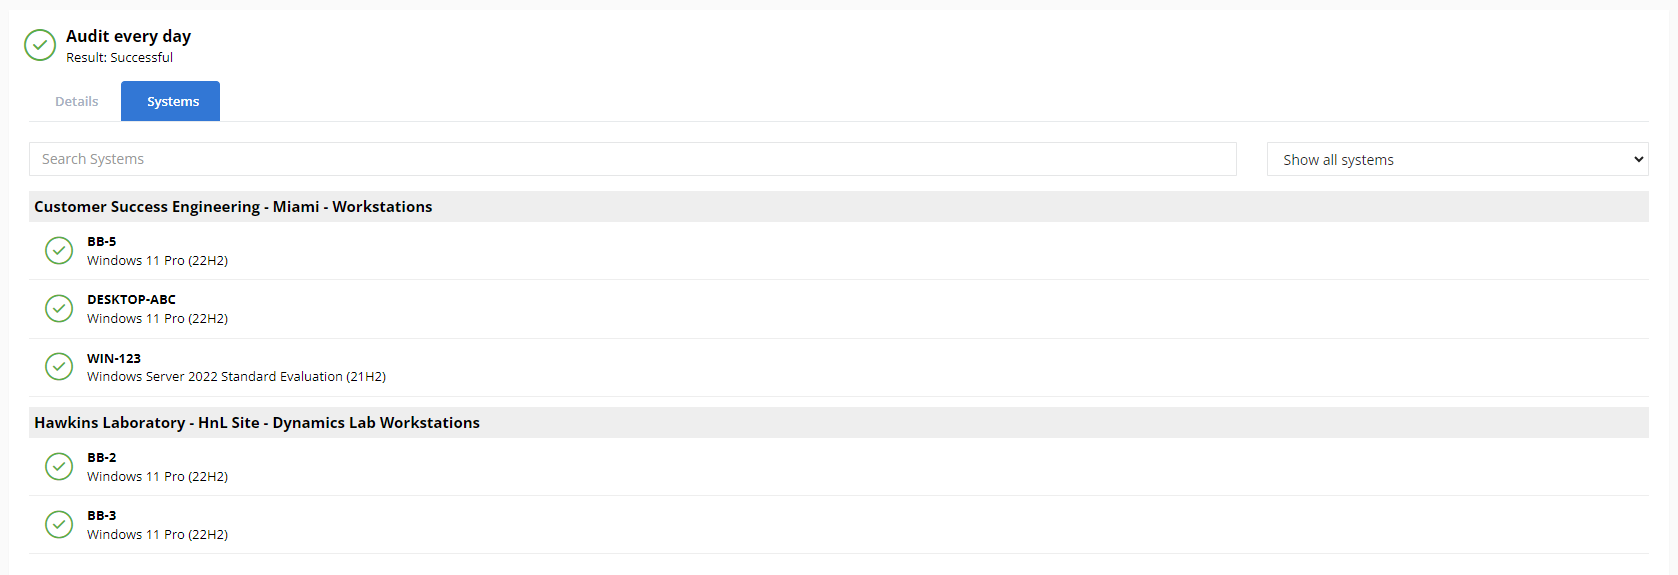 Click a device to view a list of the scripts that ran on the device. |
|
NOTE Tasks can only be deleted from within the User Defined folder and it's subfolders.
Hover over an existing task in the list and click the Delete icon ![]() .
.
The Delete Task dialog box is displayed.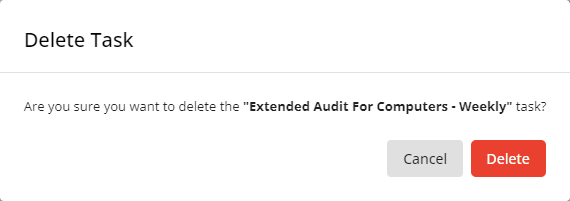
Click Delete to execute the action or Cancel to close out of the dialog box.


