Viewing device details
NAVIGATION Modules > Devices > Device List
PERMISSIONS Device Management > Add Devices
PERMISSIONS Device Management > Delete Devices
The Device List page enumerates all of your devices across all organizations and provides management options for them. It surfaces important details about each endpoint, including its hostname, assigned user and organization, installed software, monitoring status, and more.
This article describes the page's layout and functions.Overview
- In VSA 10, navigate to Devices > Device List.
- View your managed endpoints, grouped by organization.
As you navigate, you'll see the following features and fields:
| Feature | Definition | ||||||||
| Filter by | Click to select additional criteria by which you can refine your search, including by scope, group, tag, and type | ||||||||
| Search By System | Perform a basic search to filter the current view to matching records; for extended search options, refer to our Finding and managing devices article | ||||||||
| Managed devices list | Indexes all devices that match the current selections in the Search By System field, sorted by organization; the information appearing in the list is as follows:
Click any entry in the device list to populate its extended details and management options in the device details pane. Refer to Device details pane for more information. |
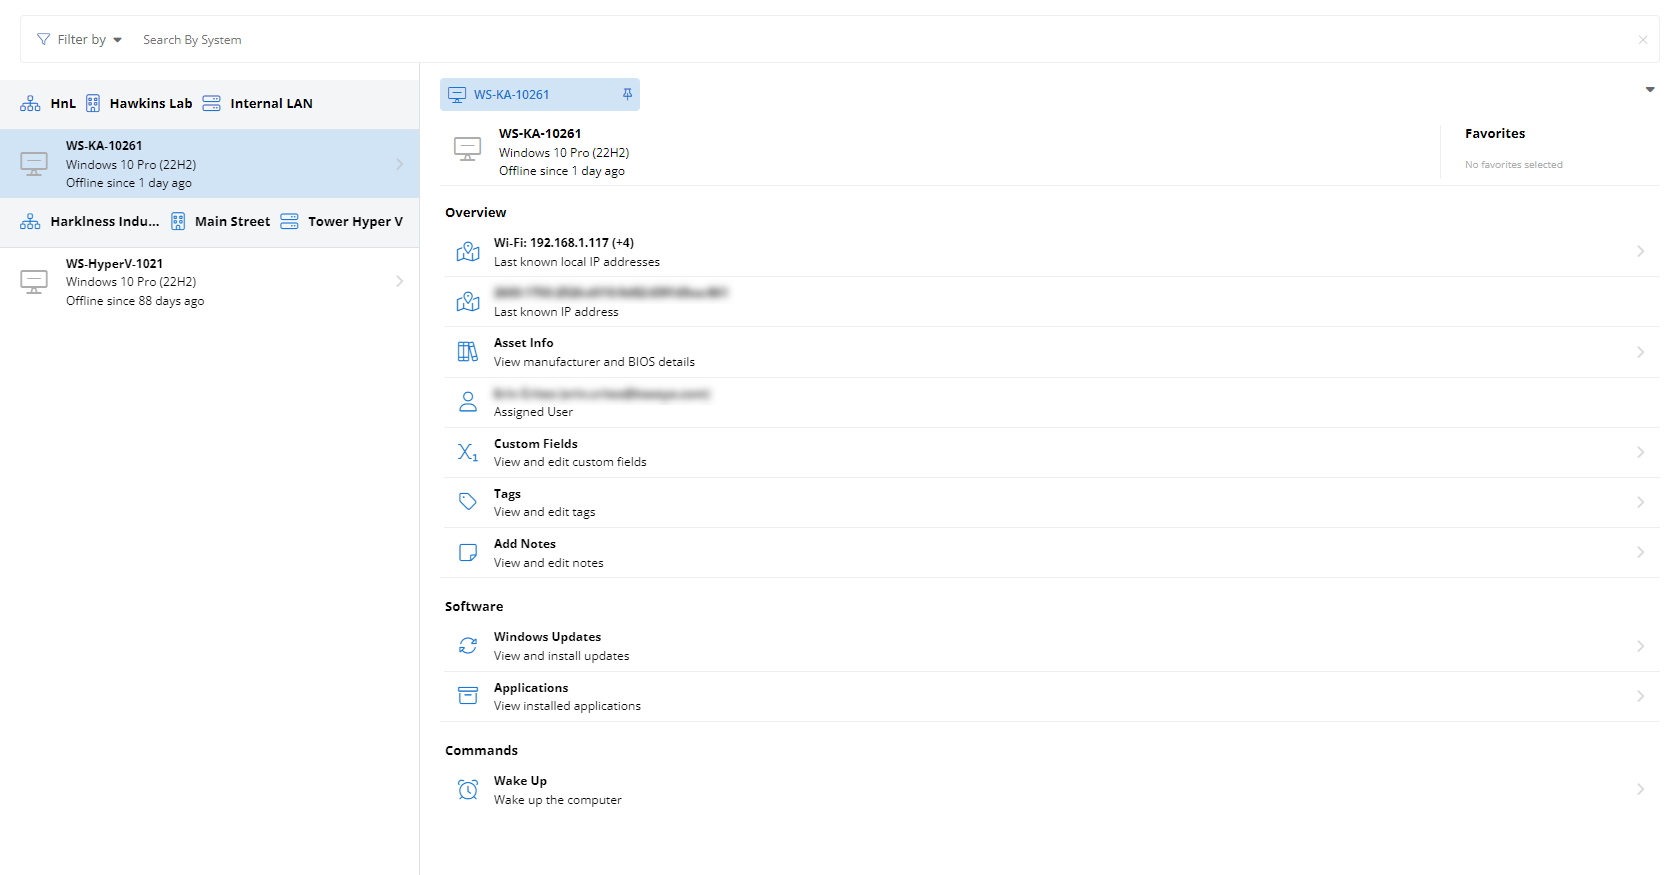
This pane enables you to review attributes of a selected device and take management actions.
NOTE Availability of device fields and management options may vary depending on the device type and its online status.
The following details and management options are available from this location.
Header
| Field | Definition |
Device tabs | Switch between multiple pinned devices; click |
| Hostname, operating system, last check-in date, online status |
| Favorites | Provides quick-access shortcuts to fields you've favorited in the device details pane; refer to the More functions section of this article to learn more |
Overview
| Feature | Definition |
| CPU Usage | Current percentage of CPU resources in use by the device; click to view usage trendlines covering the period of the endpoint's current uptime. |
| Memory Usage | Amount of RAM out of the device's total in use; click to view usage trendlines covering the period of the endpoint's current uptime. |
| Local IP addresses | The device's last known local IP addresses; hover or click to see an extended list. |
| External IP address | The device's last known public IP address. |
| Asset Info | View details about the device’s hardware, BIOS, and operating system. |
| Assigned Users | Name and email address of the user or users to whom the device is assigned. |
| IT Documentation | Click to view all internal IT documentation related to the device. |
| Policies | Click to view polices applied to the device. |
| Custom Fields | View and edit the user-defined information you've elected to audit about this device. |
| Tags | View and manage the categorization tags associated with the device. |
| Add Notes | View and edit the device's administrator notes. |
| Notifications | View notifications for this device. |
| Last known location | Clicking Last Known Location opens a single view with device status, key identifiers, location details (address, coordinates, last seen), and a map centered on the latest location. NOTE This applies to MDM managed iOS and iPadOS devices only. |
| Management type | View the management type (Agent or MDM) for the device. |
| Workflow Activity | View workflow and manage activity for the device. Refer to Viewing workflow activity. |
Details
| Feature | Definition |
| Hardware | View hardware temperatures and fan speeds |
| Network | View monitored network interfaces. NOTE For this to show, network interface monitoring must be enabled on the device. Refer to Enabling network interface monitoring. |
| Storage | Audit storage usage on the device. For supported devices, background file transfer can be initiated here. Refer to Background file transfer. |
| Printers | Managed mapped printers and jobs. |
| Services | View , start, and stop device services. |
| Processes | Manage running processes. |
| Users | Managed logged in users. |
| Chat | Chat with logged in users. NOTE For this to show, User Chat must be enabled on the device. Refer to Enabling User Chat. |
| Screens | Remotely view content on active displays. NOTE For this to show, Screens View must be enabled on the device. Refer to Enabling Screens View. |
| Webcam | Access the device's webcam and take snapshots. NOTE For this to show, Web Cam View must be enabled on the device. Refer to Enabling Web Cam View. |
| Event Log | Review events for the system and installed applications. |
Manage
| Feature | Definition |
| Terminal | Opens a terminal or PowerShell session (where available) on the endpoint as an administrator and execute commands. |
| PowerShell | Starts a PowerShell session on the device and execute commands. |
| Remote Control | Enables connection to and collaboration with any active user session on the endpoint. |
| Remote View (iOS only) | Enables connection to MDM enrolled iOS devices to view the screen and assist with troubleshooting. For more information, refer to Remote View for MDM enrolled iOS devices. |
| Scripts | Deploys scripts to the device from your VSA 10 instance. |
| Diagnostic Logging | Displays if diagnostic logging is enabled or not. Click to change diagnostic logging enablement and/or download device logs. |
| Registry Viewer | Allows users to navigate and view the registry of the target device. Previously viewed registry keys can easily be recalled using the Navigation History icon in the upper right hand corner. |
| Registry Editor | Allows users to navigate and edit the registry of the target device. For more details, refer to Editing the registry remotely. |
Software
| Feature | Definition |
| OS Updates | This section allows you to view available and installed updates for Windows OS and Linux OS devices. You can also initiate a check for available updates, and install updates. |
| Applications | Review the applications present on the device. |
| Agent Version | Surfaces the version of the VSA agent installed on the device and whether it's up to date. |
Endpoint Protection
| Feature | Definition |
| Security | View the status of and configure the device's security software. |
| Endpoint Backup | Click to view and manage backup settings, if configured. |
| Datto EDR/AV | Click to view and manage EDR/AV settings, if configured. |
Commands
| Feature | Definition |
| Lock | Lock the device. |
| Logoff | Log out the console user. |
| Restart | Reboot the device. |
| Shut Down | Gracefully shut down the device. |
| Power Off | Power off the device. |
| Suspend | Suspend the device. |
| Hibernate | Put the device into hibernate mode. |
| Enter Maintenance Mode | Put the device into maintenance mode. |
| Wake Up | Send a Wake-on-LAN (WoL) command to the device . |
The device details pane provides the following additional action shortcuts:
Click the
 icon next to any field where it appears to view extended information and access management features.
Click the
 icon next to any field to add it to the Favorites box. To remove a favorite, click the
  icon next to the field you'd like to remove.
You can view detailed workflow activity for both online and offline devices at Devices > Device List > Overview > Workflow Activity.
NOTE This functionality is also available in the mobile application for iOS and Android.
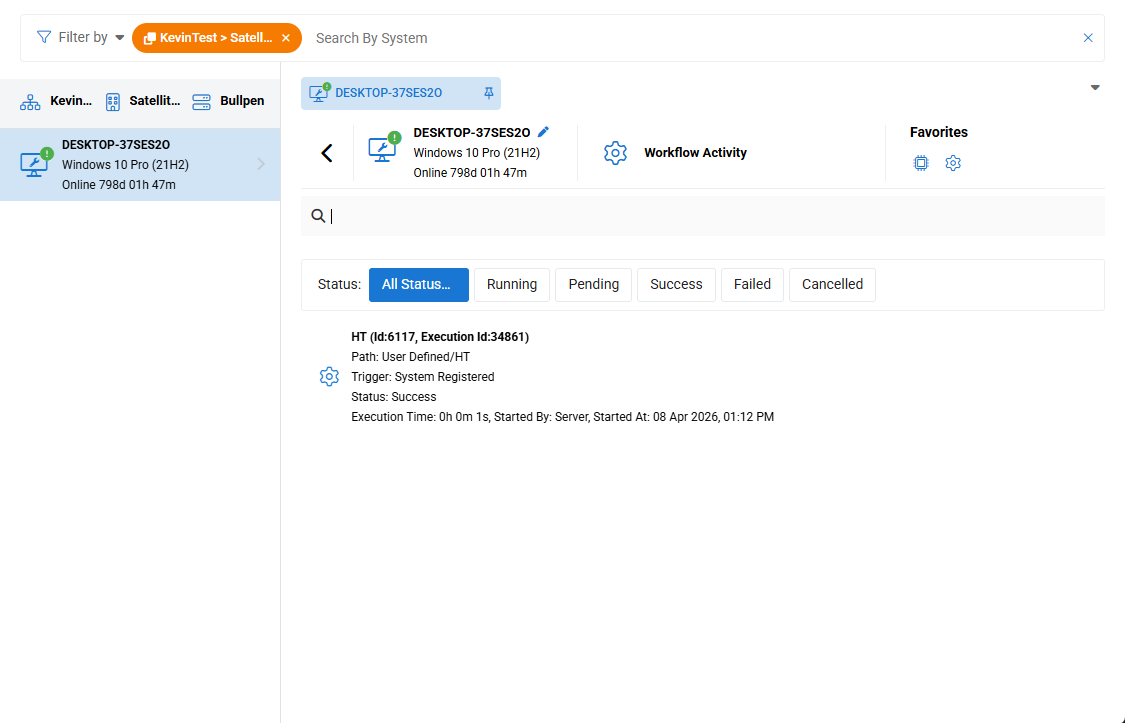
Workflows are then organized into the following status tabs for online agents:
- All Statuses
- Running (Online agents only)
- Pending
- Success
- Failed
- Canceled
Each workflow execution entry displays the following information:
- Name: The name of the workflow.
- Path: The location of the workflow in the Automation Hub.
- Trigger: The trigger type of the workflow.
- Status: The status of the workflow.
- Execution Time: The time the workflow was last run, if it is not pending.
- Started By: Displays who executed the workflow. This shows Server for scheduled workflows.
- Started At: Displays date and time the workflow was started. This shows Created At for pending workflows.
Hover over a workflow execution to view the Actions drop-down menu:
- View: View the workflow configuration.
- Cancel: Cancel the workflow (only available for pending and running workflows)
Canceled executions are displayed with a canceled icon (X) in the Workflow Activity view.
NOTE Users cannot cancel workflows initiated by others unless they have administrator privileges.
Technicians can transfer files and folders to and from Windows, macOS and Linux devices directly from the device card storage browser at Devices > Device List > Details > Storage, without requiring a remote desktop session or interrupting the end user. They can also delete files from the remote device.
![]()
The following bulk actions are available while navigating the device's file structure:
![]()
- Upload: Select multiple files or a single folder on the technician’s local machine for upload to the currently selected folder on the remote device. When clicked, prompts you to select which files or folder to upload to the remote device.
- Download: Select one or more files and/or folders from the currently selected folder on the remote device to download. If multiple files or a single folder is selected, the content will be downloaded as a ZIP file. When clicked, adds check boxes to the right of the files and folders in the currently selected folder. After at least one item is selected, click Download at the top of the page and confirm your choice in the popup to download the selected items to your browser's default file download location.
- Copy To: Select one or more files and/or folders from the currently selected folder on the remote device to create a copy of in another location on that device. When clicked, adds check boxes to the right of the files and folders in the currently selected folder. After at least one item is selected, click Copy To at the top of the page and confirm the location the files will be copied to in the popup.
- Move To: Select one or more files and/or folders from the currently selected folder on the remote device to move to another location on that device. When clicked, adds check boxes to the right of the files and folders in the currently selected folder. After at least one item is selected, click Move To at the top of the page and confirm the location the files will be moved to in the popup.
- Delete: Enables selection of one or more files and/or folders from the currently selected folder on the remote device. Click the Delete button in the top panel of the device card to initiate the action. When clicked, adds check boxes to the right of the files and folders in the currently selected folder. After at least one item is selected, click Delete at the top of the page and confirm your choice in the pop up to delete the selected items.
NOTE Files that are necessary for core system function, such as %WINDIR%\system32 on Windows devices, or Windows junction points, can not be deleted using this interface.
You can also perform file management actions on individual items by hovering over a file or folder and clicking Actions.
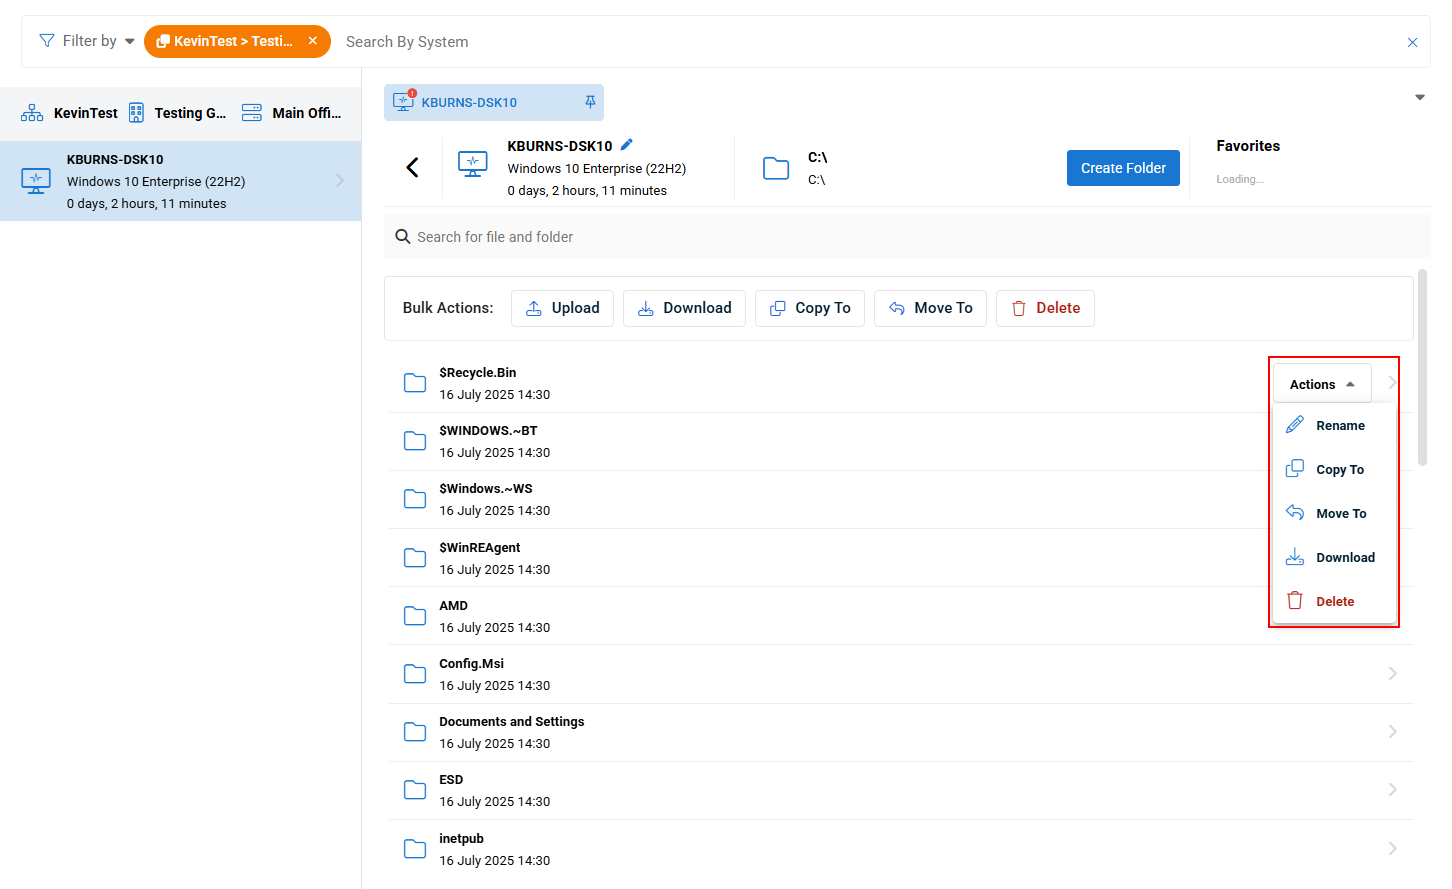
The following file management actions are available in the Actions menu:
- Rename: Rename the file or folder.
- Copy To: Create a copy of the file or folder in another location on the remote device. Confirm the location the files will be copied to in the popup.
- Move To: Move the file or folder to another location on the remote device. Confirm the location the files will be moved to in the popup.
- Download: Download the file or folder to your device. If a folder is selected, the content will be downloaded as a ZIP file. Confirm your choice in the popup to download the selected file or folder to your browser's default file download location.
NOTE Download is limited to files up to 2 GB in size.
- Delete: Delete the file from the remote device. Confirm your choice in the pop up to delete the selected items.
NOTE Upload and download functions are enabled for all devices with Storage enabled in a System Details device configuration profile. The Delete function is not available unless a File Browser device configuration profile with the Enable File Delete option enabled.
NOTE File operations are recorded in the Audit Log with the File Transfer category.
Technicians can view and edit the registry of Windows devices directly from the device card at Devices > Device List > Manage > Registry Editor, without requiring a remote desktop session or interrupting the end user.
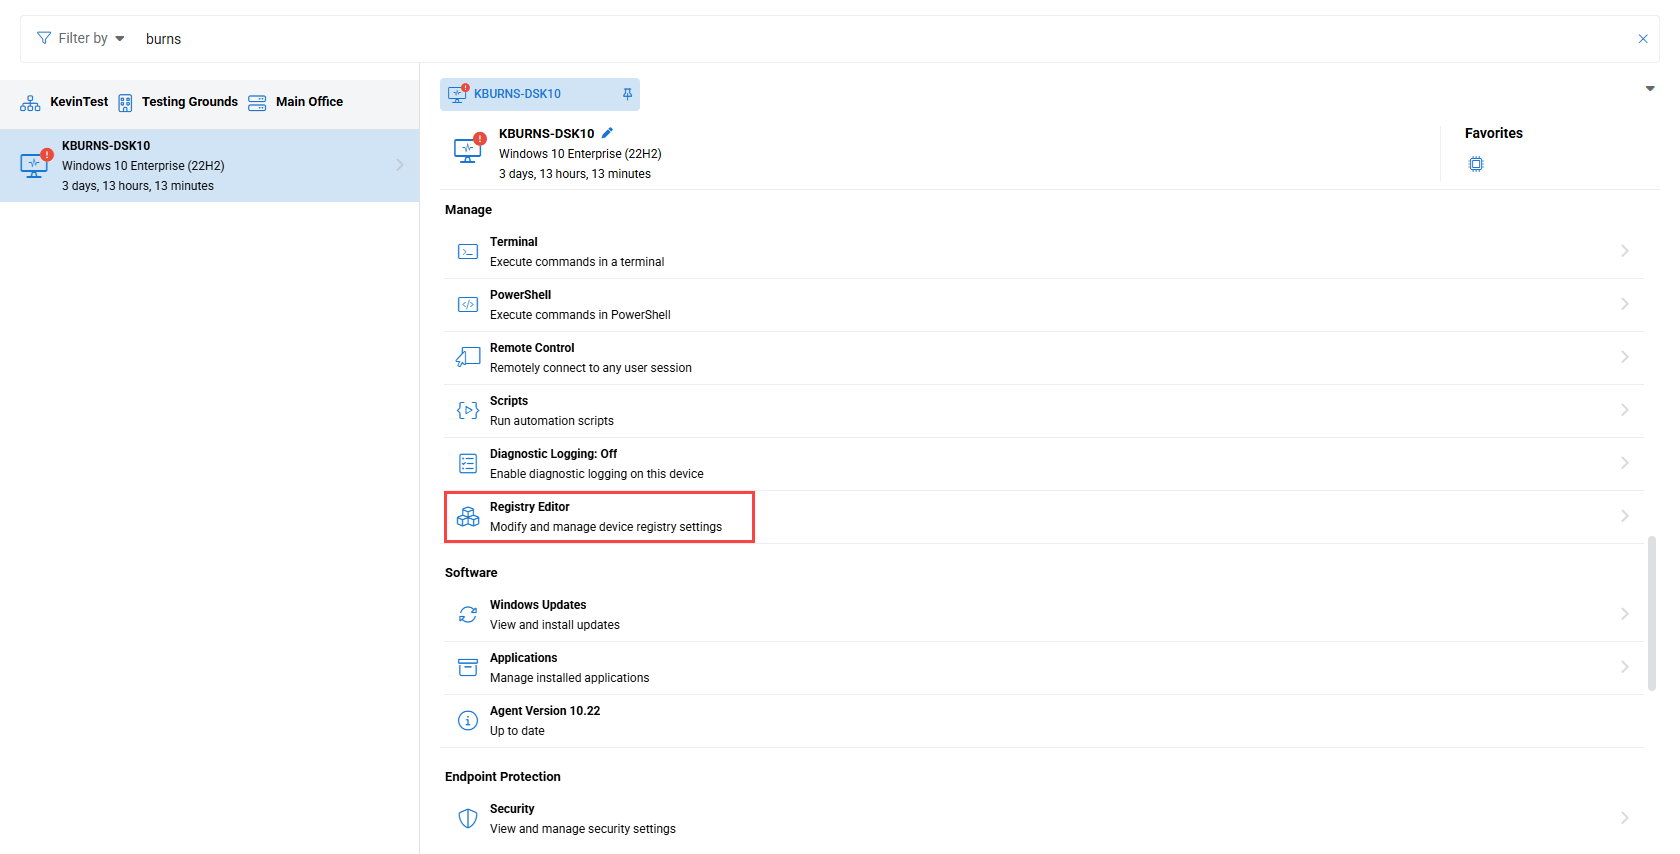
IMPORTANT Editing the registry of a Windows device must be done with care, as changes to the registry applied incorrectly can cause issues with the function of the device. Only edit the registry if you have complete confidence in the changes you are making. It is recommended that before you make any changes to a device's registry, that you create a back up. Refer to Back up the registry.
Expand the sections below to learn more about this tool's functions.
How to:
Upon clicking the Registry Editor tool for a device, it will pop up a new window where you can navigate the device's registry tree.
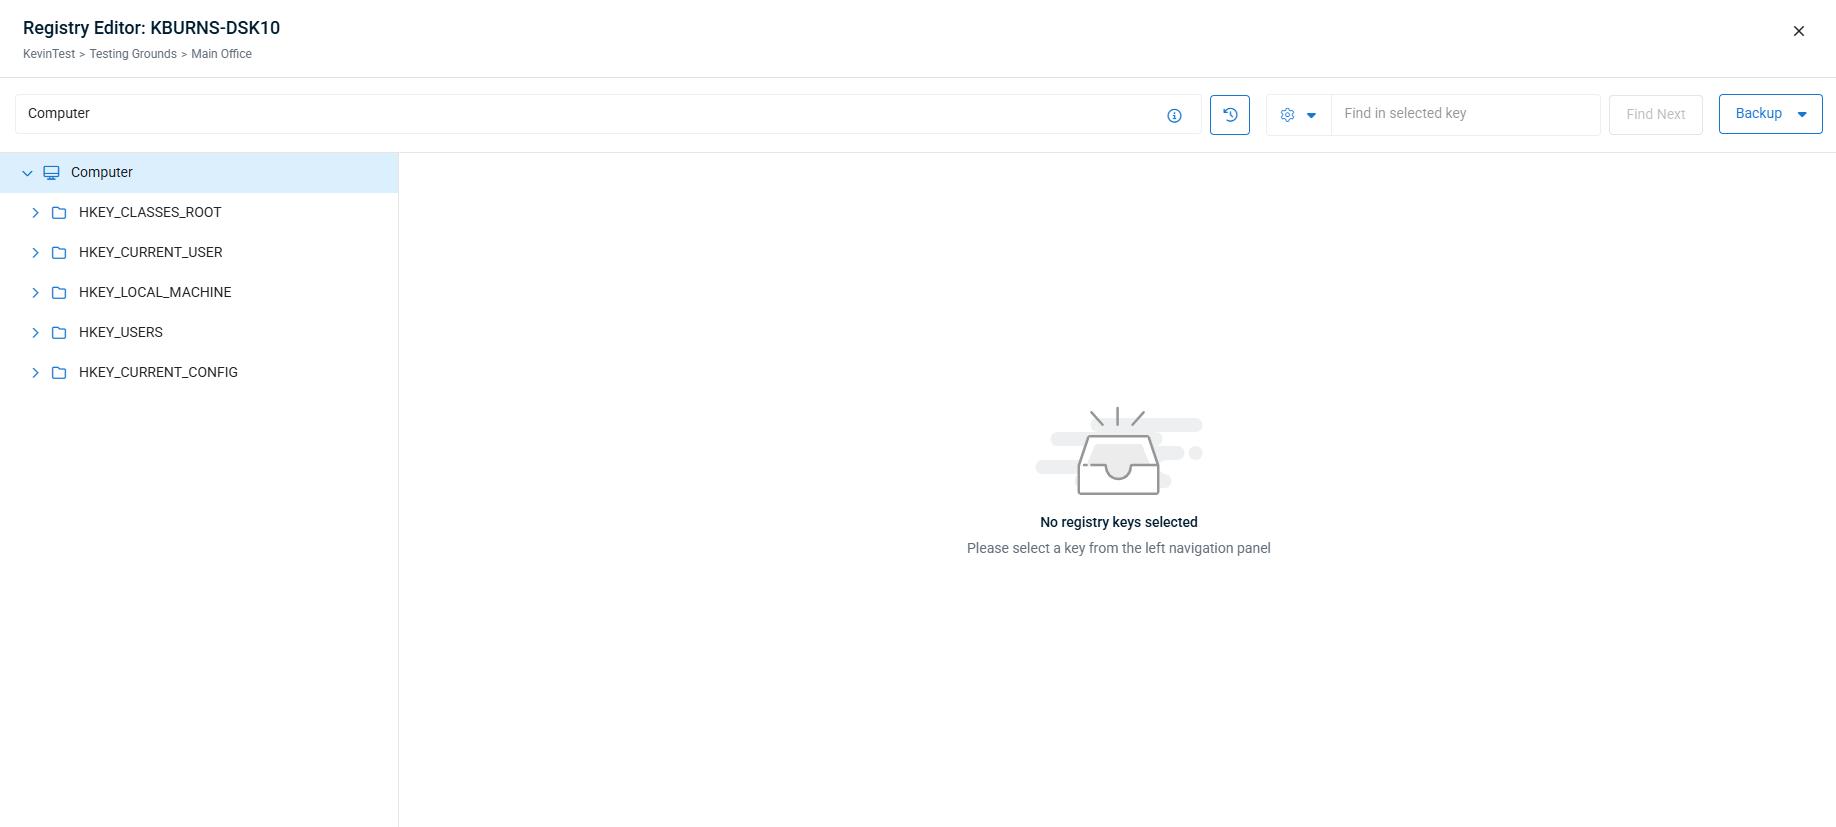
Use the left navigation menu to navigate the registry hierarchy. Click the drop-down arrows to expand the root keys (also called hives) to view the keys and subkeys within. Once you've found they registry key or subkey you want to review, select it to view it's values.
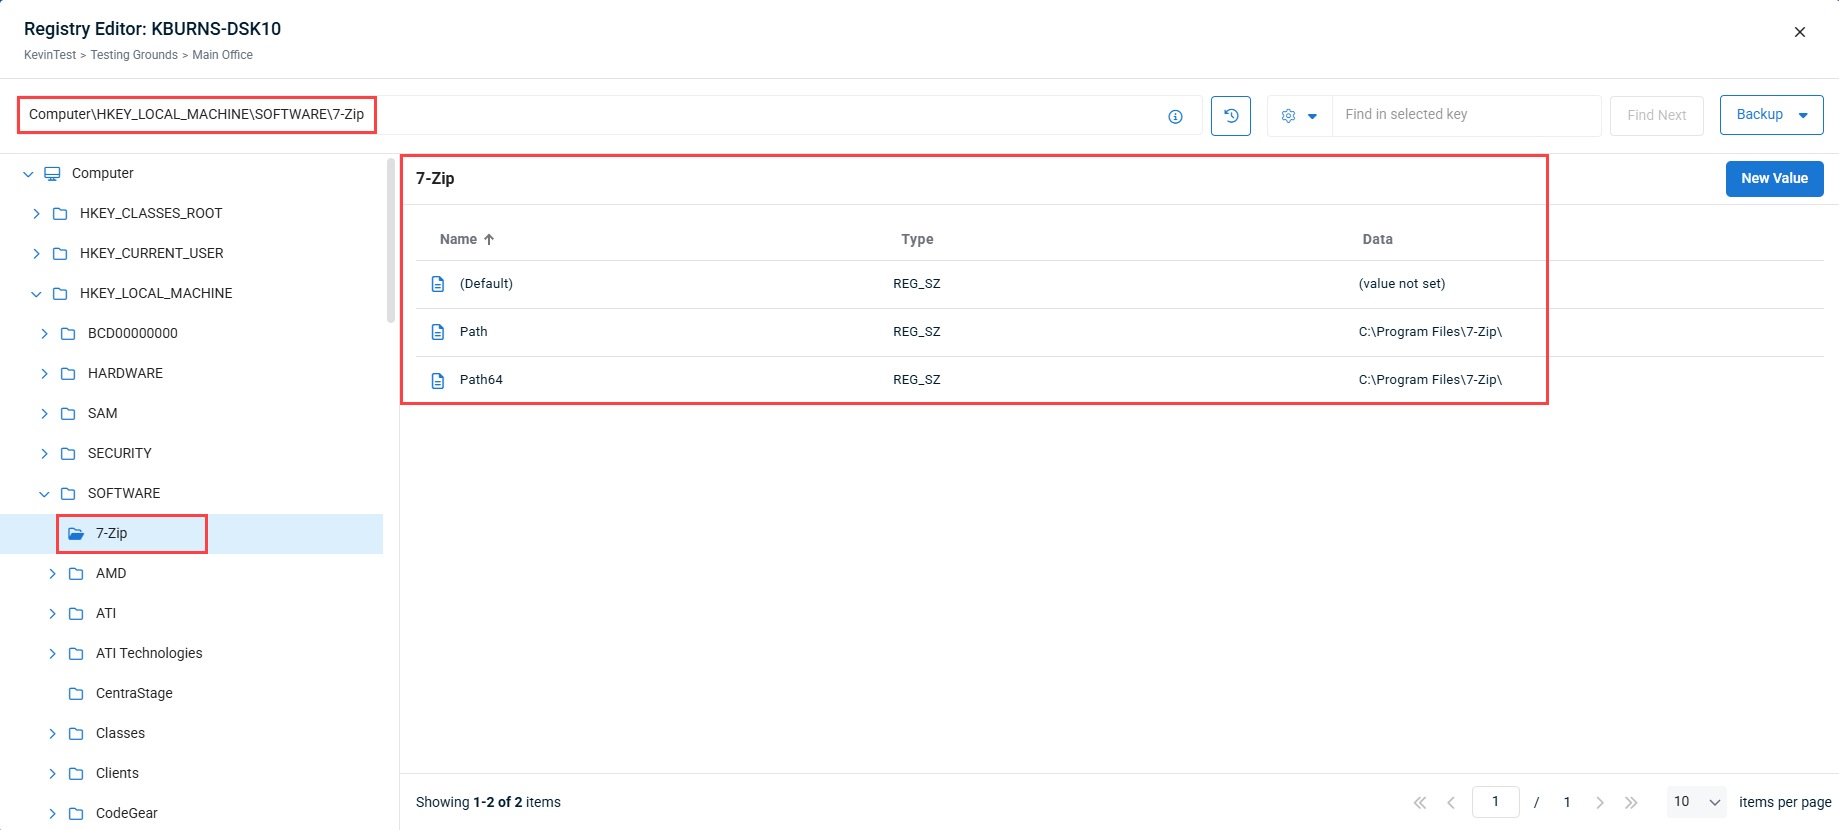
NOTE While navigating, the path you have selected will be displayed in the address bar at the top of the window.
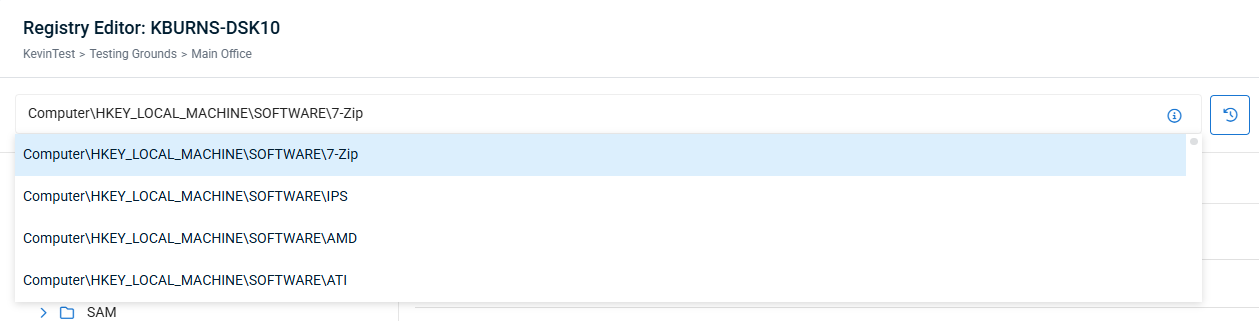
If you have the full or partial path of a registry key, you can paste it into the address bar and a drop-down will display, showing the key closest matching the path you entered at the top, and listing the other keys in that branch of the registry tree below.
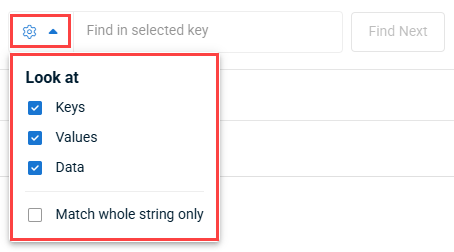
You can search the registry using the search bar in the upper right of the Registry Editor window.
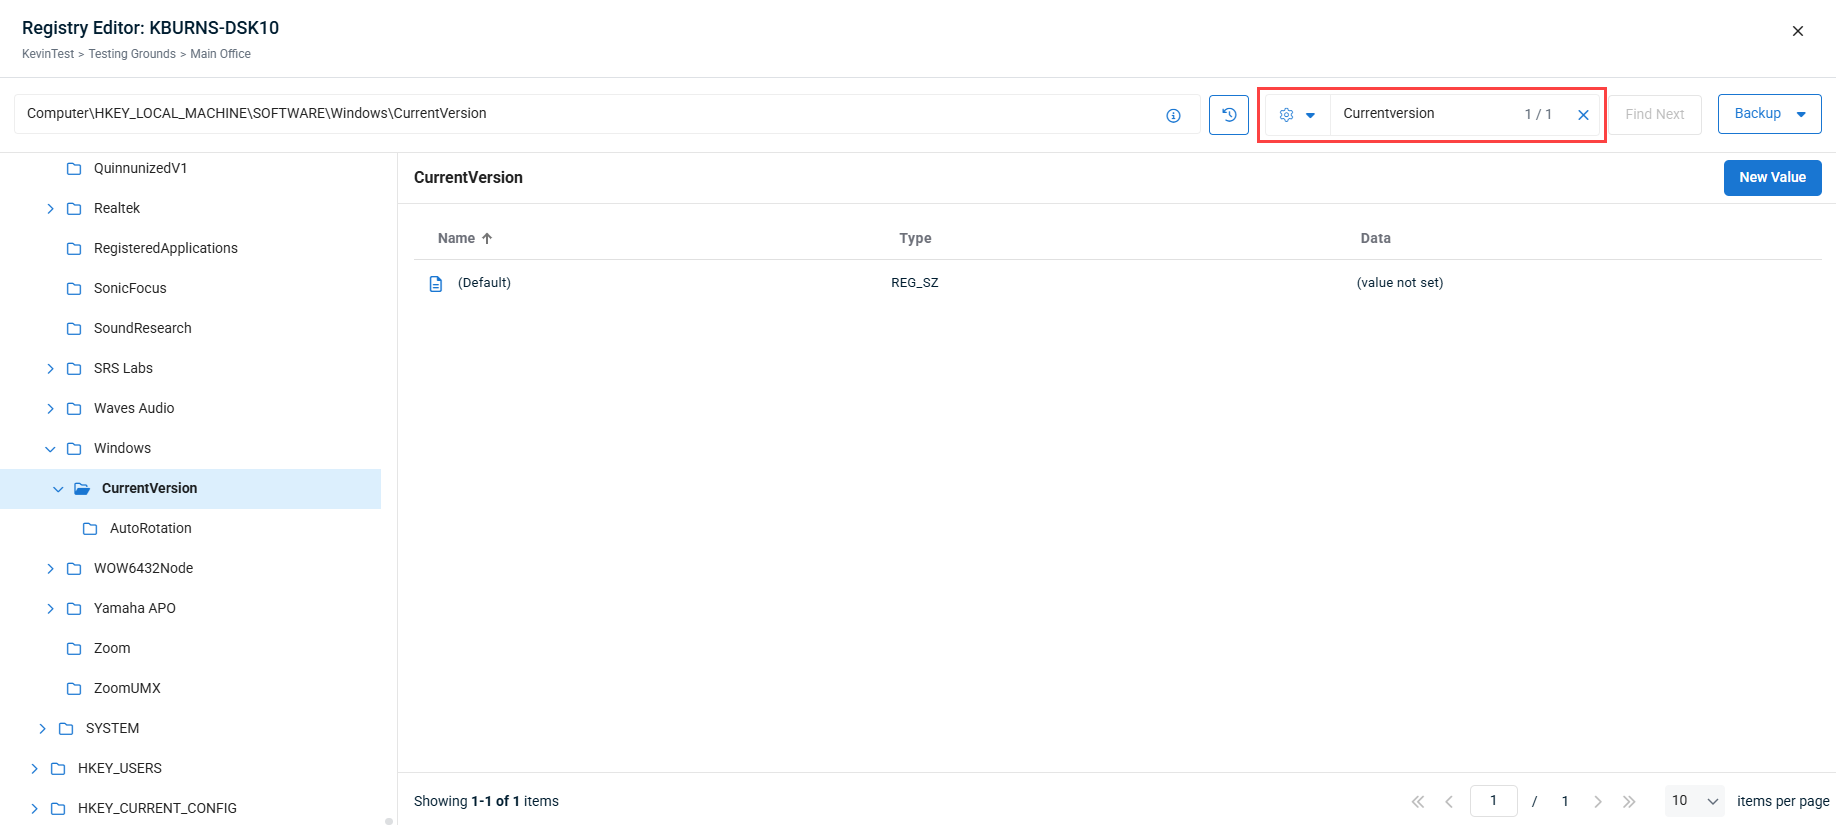
Before performing a search, you can optionally view and configure the search options using the gear icon to the left of the search bar. You can then select the checkboxes that correspond to the entities within the registry you wish to search, selecting any combination of Keys, Values, and/or Data. You can also choose whether you want your search to only include results that match the full search string.
In order to perform a search:
- Using the left hand menu, navigate to the branch or key where you wish to perform the search.
NOTE You can select Computer from the left hand menu to search all keys within the registry.
- Enter in your search string in the search bar, and click Find Next.

- A progress window will pop up, after which a results window will pop up with the number of search results. To view your search results, click Open.
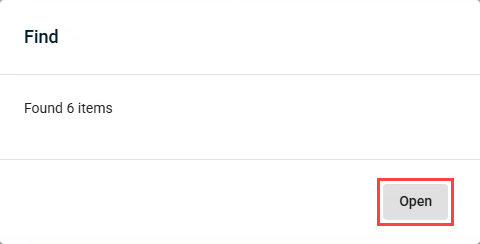
NOTE If there are no results, the results window will display a message, and suggest trying another keyword.
- The first search result will show, with the Registry Editor automatically navigating you to where it is located, and bolding the text of the relevant key or value.
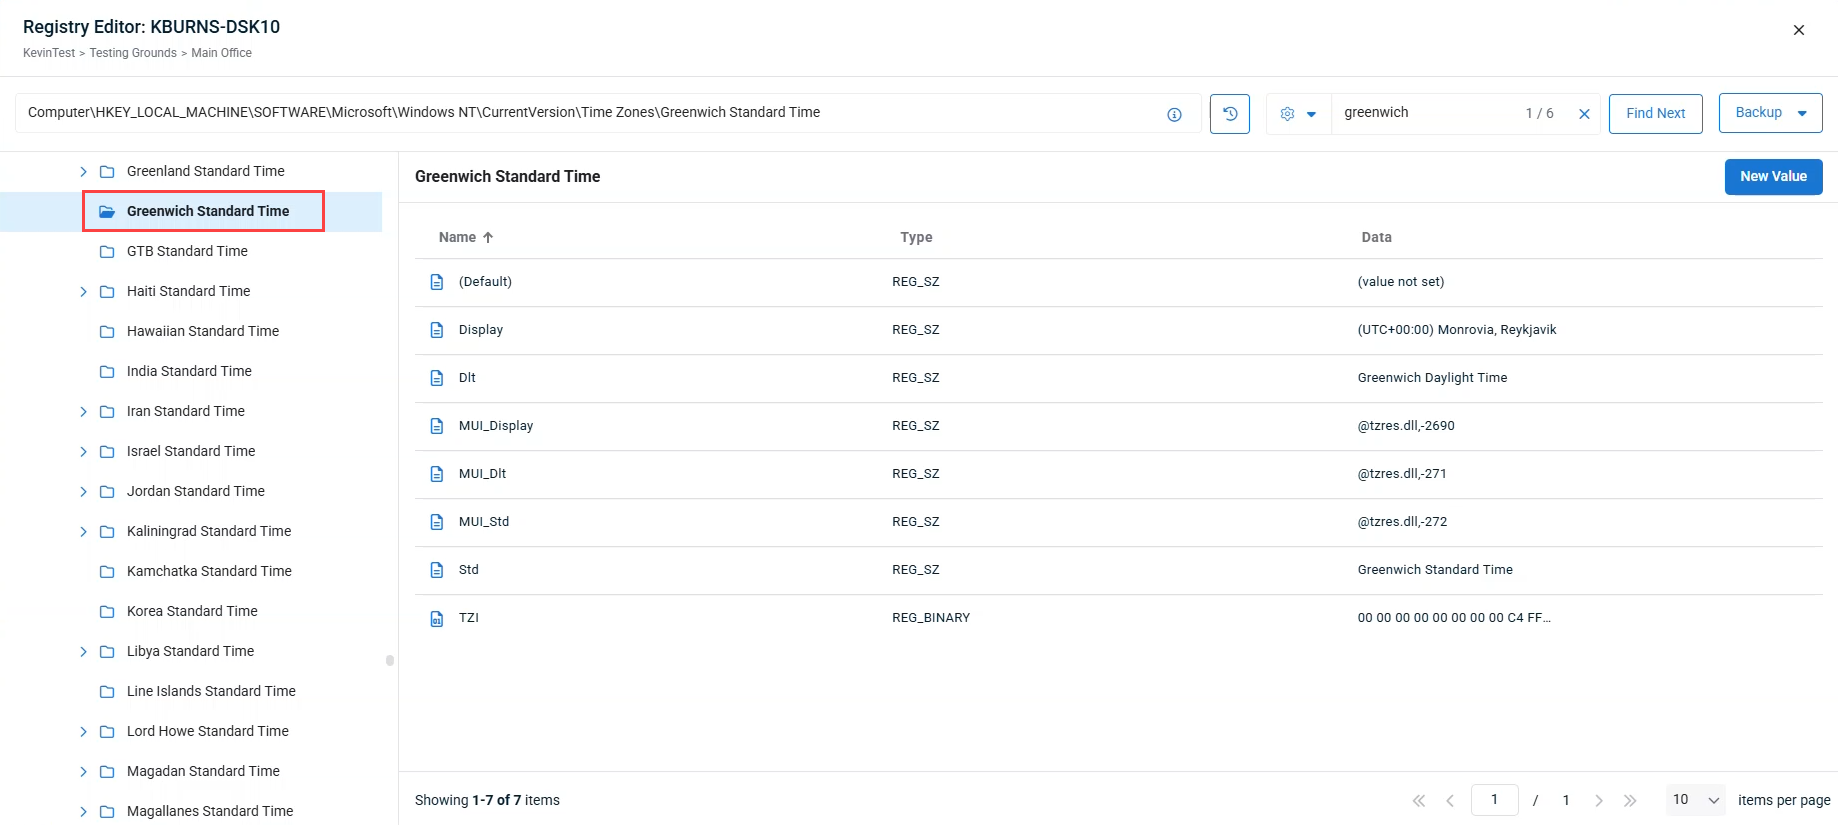
NOTE If there is more than one search result, you can cycle through them by clicking Find Next again. An indicator in the search bar will indicate which search result you are looking at numerically.

You can view a list of the last ten locations you visited in the Registry Editor, and quickly navigate to them, by following the steps below:
In the Registry Editor, click the Navigation History button to the right of the search bar. This will drop down a list of the last ten locations you visited.
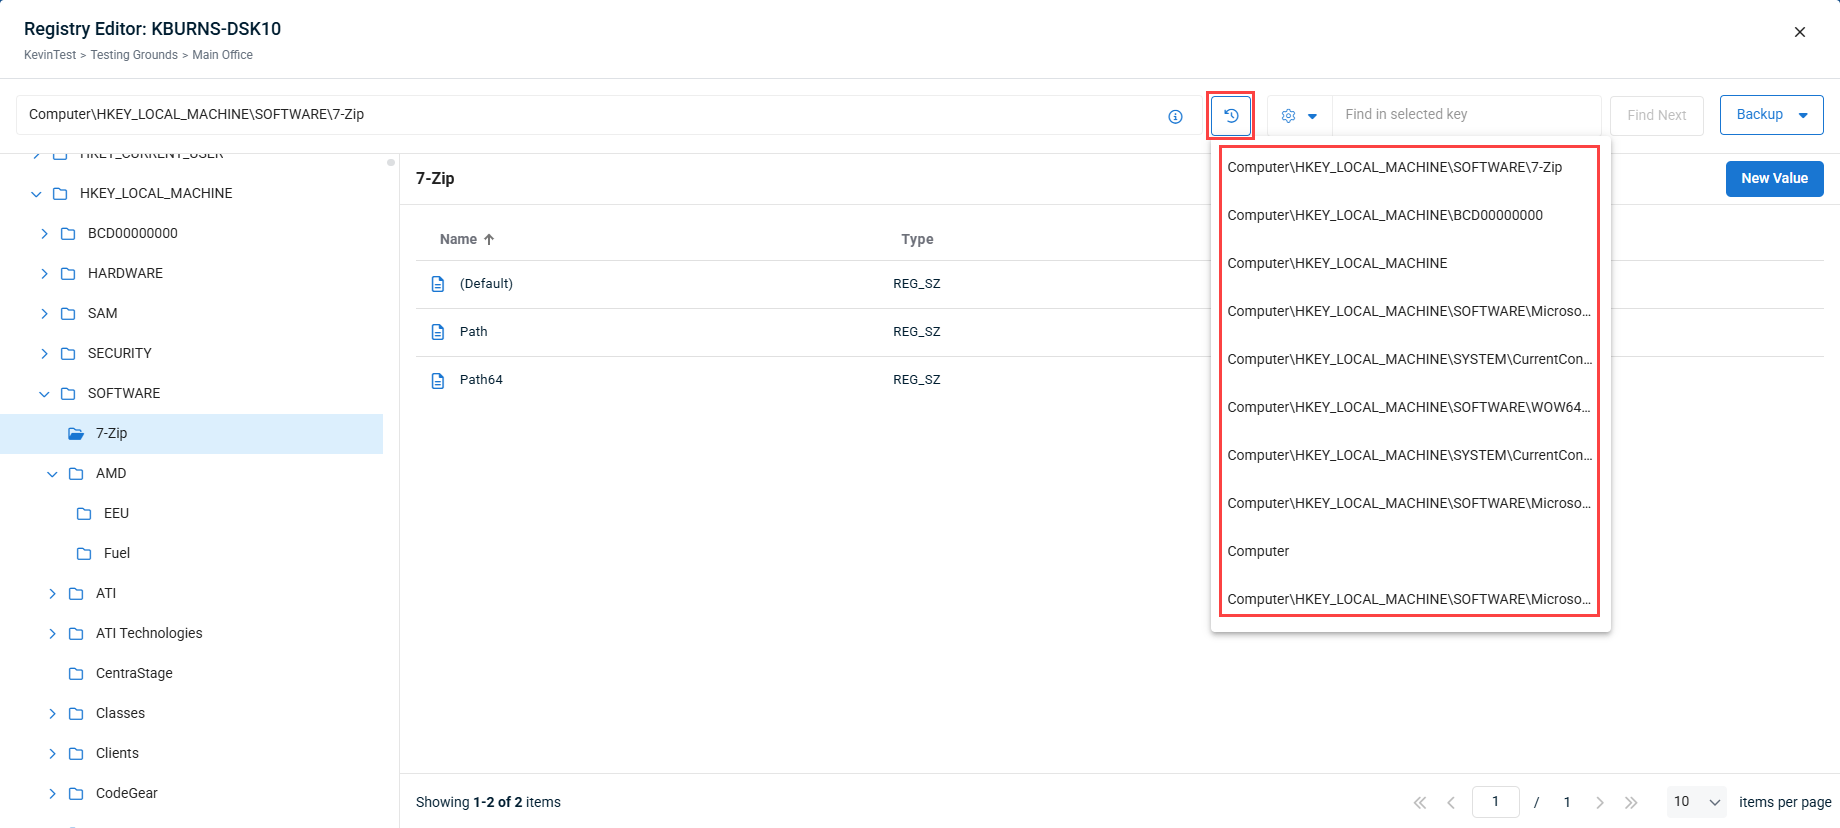
Click one of the paths on the list to be immediately taken to that location.
NOTE Before editing the registry, it is recommended you first create a back-up. To learn how to create a registry back-up, refer to Back up the registry.
You can edit registry keys using the Registry Editor by following the steps below:
- Using the left hand menu, navigate to the registry key that contains the value you want to edit.
- Hover over the value and click the Edit icon.
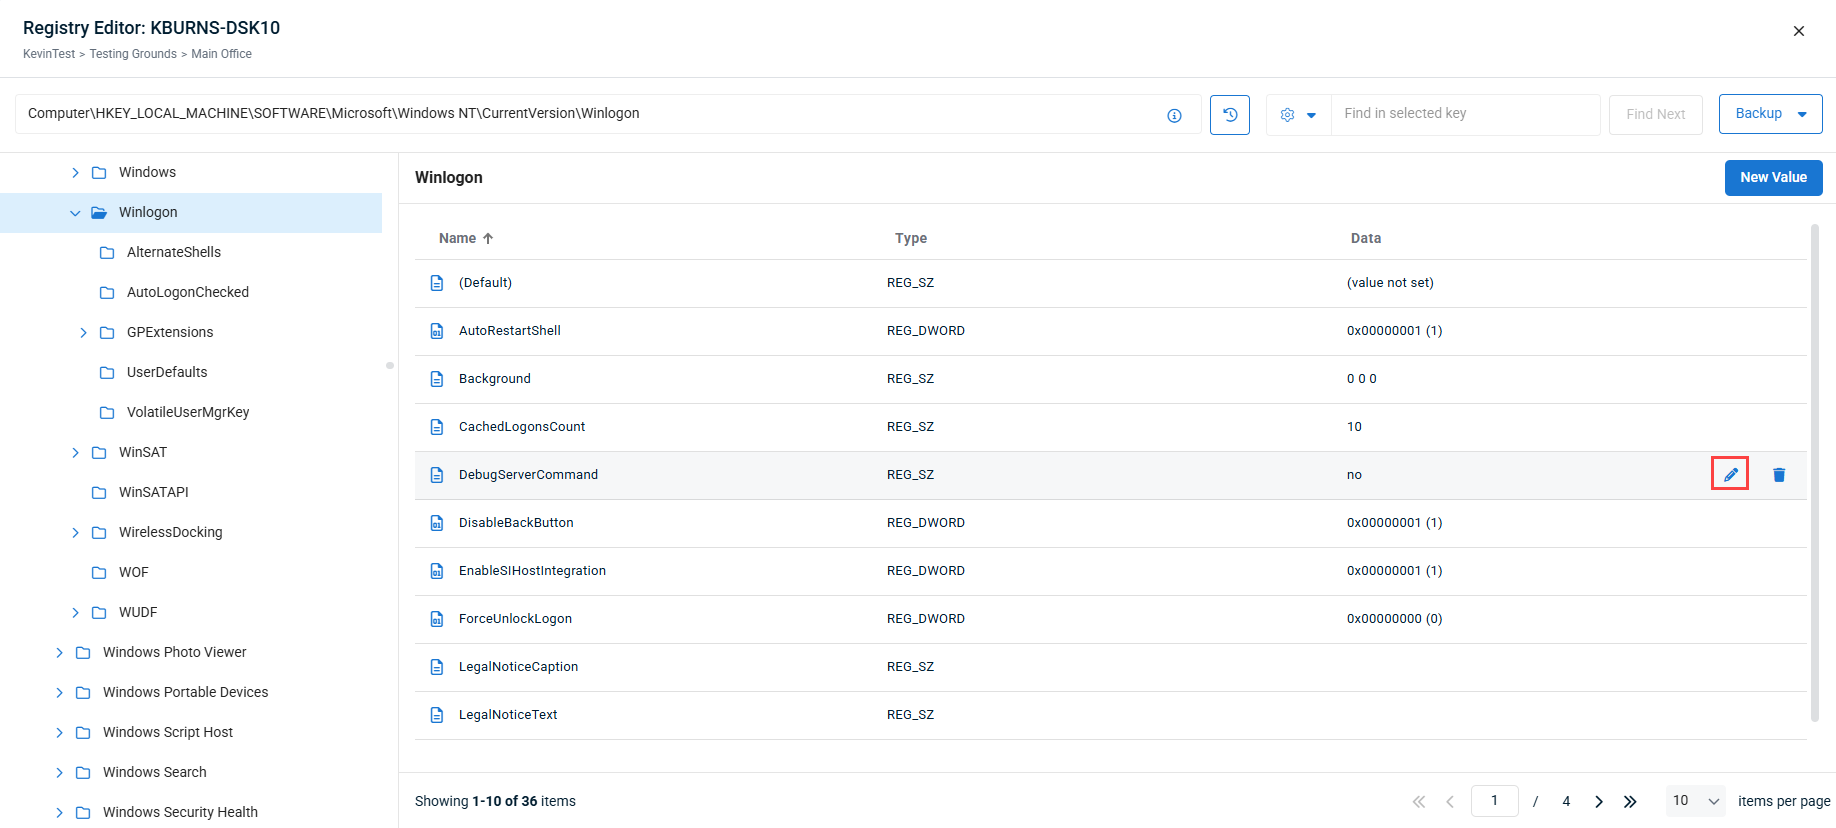
- In the Edit Value window, edit the Name and Value fields as needed.
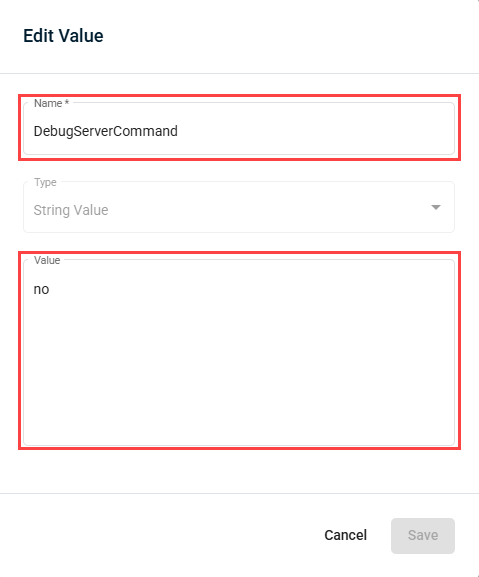
- Click Save to save your changes and close the Edit Value window.
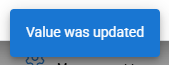
- After your change is applied, the message Value was updated will display at the bottom of the window.
NOTE Before creating new registry keys, it is recommended you first create a back-up. To learn how to create a registry back-up, refer to Back up the registry.
You can create new registry keys using the Registry Editor by following the steps below:
- Using the left hand menu, navigate to the location where you want to create a new key.
- Hover over the location and click the options menu, and select New Key.
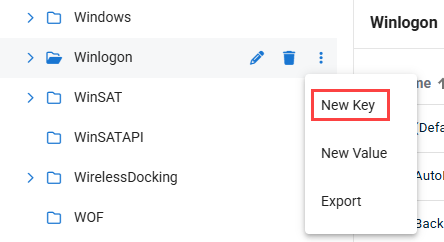
- In the New Key window that appears, enter a name for the key, and click Create to create the key and close the pop-up.
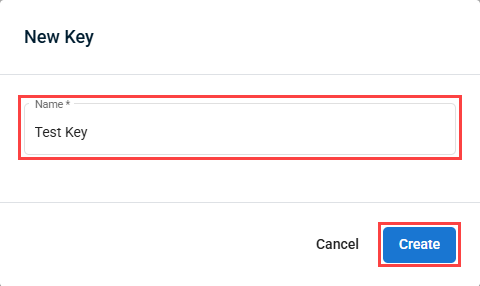
- Once the key has been created, a confirmation message will appear at the bottom of the window.

NOTE Before creating new registry key values, it is recommended you first create a back-up. To learn how to create a registry back-up, refer to Back up the registry.
You can create new registry key values using the Registry Editor by following the steps below:
- Using the left hand menu, navigate to the location where you want to create a new key.
- Hover over the location and click the options menu, and select New Value. Alternately, you can use the New Value button in the upper right.
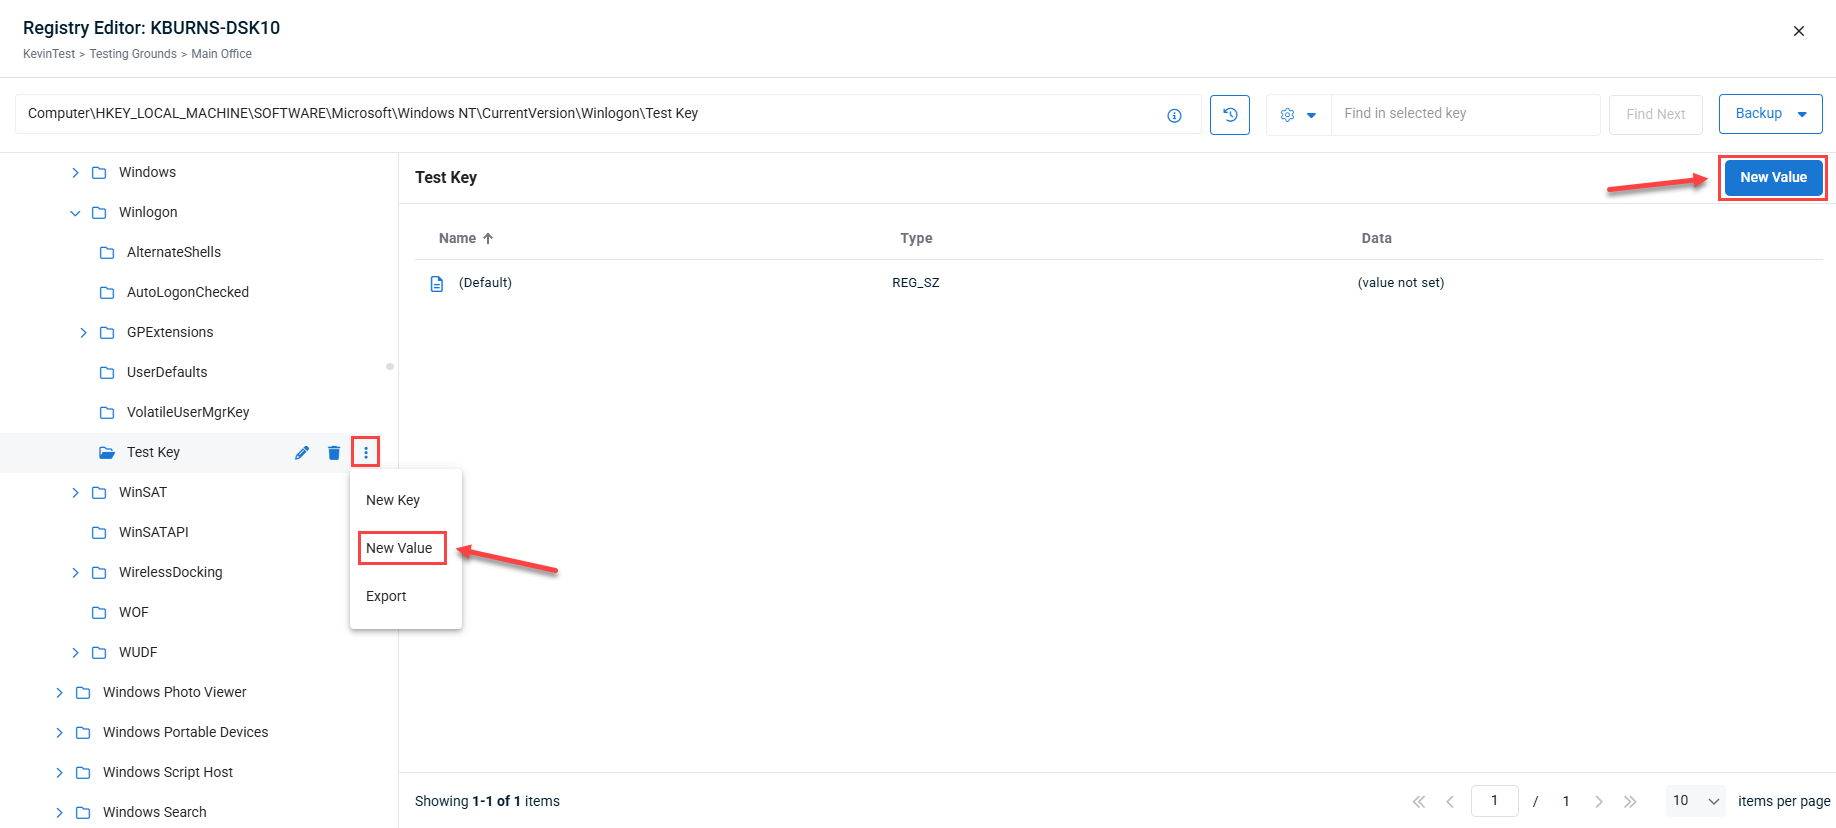
- In the New Value window that appears, enter a name for the value, select the value type, enter the value data if needed, and click Create to create the value and close the pop-up.
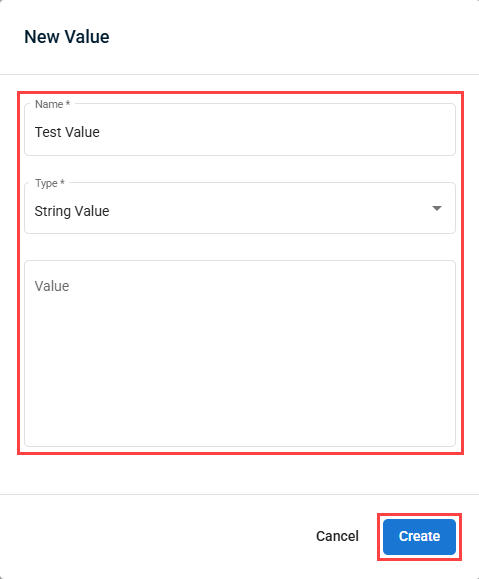
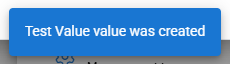
- Once the value has been created, a confirmation message will appear at the bottom of the window.
NOTE Before deleting any registry keys, it is recommended you first create a back-up. To learn how to create a registry back-up, refer to Back up the registry.
You can delete registry keys within the Registry Editor tool by following the steps below:
- Using the left hand menu, navigate to the registry key that you want to delete.
- Hover over the key and click the Delete icon.
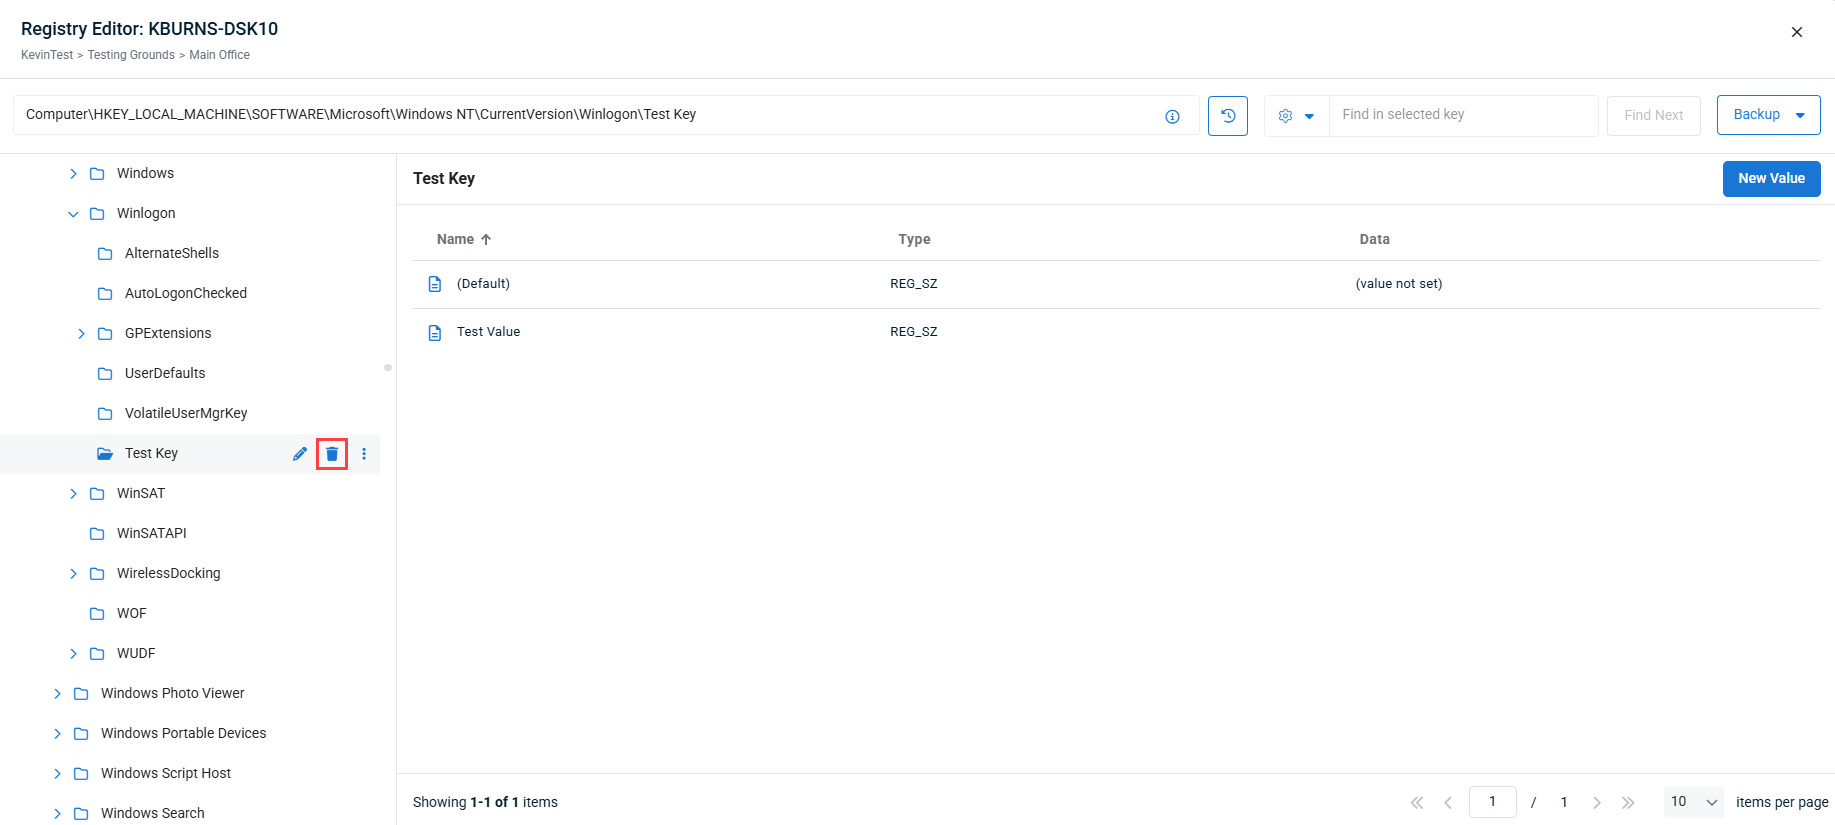
- In the Delete Key pop-up that appears, check the box next to I am sure that I want to delete this key and click Delete to confirm deletion and close the pop-up.

- After the value has been deleted, a confirmation message will display at the bottom of the window.

NOTE Before deleting any registry key values, it is recommended you first create a back-up. To learn how to create a registry back-up, refer to Back up the registry.
You can delete registry key values within the Registry Editor tool by following the steps below:
- Using the left hand menu, navigate to the registry key that contains the value you want to edit.
- Hover over the value and click the Delete icon.
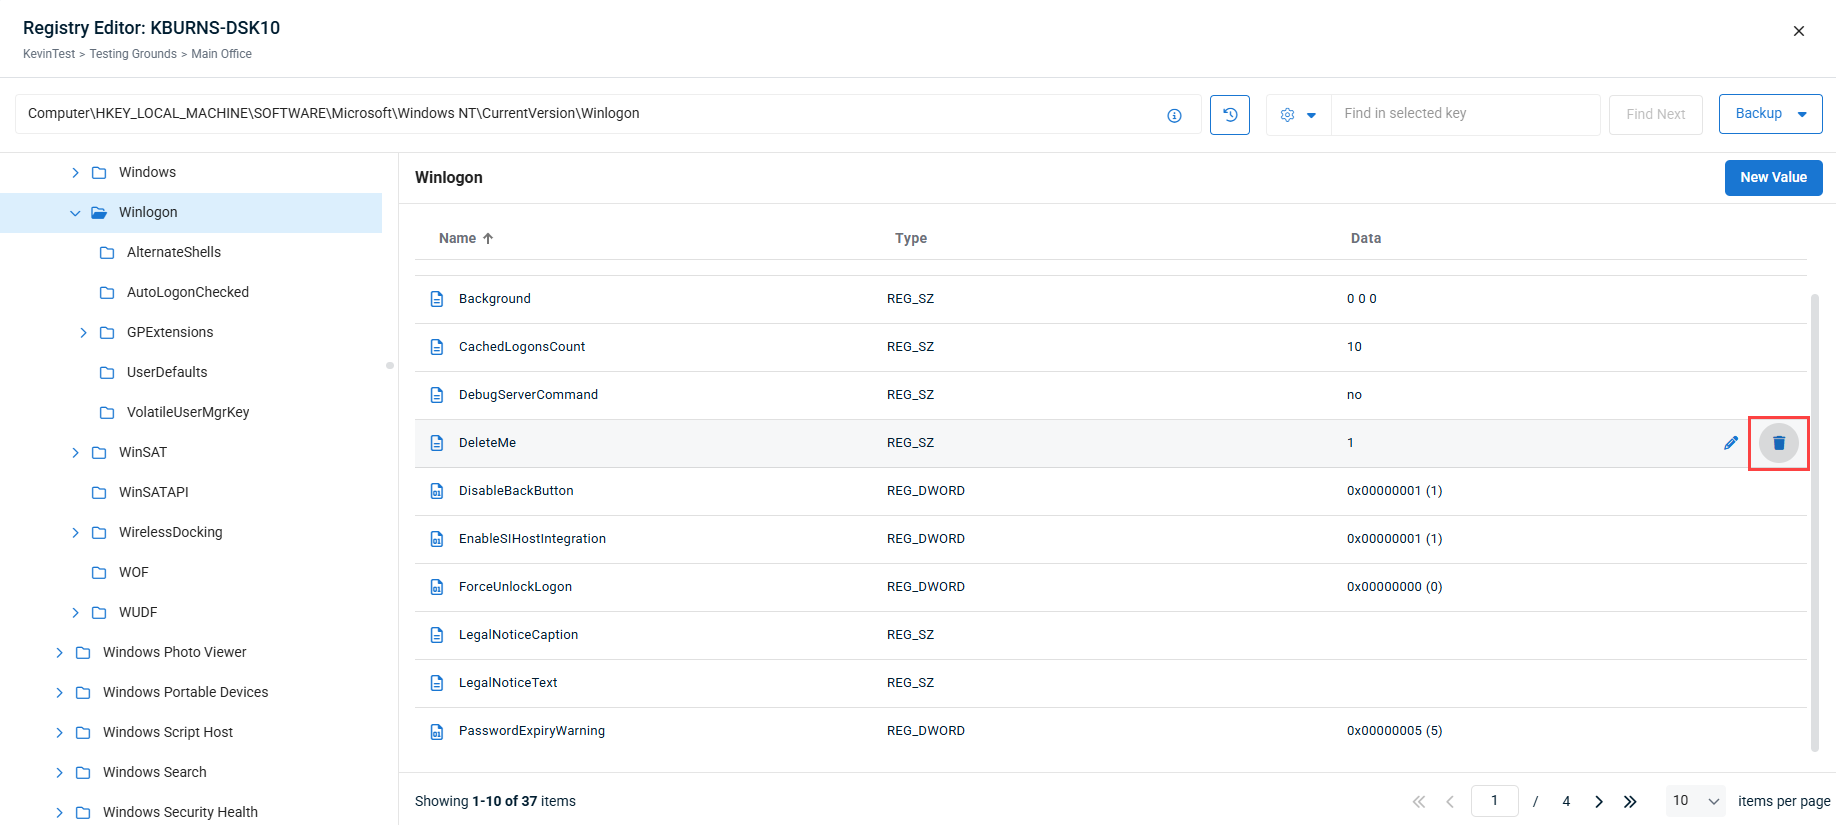
- In the Delete Value pop-up that appears, check the box next to I am sure that I want to delete this value and click Delete to confirm deletion and close the pop-up.
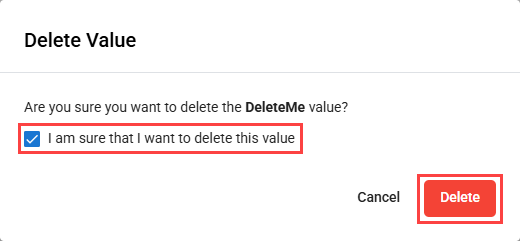
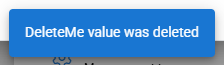
- After the value has been deleted, a confirmation message will display at the bottom of the window.
You can use the Registry Editor to back up the entire registry or a specific branch or key, allowing you to easily revert back to a previous configuration.
Select a scenario below to learn more.
In order to use the Registry Editor to export a back up one or more entire branches of the registry, follow the steps below:
- Using the left-hand menu, navigate to the branch you want to back up, if needed, select the Backup menu in the upper right, and choose Export.
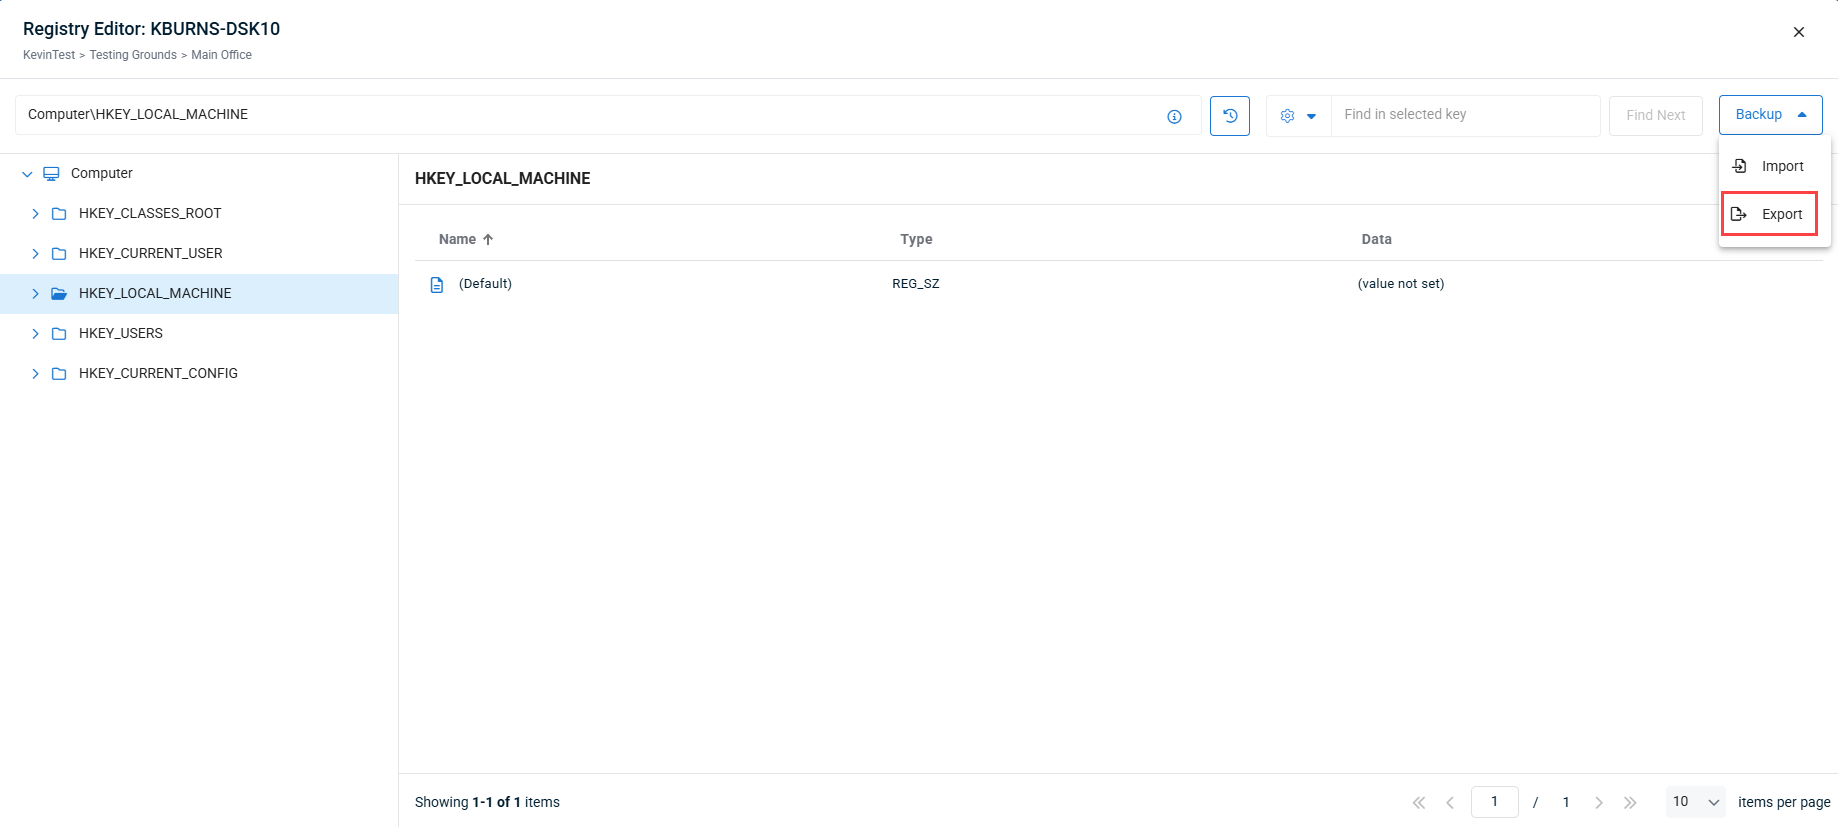
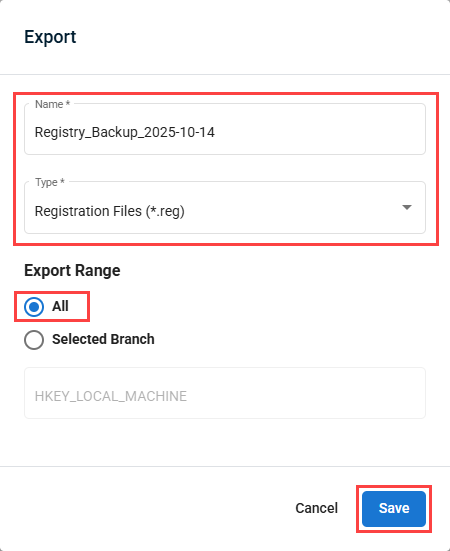
- In the Export window that appears, change the name if needed, select the export file type (.reg or .txt) and ensure the Export Range is set to All. Click Save when finished to initiate the download and close the Export window.
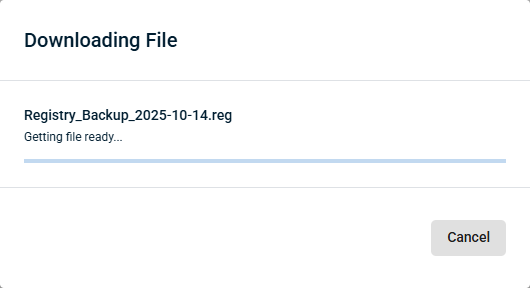
- The Downloading File window will appear, with a progress bar. When the progress bar has completed, the window will close and the registry backup will download to your browser's default download location.
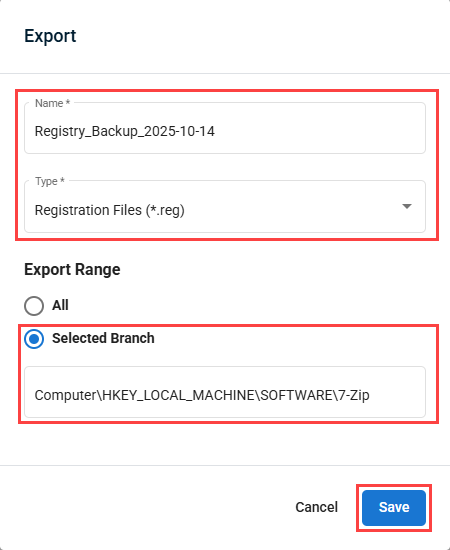
In order to use the Registry Editor to export a back up a registry key, follow the steps below:
- Using the left-hand menu, navigate to the key you want to back up.
- Hover over the location and click the options menu, and select New Value. Alternately, you can use the New Value button in the upper right.
- In the Export window that appears, change the name if needed, select the export file type (.reg or .txt) and ensure the Export Range is set to Selected Branch. Click Save when finished to initiate the download and close the Export window.
- The Downloading File window will appear, with a progress bar. When the progress bar has completed, the window will close and the registry backup will download to your browser's default download location.


