Patch Management custom titles
NAVIGATION Modules > Patch Management > Custom Titles
PERMISSIONS Patch > View Policy
PERMISSIONS Patch > Edit Policy
Via the Custom Titles page, you can add any third-party application of your choice to the list of software you'd like to manage in VSA 10's managed by VSA 10's Patch Management.
This article describes the page's layout and functions.NOTE To learn how to work with VSA 10's patch management feature, refer to Creating/editing Patch Management policies.
Overview
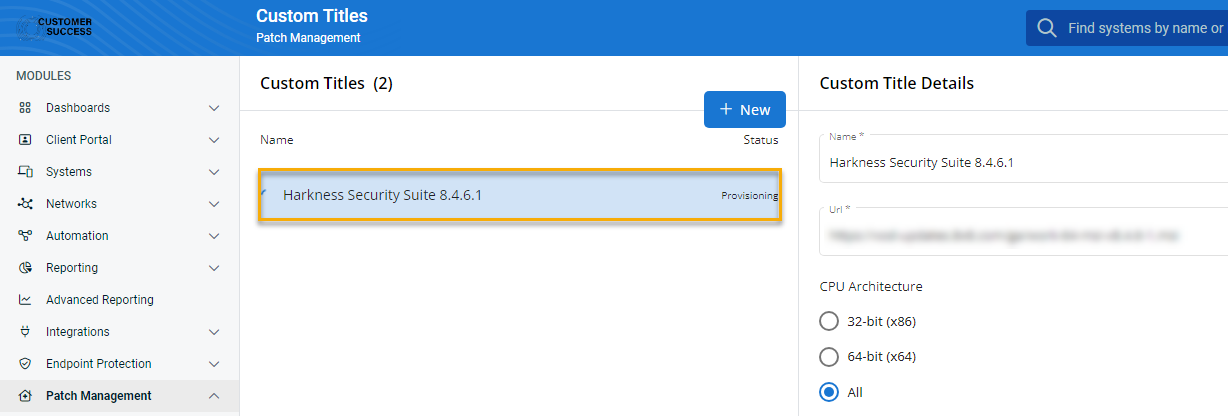
From the left navigation menu in VSA 10, navigate to Patch Management > Custom Titles.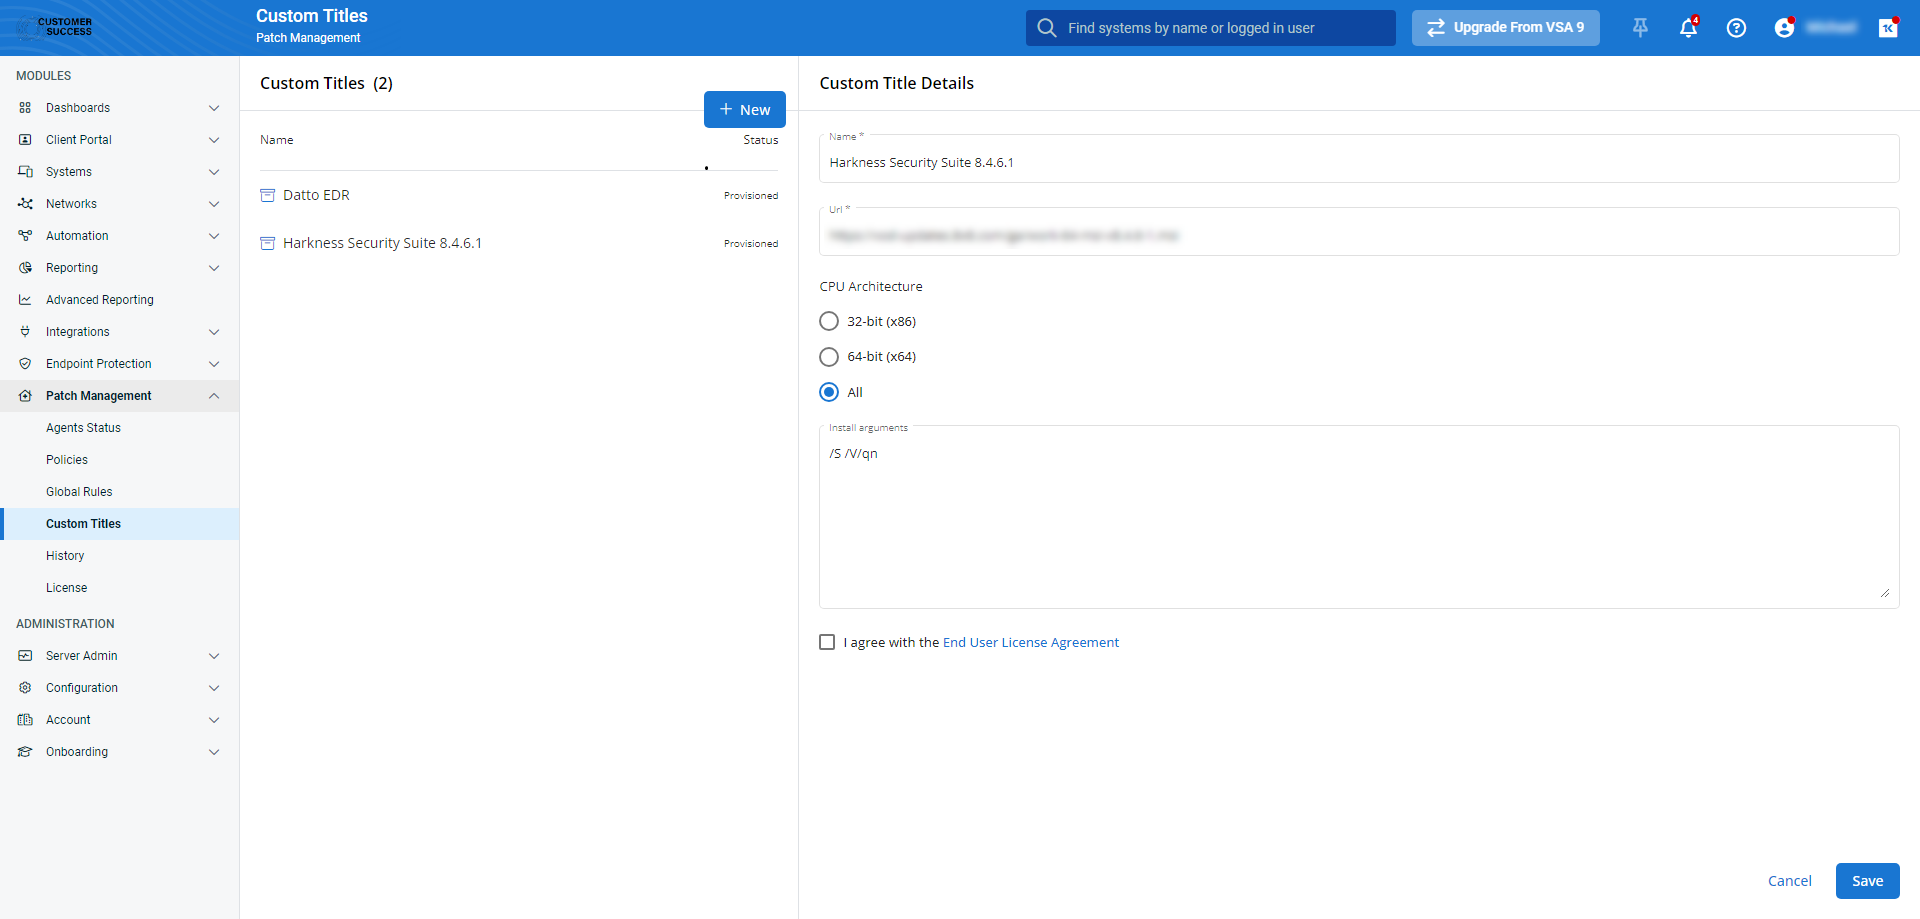
As you navigate, you'll see the following features and fields:
| Feature | Definition |
|---|---|
| Custom Titles list | Provides an index of all third-party applications manually added to your VSA 10 software catalog, sorted alphabetically; click any entry to view and edit its details |
| Custom Title Details | Displays extended information about the application and enables you to manage its installation parameters |
| + New | Begins the custom title creation workflow; to learn more, refer to Create a custom title |
| Field | Definition | ||
|---|---|---|---|
| Name | The name of the application as it appears in your software catalog | ||
| Status | Indicates the provisioning status of the application in your catalog; possible values are Provisioning or Provisioned | ||
Actions | Click any entry in the list to open the custom title in view or edit mode; move your mouse over any list entry to reveal the following options:
|
| Field | Definition |
|---|---|
| Name | The name of the application as it appears in your software catalog |
| URL | The direct download link to the application's installer |
CPU Architecture | Designates the type of processor architecture supported by the application; VSA 10 uses this value to identify compatible endpoints |
Install arguments | Optional field within which you can provide deployment instructions (such as silent install) for the installation package |
I agree with the End User License Agreement | Select to agree to the Kaseya acceptable use policies when creating or updating your custom title |
How to...
Create a custom title
Host the installer on a public cloud storage provider
NOTE This guide uses Google Drive and Dropbox as examples; however, you can use any cloud provider that supports link sharing.
Before you can create the custom title, you'll need to obtain the direct download link to the third-party application's MSI installer. If you already have it, skip to the Configure the custom title in VSA 10 section of this article.
IMPORTANT The installer file must support installation for all users by default, or command-line installation for all users using standard MSI parameters.
If you don't have a direct download link, you can share the file on a public cloud provider and use the download link it provides. To do so, perform the following steps:
Google Drive
Upload an MSI installer to Google Drive.
In the Google Drive file explorer, click the
 icon next to the installer's name. Then, click Share > Share.
The sharing modal will open.
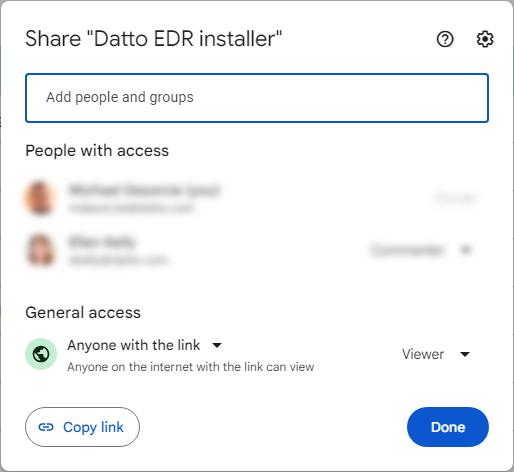
In the General access section, ensure that Anyone with the link can view is selected.
Click Copy link. Google Drive will copy the sharing URL to your computer's clipboard.
Click Done.
Navigate to the Google Direct Link Generator page.
Paste the sharing link you copied into the Enter your sharing URL field.
Click Create Direct Link.
Copy the contents of the Output link field to your computer's clipboard.
Save the URL in a convenient location. Then, proceed to the Configure the custom title in VSA 10 section of this article.
Dropbox
Upload an MSI installer to Dropbox.
In the Dropbox file explorer, click the
 icon next to the installer's name.
The Share this file modal will open.
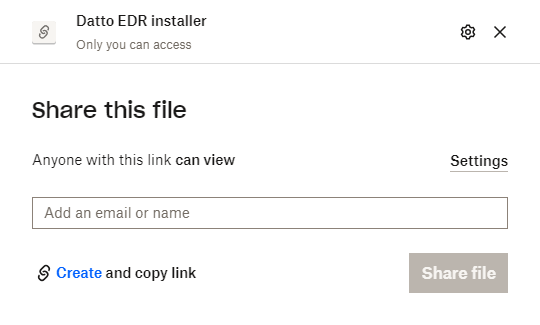
Ensure that Anyone with this link can view is selected in the sharing settings.
Click Create and copy link. Dropbox will copy the link to your computer's clipboard.
If the output URL provided by Dropbox ends in &dl=0, as shown in the below example, change the value to &dl=1.

Save the URL in a convenient location. Then, proceed to the Configure the custom title in VSA 10 section of this article.
Configure the custom title in VSA 10
Next, you'll create the custom title and provision it in your software catalog. To do so, perform the following steps:
From the left navigation menu in VSA 10, navigate to Patch Management > Custom Titles.
Click + New
The Custom Title Details pane will open.
In the Name field, provide a name for the installation package. This value will appear in your software catalog.
Enter the sharing URL to your installer in the URL field.
Select the CPU Architecture supported by your installer. If both 32-bit (x86) and 64-bit (x64) architectures are supported, choose All.
If you'd like VSA 10 to include any custom arguments when it executes the installation, input them into the Install arguments field.
Select the box next to I agree with the End User License Agreement to agree to Kaseya's acceptable use terms. Then, click Save.
Your new title will appear in the Custom Titles list in a Provisioning status.
Once the process completes, the third-party application will appear in your software catalog.
NOTE The install arguments are added the same as you would inline if running the installer in a command line. For example, if you were adding a custom title for Microsoft Teams, then instead of the full command line Teams_windows_x64.msi /quiet /f /norestart, because the installer path and name is set by the URL field, you just have to enter /quiet /f /norestart in the Install arguments field.
Lean more
The following additional resources will help you get the most out of VSA 10's patch management features:


