IT Glue Integration
VSA 10
NAVIGATION Modules > Integrations > IT Glue
PERMISSIONS Administrator
IT Glue
NAVIGATION Admin > Account > Integrations
PERMISSIONS Manager or Administrator
A Manager role will see matched and unmatched VSA 10 data for organizations to which they have explicit access only.
Overview
This integration allows you to synchronize and map your VSA 10 groups to organizations in IT Glue, enabling the sharing of information about managed entities, including device status and details, between both platforms.
Upon performing your first synchronization, IT Glue will discover all organizations and devices in VSA 10. The system will automatically attempt to map organizations based on name and pattern recognition and configurations based on exact device name, MAC address, or serial number.
Once the discovery is finished, you'll have the opportunity to review and fine-tune the relationships of VSA 10 groups to their corresponding IT Glue organizations.
With this integration activated, you can view, manage, and create documentation from IT Glue while working in VSA 10. While in a Remote Control session, leverage the 1-Click feature for automatic password injection, eliminating the need to switch between screens.
BEFORE YOU BEGIN If you plan to use a PSA platform with this integration, we strongly recommend that you first sync VSA 10 to your PSA solution and then sync the PSA platform to IT Glue to ensure accurate configuration matching.
Automations powered by this integration
- In-context device documentation.
- IT Glue documentation in VSA X mobile app.
- IT Glue password support for VSA 10 1-Click.
Prerequisites
To set up the integration, you'll need the following:
- An SSL connection with a valid VSA 10 certificate chain, including an intermediate certificate signed by a trusted authority, is required. The certificate must meet the following requirements:
- The certificate must be signed by a valid issuer and cannot be a self-signed certificate.
- The SSL chain, including the intermediate certificates, must be complete.
- The fully qualified domain name (FQDN) for the server hosting the VSA 10 instance must match one of the certificate's common names.
NOTE You can use an online SSL checker, such as SSL Shopper, to check your certificate status.
Field mappings
Learn how RMM fields are mapped to IT Glue fields in the IT Glue Help system.
How to...
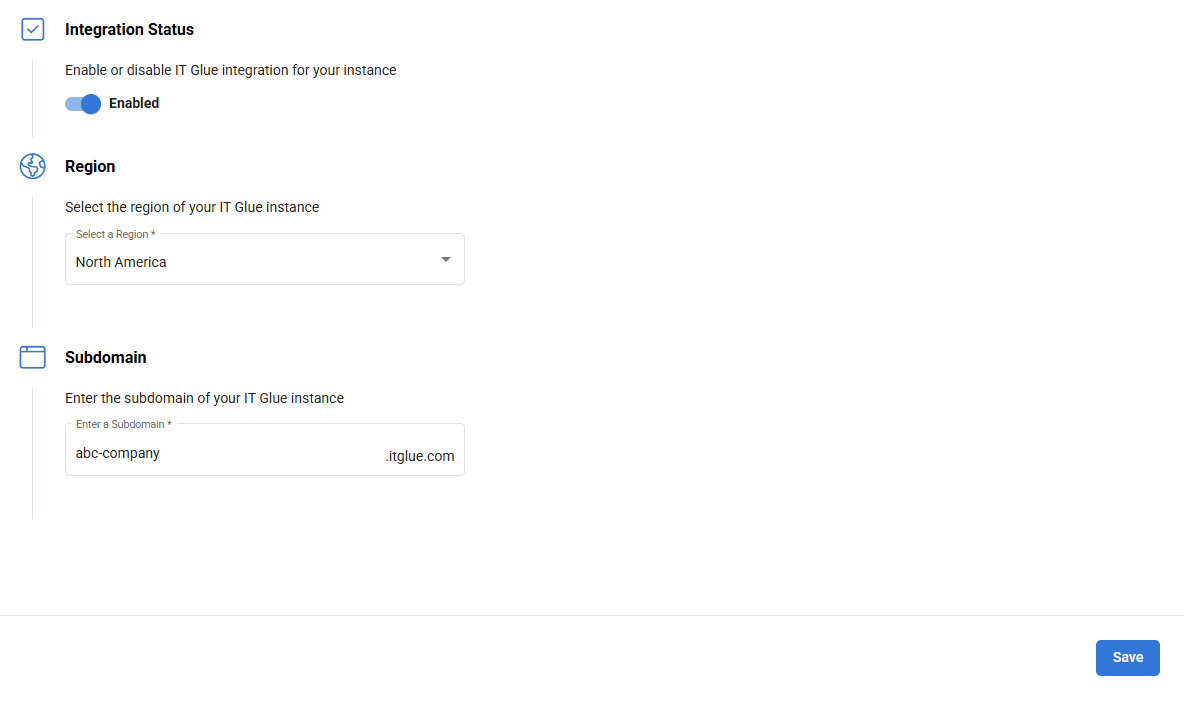
First, you'll activate the integration in VSA 10 by entering the IT Glue subdomain authorized to connect to your VSA 10 instance. Complete the following steps:
- From the left navigation menu, navigate to Integrations > IT Glue.
- In the Integration Status section, turn on the Enabled toggle.
- In the Region section, select the hosting location of your IT Glue instance.
- In the Subdomain section, enter your IT Glue subdomain.
EXAMPLE If your IT Glue URL is abc-company.itglue.com, enter abc-company.
- Click Save.
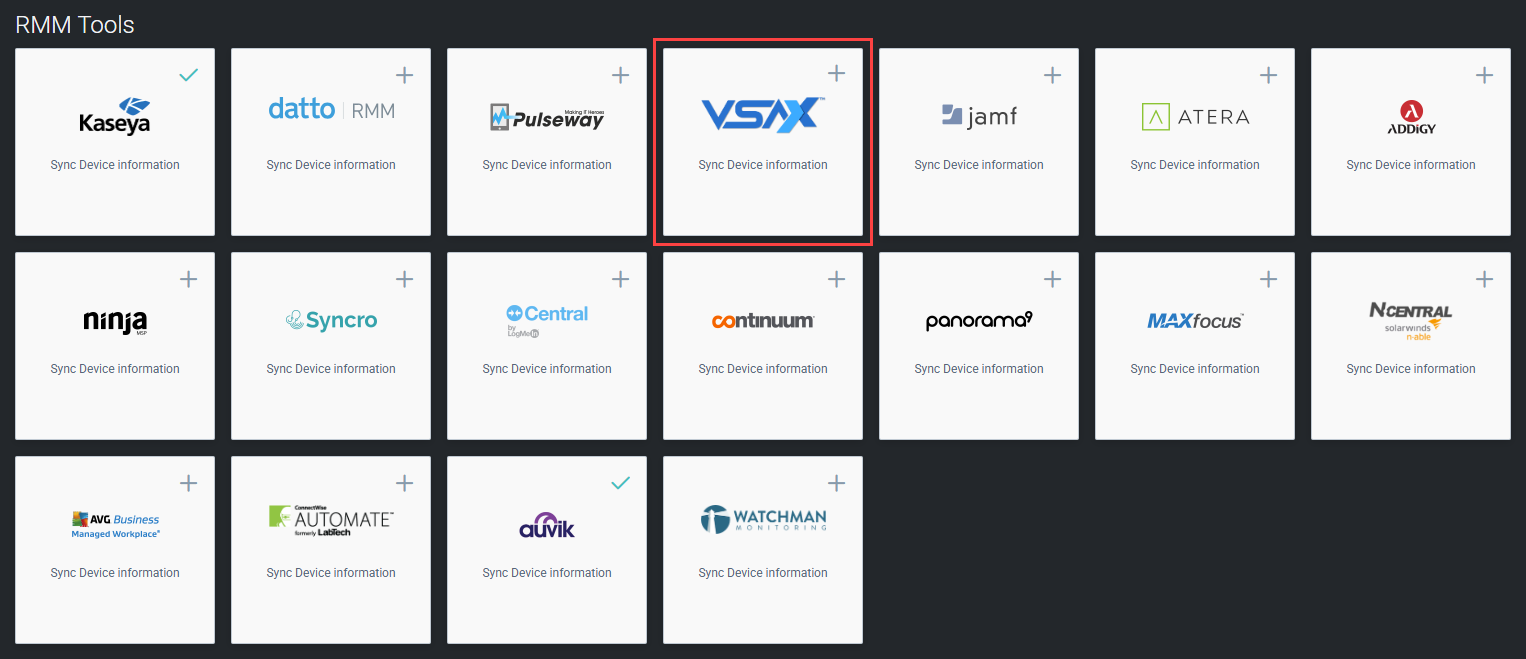
Next, you'll authenticate the integration by completing the following steps in IT Glue:
- From the top navigation menu, click Admin.
- From the left navigation menu, navigate to Account > Integrations.
- In the upper-right corner of the page, click New.
- In the RMM Tools section, click the + icon in the VSA 10 tile.
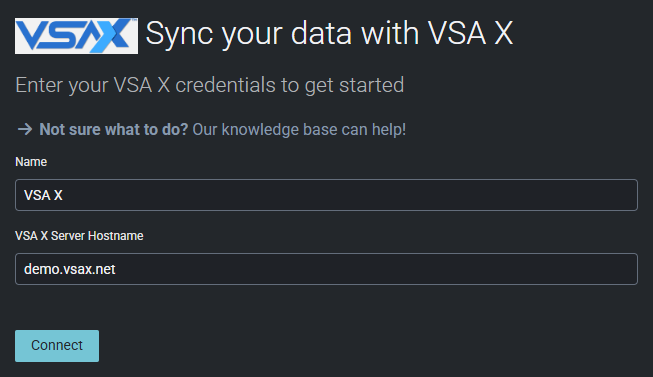
- In the Name field, enter a name for this integration's connector. The value you input here will appear in your list of integrations on the Active Integrations page in IT Glue.
- In the VSA X Server Hostname field, enter the fully qualified domain name (FQDN) of the VSA 10 instance to which you'd like to connect.
- Click Connect.
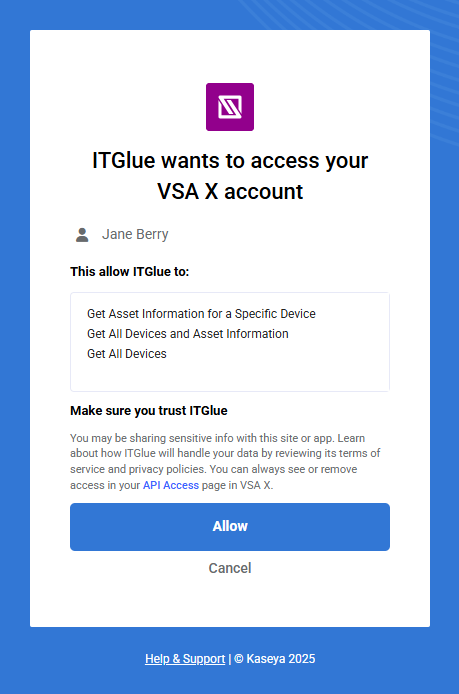
- On the API access authorization page, click Allow to grant IT Glue access to your VSA 10 data.
EXAMPLE demo.vsax.net
Once successfully connected, you will be redirected to the Active Integrations page in IT Glue, where the new VSA 10 connector will display the status OK.
NOTE Enabling the integration may result in Kaseya data center IP addresses appearing in your activity logs.
Initiating a data sync allows the integration to discover your VSA 10 groups and devices and match them to their IT Glue counterparts. After the sync finishes, you'll need to review and manually action any items the integration was unable to automatically match.
Import VSA 10 data into IT Glue as follows:
- From the top navigation menu, click Admin.
- From the left navigation menu, navigate to Account > Integrations.
- From the more menu
 in the VSA 10 connector, select Start Manual Sync.
IT Glue will begin to import and match your VSA 10 groups. During this process, the Status column will display Syncing. When the process finishes, the Status column will change to OK, and you will receive an email notification.
Pausing and resuming a sync
To pause a sync, select Pause Sync from the connector more menu ![]() . When ready to resume the sync, select Resume Sync.
. When ready to resume the sync, select Resume Sync.
BEFORE YOU BEGIN Before a VSA 10 group can sync to an IT Glue organization, you must add at least one VSA 10 device to it. If none exist, and the organization does not already exist in IT Glue from any other source, then it will not appear. In that case, you'll need to manually create it in IT Glue.
Following the initial sync and automatic matching in IT Glue, it's important to review the results of the import to check for and manually map any unmatched organizations as follows:
- From the top navigation menu, click Admin.
- From the left navigation menu, navigate to Account > Integrations.
- From the more menu in the VSA 10 connector, select Matching.

- In the Unmatched filter, which is selected by default, review any unmatched VSA 10 groups. If IT Glue has a mapping recommendation, it will appear in the Suggested Match column.
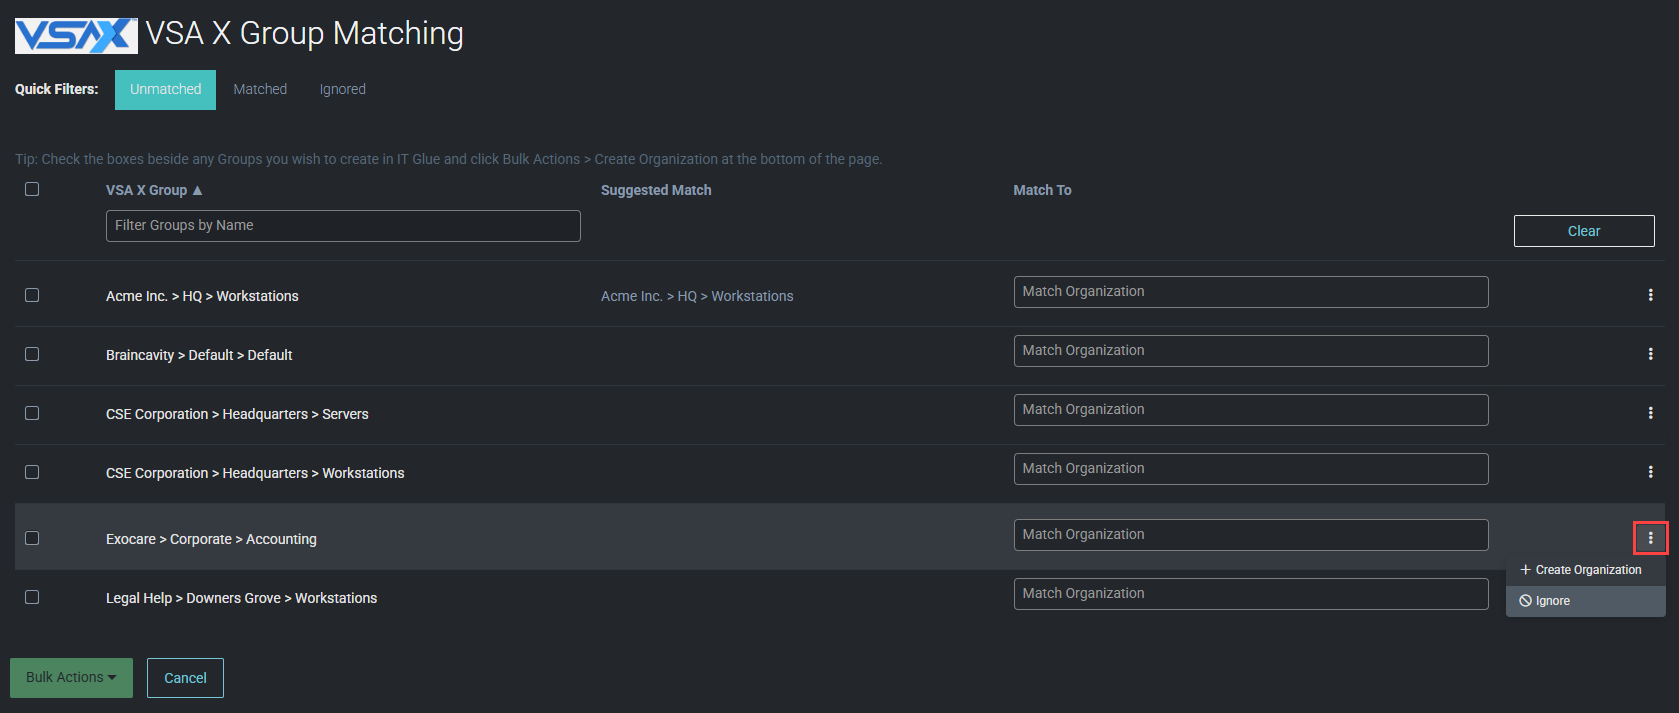
- For any unmatched groups, you can perform one of the following actions:
- Match to a suggested IT Glue organization, if available in the Suggested Match column, by selecting Accept Suggested Match from the more menu .
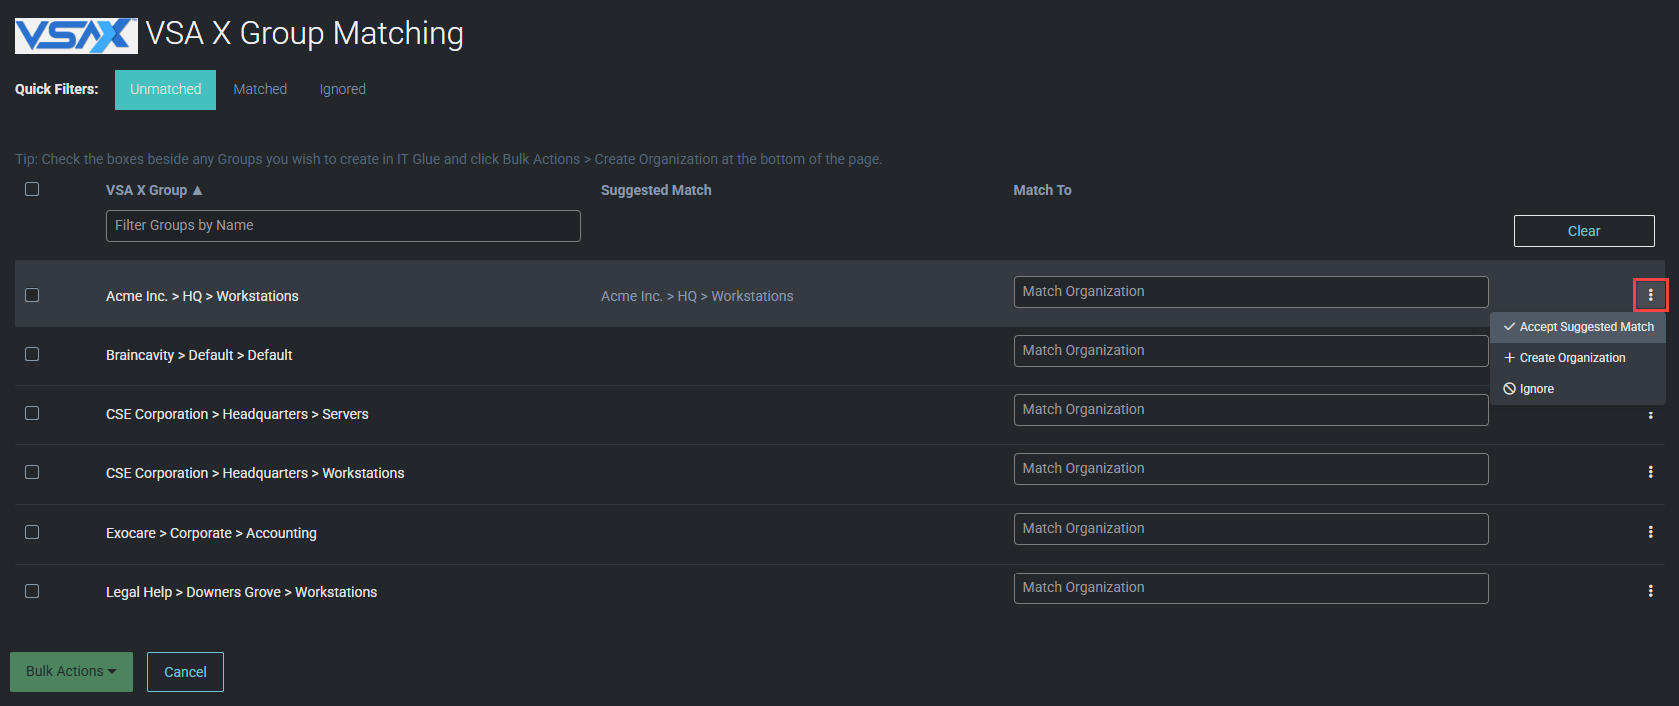
- Create a new IT Glue organization to match to by selecting Create Organization from the more menu .
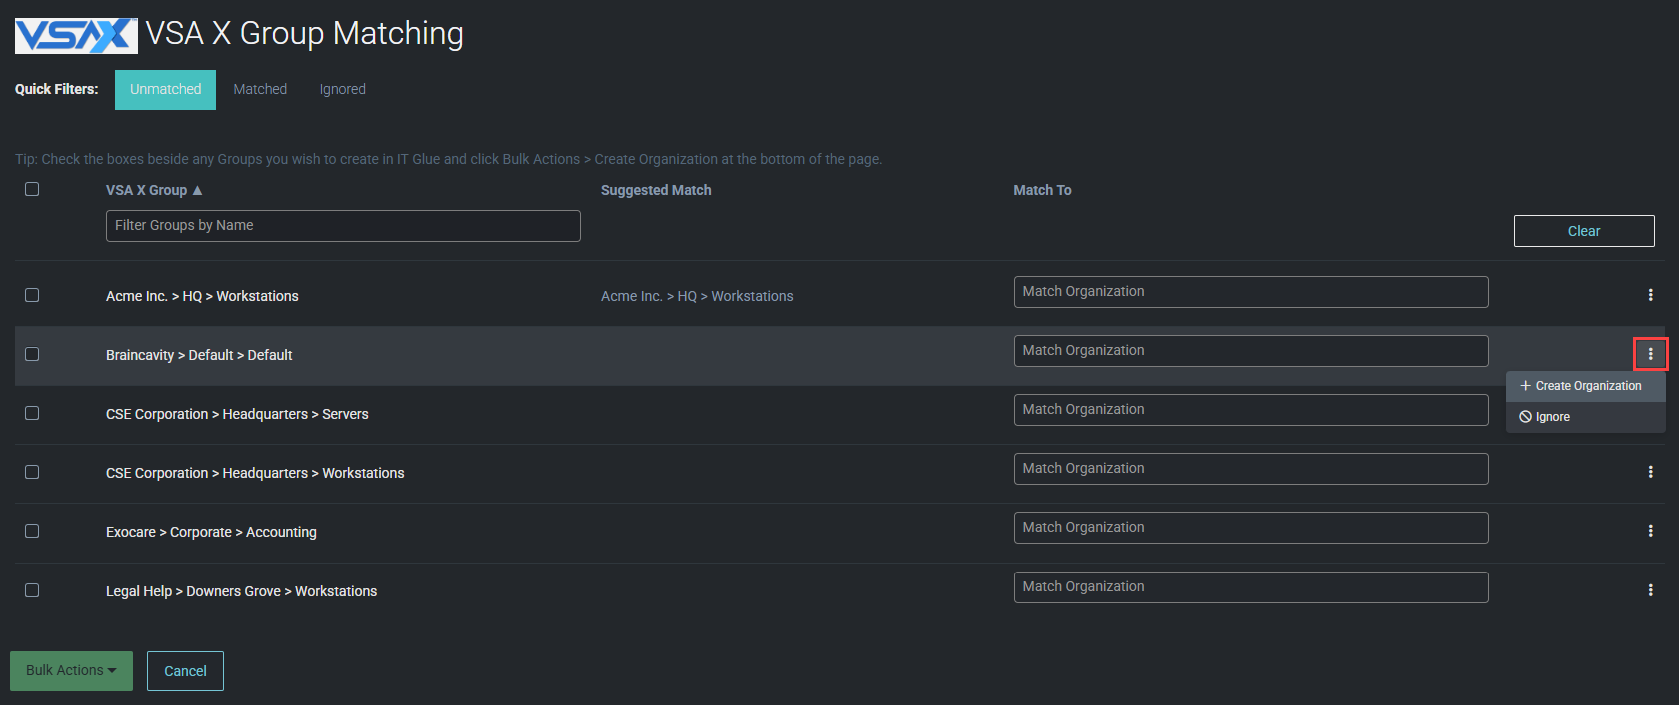
- Prevent an item from counting as unmatched in subsequent syncs by selecting Ignore from the more menu . The group will move to the Ignored filter, where you can match it in the future, if desired.
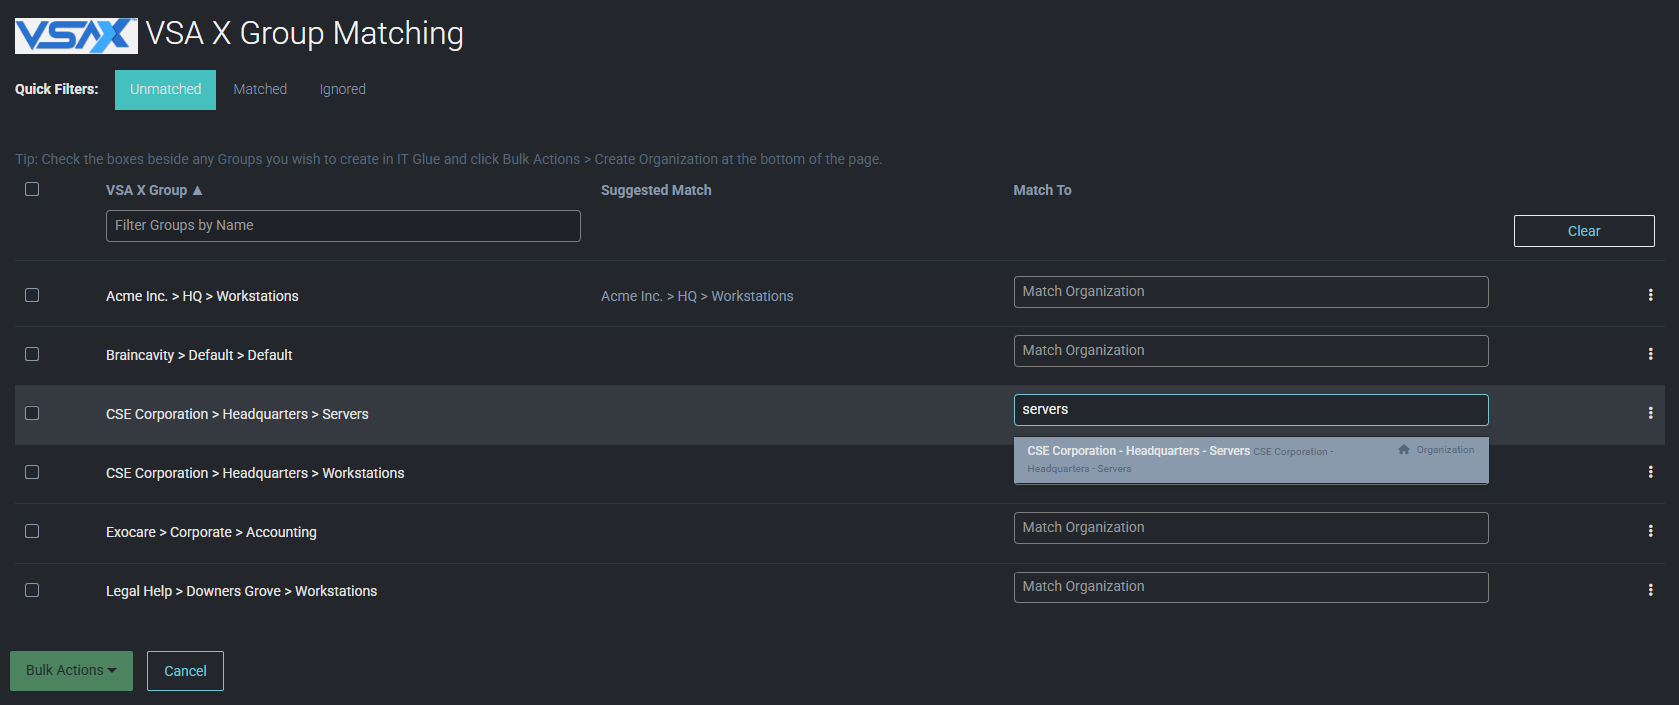
- Search for and select an IT Glue organization to match to by entering its name in the Match To column.
IMPORTANT Before creating an organization, ensure that no corresponding organization already exists; otherwise, a duplicate will be created.
You also have the option to accepted suggested matches for, create organizations for, or ignore multiple groups at once. Select the check boxes next to any number of groups, or select all groups by selecting the check box in the header, and select the applicable action from the Bulk Actions drop-down menu in the lower-left corner of the page.
- Match to a suggested IT Glue organization, if available in the Suggested Match column, by selecting Accept Suggested Match from the more menu
Once all organizations have been matched or ignored, the same process should be followed for any unmatched devices, as described in the next section.
Reverting or changing a match
To revert a match, click the Matched filter. From the more menu ![]() for a group, select Revert Match to move it back to the Unmatched filter.
for a group, select Revert Match to move it back to the Unmatched filter.
To change a match, click the Matched filter. From the more menu ![]() for a group, select Change Match, and enter an IT Glue organization name in the Matched To column.
for a group, select Change Match, and enter an IT Glue organization name in the Matched To column.
The final step in the integration deployment process is to check for and map any unmatched devices. Complete the following steps in IT Glue:
- From the VSA X Group Matching page, click the Matched filter.
- Any organization displaying a count of matched devices that does not equal the total number of devices in the Unmatched Systems column requires review. From the more menu , select Match Devices.
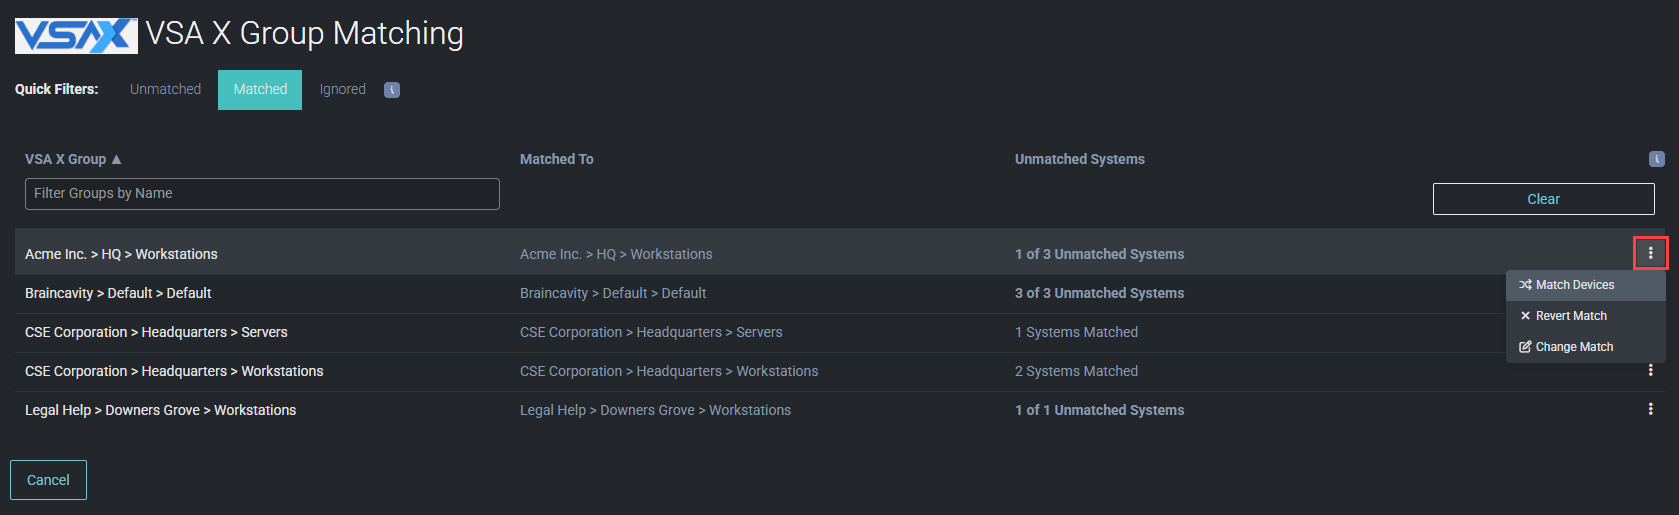
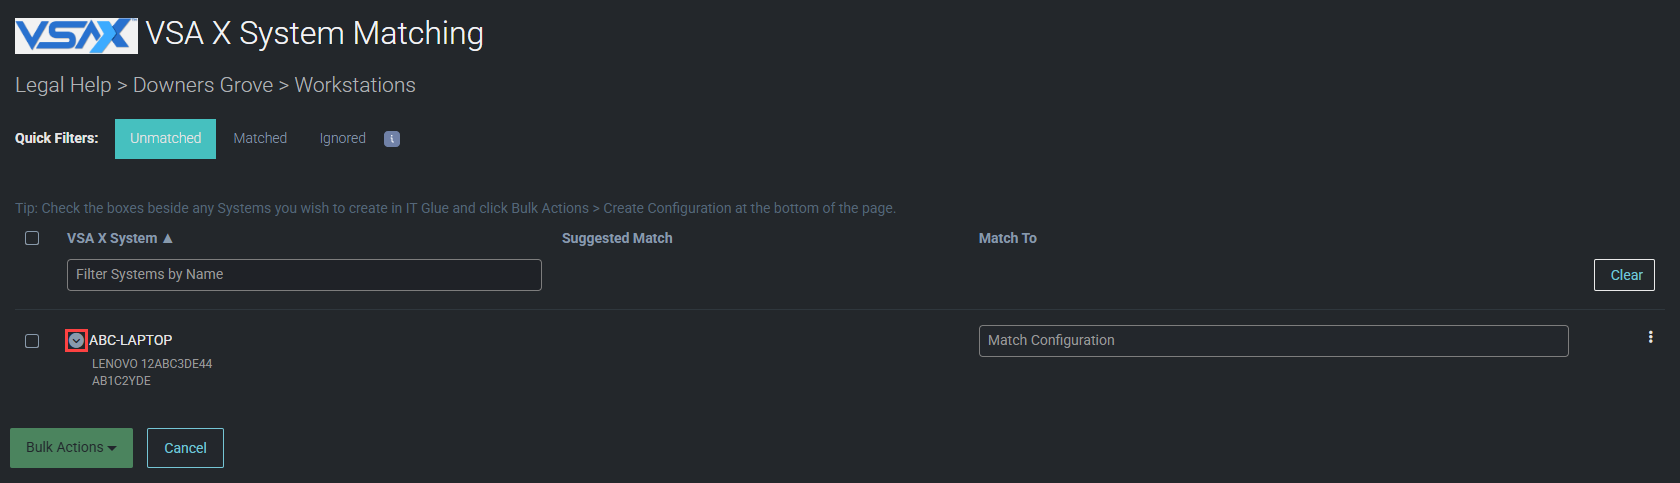
- You'll be redirected to the System Matching page for the selected organization. For each unmatched VSA 10 device, you can perform one of the following actions:

- Match to a suggested IT Glue configuration by selecting Accept Suggested Match from the more menu .
- Create a new IT Glue configuration to match to by selecting Create Configuration from the more menu .
- Prevent an item from counting as unmatched in subsequent syncs by selecting Ignore from the more menu . The device will move to the Ignored filter, where you can match it in the future, if desired.
- Search for and select an IT Glue configuration to match to by entering its name in the Match To column.
NOTE Kaseya does not recommend that you create new configurations if your intent is to have them populate from IT Glue to your PSA solution. New items created in this way will not automatically sync with your PSA unless you manually edit and save each item.
IMPORTANT Before creating a configuration, you should first try to match the devices by MAC addresses or serial number. Only after you've verified that the corresponding configurations do not exist in IT Glue should you create them. You can expand a device to view its details.
You also have the option to accepted suggested matches for, create configurations for, or ignore multiple devices at once. Select the check boxes next to any number of devices, or select all devices by selecting the check box in the header, and select the applicable action from the Bulk Actions drop-down menu in the lower-left corner of the page.
- Match to a suggested IT Glue configuration by selecting Accept Suggested Match from the more menu
- Repeat this process for each organization until you've matched all unmatched devices. Once you've done so, the integration setup is complete.
Reverting or changing a match
To revert a match, click the Matched filter. From the more menu ![]() for a device, select Revert Match to move it back to the Unmatched filter.
for a device, select Revert Match to move it back to the Unmatched filter.
To change a match, click the Matched filter. From the more menu ![]() for a device, select Change Match, and enter an IT Glue configuration name in the Matched To column.
for a device, select Change Match, and enter an IT Glue configuration name in the Matched To column.
With the integration active, VSA 10 users with Remote Control > Use IT Glue Passwords permission will notice the Remote Control 1-Click manager includes IT Glue Embedded and Related password objects for supported devices.
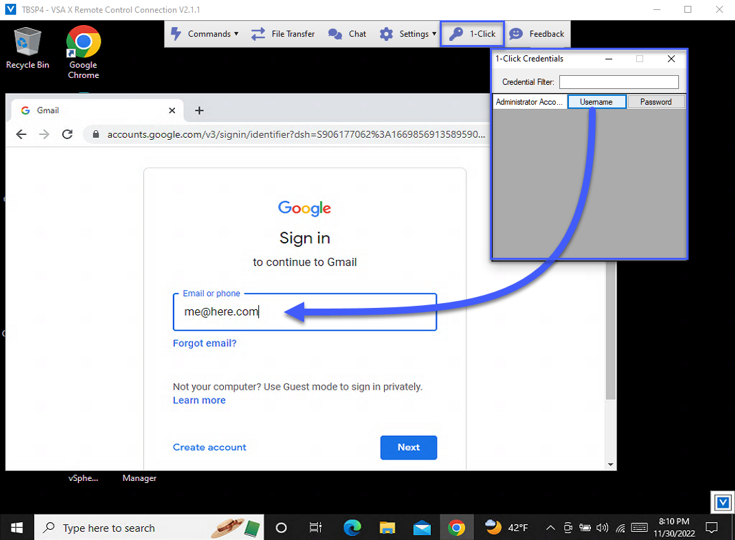
You'll be able to select the credentials directly from within VSA 10 to automatically launch a remote session and log in to Windows computers in one step. IT Glue passwords will also be available for secure copy and paste while working within Remote Control sessions.
The integration improves efficiency by reducing the number of clicks and context-switching that are normally required when searching for credentials. It also eliminates the need to copy passwords to the clipboard, which improves security.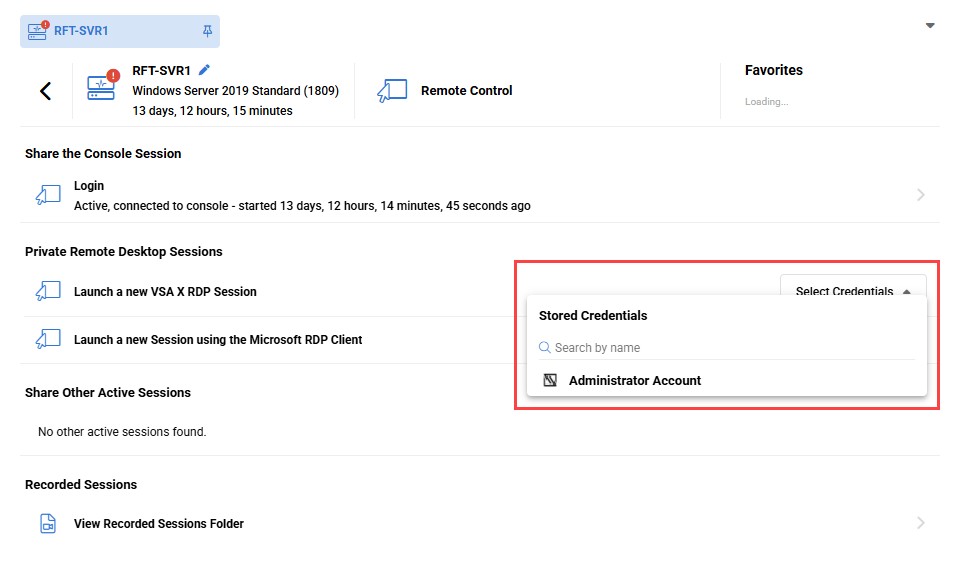
For more information about Remote Control 1-Click, refer to Remote Control.
Complete the following steps in IT Glue to disconnect or delete the integration:
- From the top navigation menu, click Admin.
- From the left navigation menu, navigate to Account > Integrations.
- From the more menu in the VSA 10 connector, select Disconnect.

- If you may resync the integration in the future and wish to preserve the VSA 10 data in IT Glue, select Pause syncing and keep all data. Otherwise, select Permanently disconnect integration and remove all organization and asset matchings, which will remove overlaid data but retain IT Glue assets. Learn about overlaid data in the IT Glue Help system.
NOTE This option is also available from the Edit Credentials page.
Disabling the integration in VSA 10 will clear all user data. To do so, turn off the Enabled toggle, click Save, and then click Confirm in the confirmation dialog box.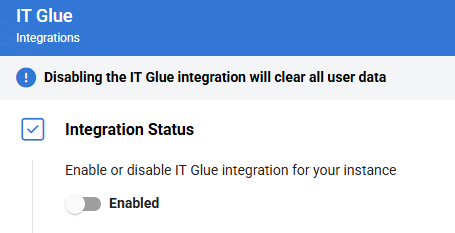
VSA 10 Agent status on the network diagram
Customers with Network Glue and a VSA 10 integration can view and filter all agent statuses on the network diagram. If your Network Glue devices are matched to IT Glue configurations and synced with VSA 10, your diagram will show the following statuses:
- VSA 10 Agent is currently online.
- VSA 10 Agent is currently offline.
- VSA 10 Agent and user are both currently online.
In addition, you can filter for devices that are matched or not matched to IT Glue via the Matched to IT Glue status. Learn about the network diagram in the IT Glue Help system.


