Connectors
NAVIGATION Modules > Integrations > Connectors
PERMISSIONS PSA > Read-only access to all PSA Integration pages
PERMISSIONS PSA > Full access to all PSA Integration pages
From the Connectors page, you can review details about all of the Apple MDM and virtualization connectors created for your VSA 10 account and create new connectors.
Overview
From the Apple MDM view of the Connectors page, you can view existing VSA 10 mobile device management (MDM) connectors for supported devices.
The list of connectors displays the following information:
| Column | Description |
|---|---|
| Organization/Connector | The VSA 10 Organizations where at least one connector is present. Click on an organization to expand it and see all associated connectors. |
| Expiration date | Surfaces the date on which the certificate for the MDM connector expires. Filter by connectors that have expired |
| Licensed Applications | Displays the number of licensed applications for any organization with an Apple Apps and Books connector. Click the number to see which applications are licensed to that connector. |
| Type | Lists the types of connectors applied to the organization. Refer to Types of Apple MDM connectors for the list of types and descriptions of each. |
To search for specific connectors, enter a partial or whole value in the search bar to filter the current list to matching records. To sort a column alphabetically or chronologically, click the column heading. To edit a connector, hover over the row and click the Edit icon ![]() .
.
Types of Apple MDM connectors
Apple Push Notification Service
This connector facilitates communication between the Apple devices and the MDM server, ensuring real-time management.
Apple Automated Device Enrollment
Automated Device Enrollment (ADE) is a feature within the Apple MDM ecosystem that simplifies the deployment of Apple devices at scale. By leveraging Apple Business Manager, devices can be preconfigured with specific management settings as soon as they are powered on, bypassing manual setup steps and streamlining the onboarding process. This ensures that devices are enrolled in mobile device management (MDM) from the start, offering zero-touch deployment for organizations.
IMPORTANT You are required to add both an Apple Push Notification Service connector and an Apple Automated Device Enrollment connector to each organization you are configuring ADE for, starting with the push certificate.
To learn more about ADE, refer to ADE in VSA 10 MDM: enrollment.
Apple Apps and Books
The Apps and Books feature is a part of the Apple MDM framework that facilitates the deployment, management, and licensing of apps and books in enterprise and educational environments. This feature leverages Apple's Volume Purchase Program (VPP), now integrated into Apple Business Manager (ABM) or Apple School Manager (ASM) to simplify app distribution and licensing.
To learn how to create these types of connectors, refer to Apple MDM in Creating connectors.
The Virtualization view of the Connectors page provides status reporting and management options for all of the hypervisor connections you've created.
The list of connectors displays the following information:
| Column | Description |
|---|---|
| Name | The name of the connector. |
| Type | The type of connector: Hyper-V or VMware. Filter by either type using the Filter by drop-down menu. |
| Probe | The probe performing discovery for the connector. Refer to Network discovery and automatic agent deployment. Filter by any one configured probe using the Filter by drop-down menu. |
| Status | Indicates whether the connector is active or inactive. Filter by either status using the Filter by drop-down menu. |
To search for specific connectors, enter a partial or whole value in the search bar to filter the current list to matching records. To sort a column alphabetically, click the column heading. To edit a connector, hover over the row and click the Edit icon ![]() .
.
Creating connectors
To create a new connector, perform the following steps:
- From the left navigation menu in VSA 10, navigate to Integrations > Connectors.
- Select Apple MDM or Virtualization.
- Click Create Connector.
- Depending on your selection, expand one of the following sections for next steps:
For descriptions of both connector types, refer to Types of Apple MDM connectors.
NOTE The Apple Push Notification Service connector must first be configured for an organization before the Apple Automated Device Enrollment connector can be configured for that organization.
NOTE If an MDM connector becomes revoked, a device notification will be generated. To enable this functionality for on-prem customers, they must allowlist the MDM webhooks API IP address: 74.235.48.191. Otherwise, updates will occur every 30 minutes.
On the Create Connector page, select the Apple Push Notification Service connector type from the Type drop-down menu:
-
With Apple Push Notification Service selected as the connector type, select the organization with which the new connector will be associated.
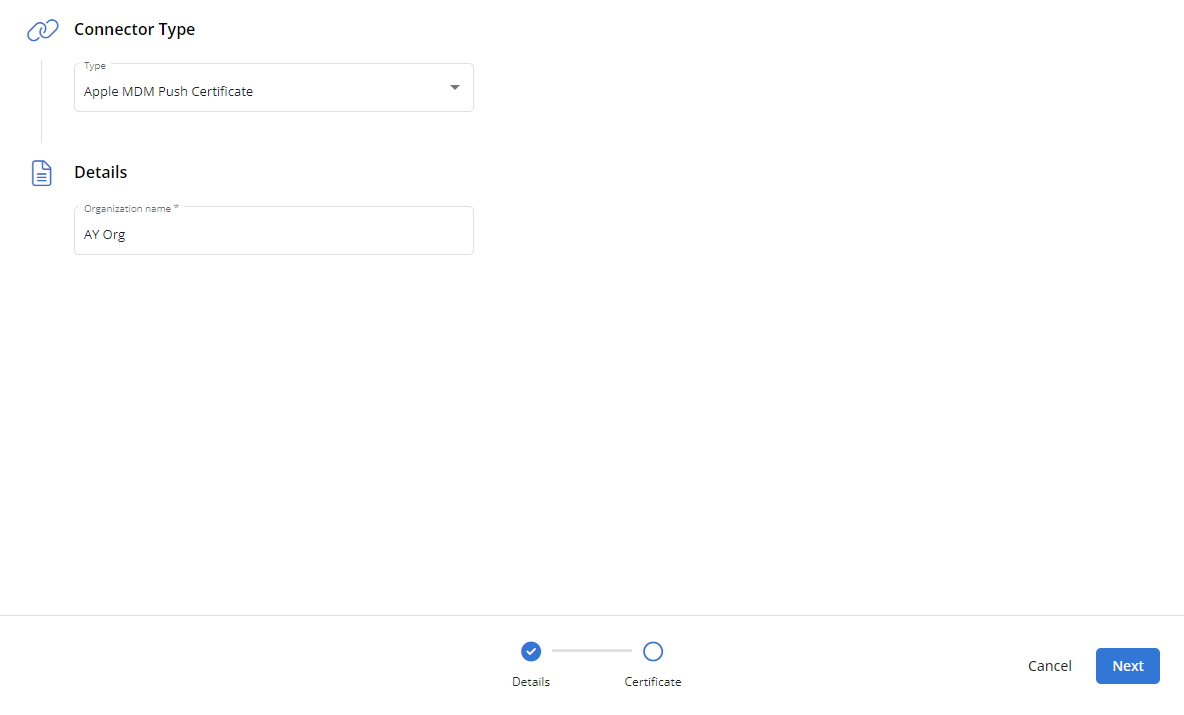
- Click Next.
- In the Download CSR File section, click Download CSR. VSA 10 will transfer a Certificate Signing Request (CSR) file named CertificateSigningRequest.plist to the default download location on your computer.
- In the Create the Apple Push Certificate section, click Go to Apple portal.
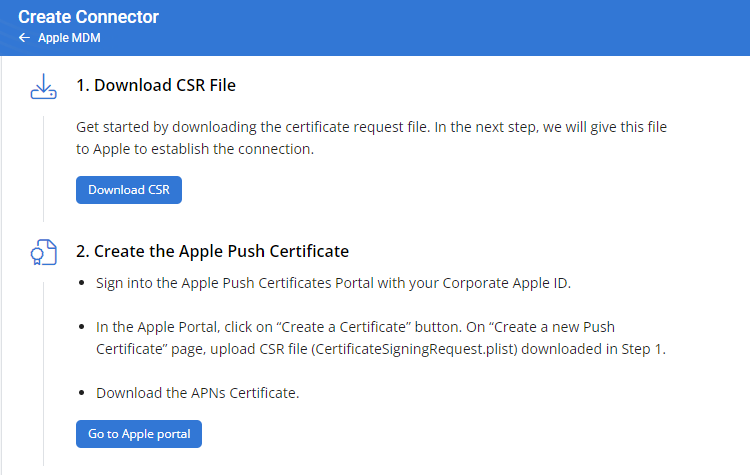
- Without closing the Create Connector page, you'll create a push certificate via the Apple portal and return to VSA 10 to upload the certificate file. For step-by-step instructions on this process, refer to Create a push certificate in VSA 10 MDM: enrollment.
- With Automated Device Enrollment selected as the connector type, select the organization and site associated with the devices you wish to automatically enroll in VSA 10.
- Select the specific agent group in which the devices will be automatically enrolled.
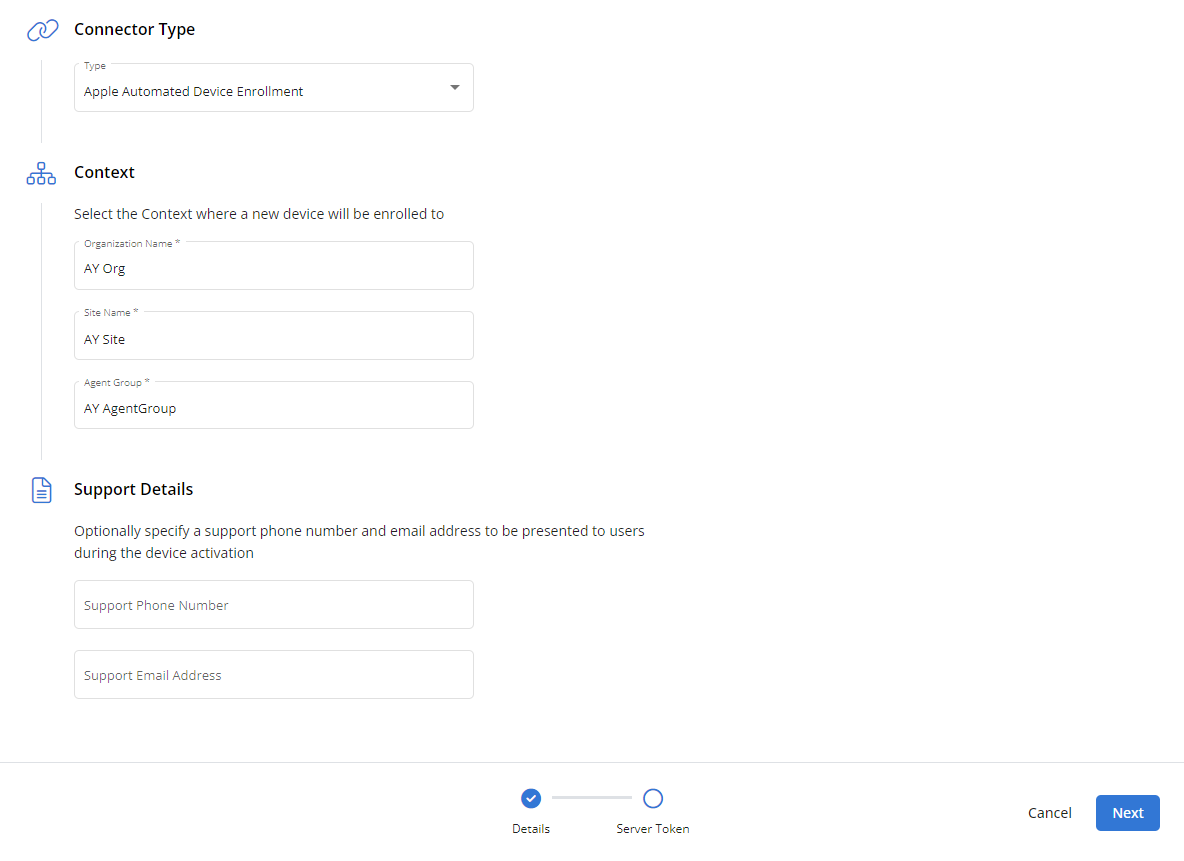
- Optionally, enter a phone number and/or email address at which your support team can be reached, which users will see during device activation.
- Click Next.
- Click Download Public Key. VSA 10 will transfer a Privacy Enhanced Mail (PEM) file named ABM_Public_Key.pem to the default download location on your computer.

- In the Generate New Server Token section, click Go to Apple Business Manager.
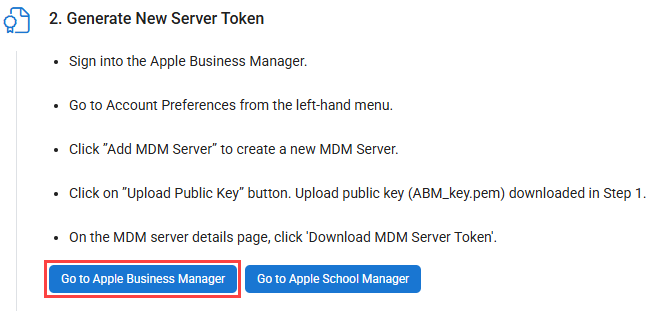
- Without closing the Create Connector page, you'll upload the public key to Apple Business Manager and return to VSA 10 to upload a server token. For step-by-step instructions on this process, refer to Configure Automated Device Enrollment (ADE) in VSA 10 MDM: enrollment.
NOTE The Organization Name field displays an error message if the selected organization is missing an Apple Push Notification Service connector, which you must configure first. Refer to the preceding section for instructions.
- With Apps and Books selected as the connector type, select the organization with which the connector will be associated.
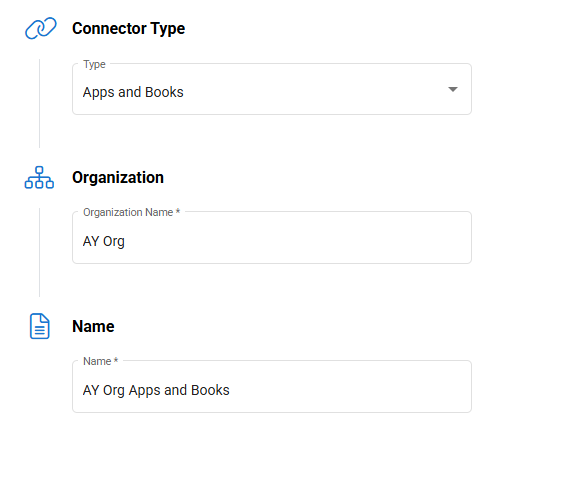
- Click Next.
- In the Download New Content Token section, follow the instructions in that section to download a content token from Apple Business Manager or Apple School Manager.

-
Upload the content token (it should end with the .vpptoken extension) you downloaded in Step 3 to the Upload Content Token section.

-
Save your Apple ID to remember which Apple ID was used.
-
Click Create to save your configuration and create the connector.
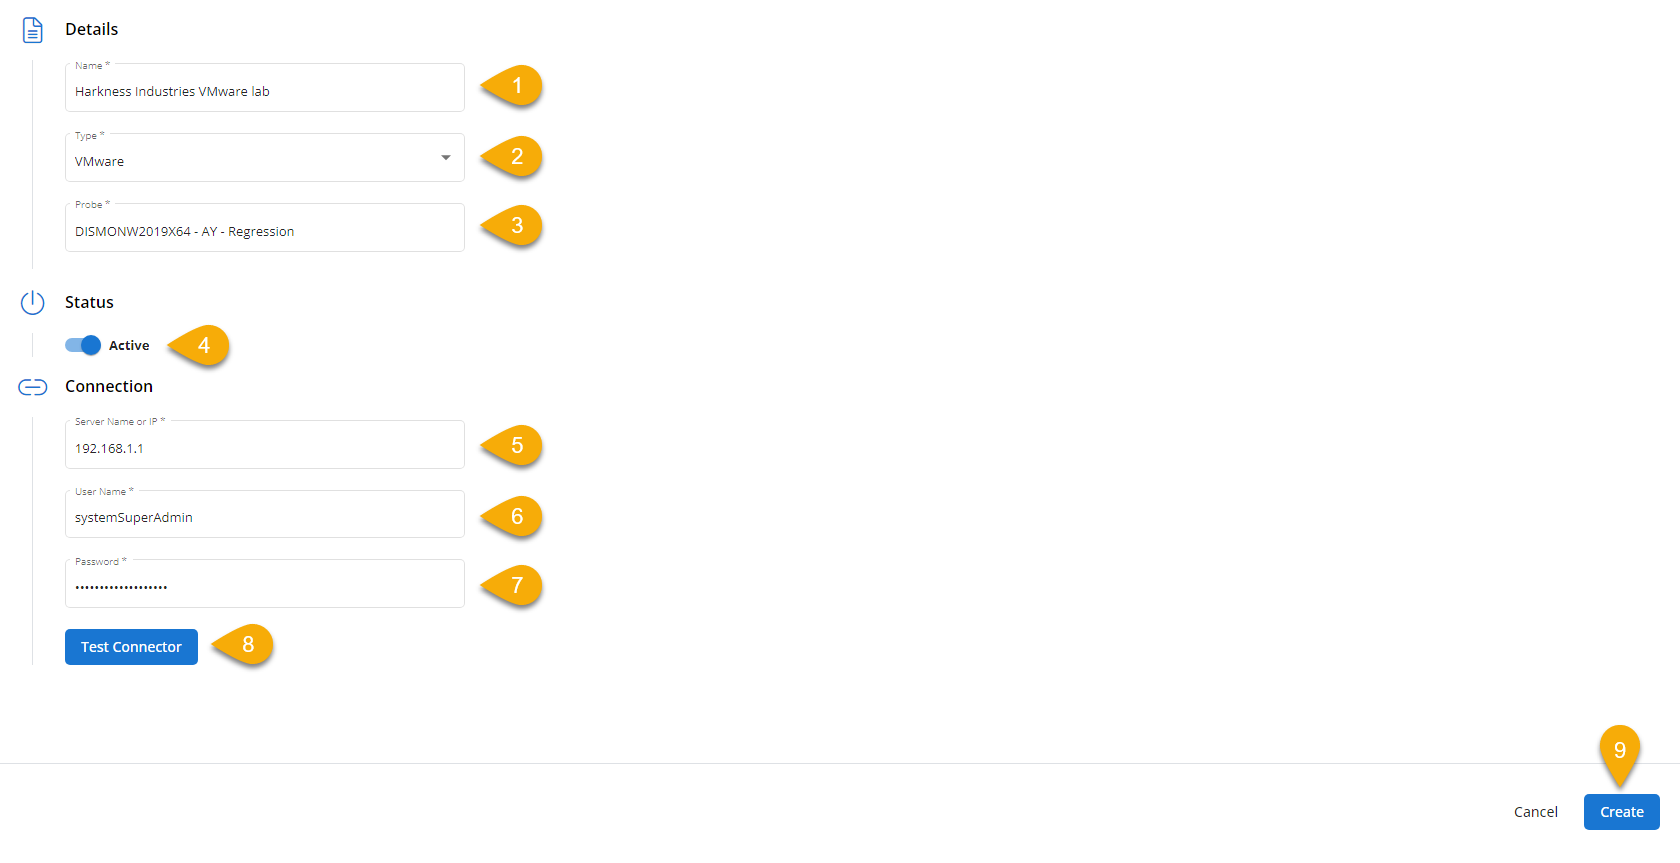
- The Create Connector page will load. In the Name field, enter an alias for the connector that identifies its purpose.
- From the Type drop-down menu, select either VMware or Hyper-V.
- In the Probe field, select the probe you'd like to use for device discovery.
NOTE If you haven't created any probes, perform the steps described in Network discovery and automatic agent deployment.
- Turn on the Active toggle to immediately initiate the connector upon its creation. Then, if you chose Hyper-V in step 2 of this section, proceed to step 8.
- If you chose VMware in step 2, input the hostname or IP address of your virtualization server in the Server Name or IP field.
- In the User Name field, enter the hypervisor's login name.
- Enter the hypervisor's password in the Password field.
- Click Test Connector to validate that VSA 10 can communicate with your virtualization server.
- Click Create to save your configuration. You'll see the new connector appear in the Virtualization table on the Connectors page.
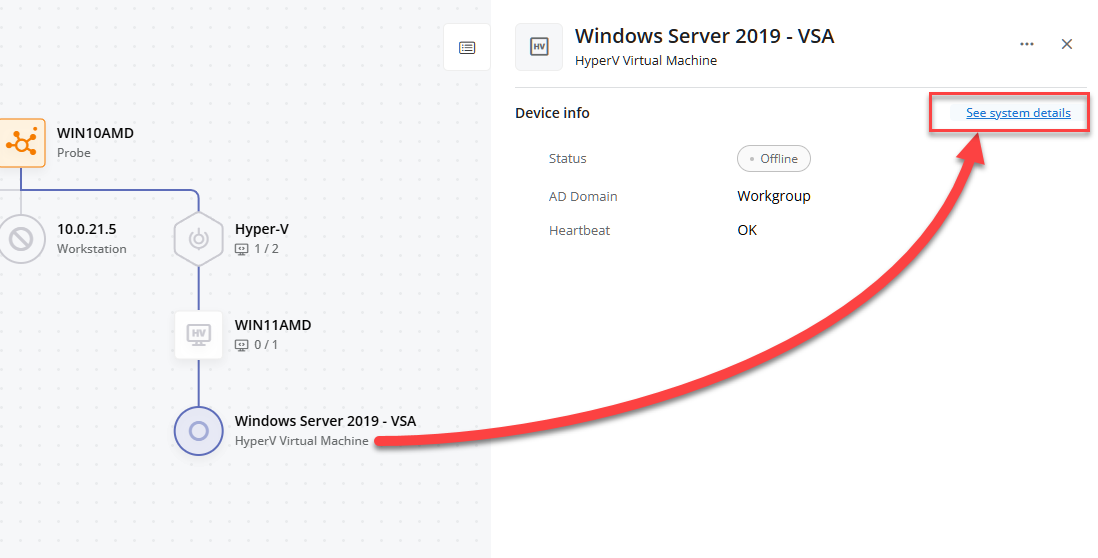
Once a Hyper-V connector has been added, VSA 10 will expose the hypervisor and its child entities on the Devices > Site Maps page topology map and the Devices > Active Connectors page. You can view version information, status, events, and other information from these areas.
If you enroll the Hyper-V host within Site Maps, you will unlock the management features of both hosts and virtual machines nested under the host, such as powering on/off, restarting, suspending, and working with snapshots. Once the host is enrolled, when you open the device details pane of a virtual machine, select See system details to access the management capabilities.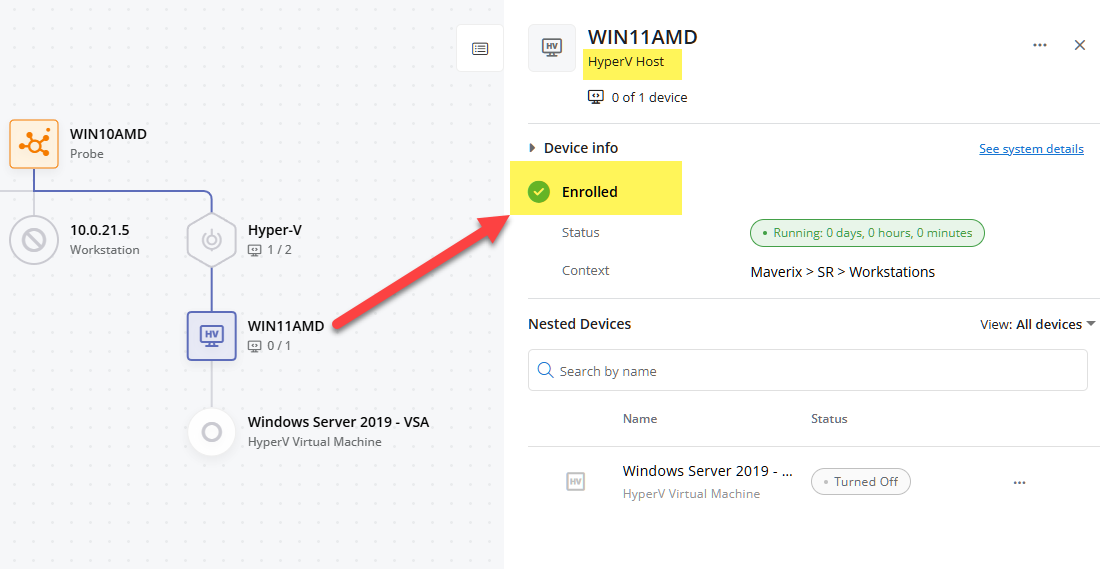
NOTE Enrollment of a host will consume a single device license.
NOTE Currently, only Virtualization and Apps and Books connectors can be deleted.
To delete a connector, perform the following steps:
- From the left navigation menu in VSA 10, navigate to Integrations > Connectors.
- Select Apple MDM or Virtualization.
- Navigate to the connector you want to delete, hover over it, and click the Delete icon
 .
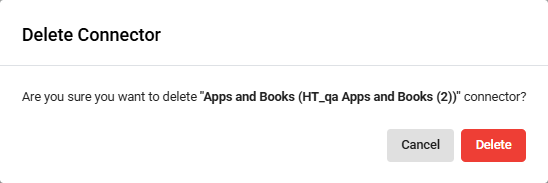
. - In the confirmation pop-up, click select Delete to confirm deletion of the connector.
-
Upon successful deletion, a confirmation message will display at the bottom of the screen.


