Autotask Integration
NAVIGATION Modules > Integrations > Autotask
PERMISSIONS PSA > Read-only access to all PSA Integration pages
PERMISSIONS PSA > Full access to all PSA Integration pages
Prerequisites
- Only administrators and those who have full PSA access permission are able to configure the Autotask Integration.
- You must enter valid Autotask API credentials in VSA 10. Refer to Adding or editing an API user in the Autotask Help system. If the VSA 10 integration is enabled but Autotask has not yet been added as a Trusted Application in VSA 10, a warning message will appear. Refer to Trusted Applications.
- VSA 10 Remote Control Manager 32-bit or 64-bit must be installed onto your machine prior to use of the Remote Control feature. Links to download the software will appear when the list of active sessions are shown. Linux is not supported.
NOTE After adding Autotask as a Trusted Application in VSA 10, you will not need to add it again unless the VSA 10 configuration is cleared. Refer to Clear Configuration in the Autotask Help system.
IMPORTANT If the VSA 10 configuration is cleared in Autotask after it has already been added as a Trusted Application in VSA 10, you must revoke the Autotask application in VSA 10 before reconfiguring the integration.
Configuration steps
BEFORE YOU BEGIN Establish the connection from Autotask to VSA 10. For instructions, refer to VSA 10 Integration in the Autotask Help system.
After establishing the connection in Autotask, set up the Autotask Integration in your VSA 10 instance as follows:
- Navigate to Integrations > Autotask from the left navigation menu.

- Log in with your Autotask API credentials, which opens the integration configuration page.
NOTE If you already have a different PSA integration active in your account (for example, BMS or ConnectWise), you will not have the option to enter your Autotask API credentials to set up this integration.
NOTE Depending on how many organizations and assets exist in your VSA 10 instance, the integration configuration page will require between 30 seconds and a couple of minutes to load. To preserve the loading progress, do not leave the page.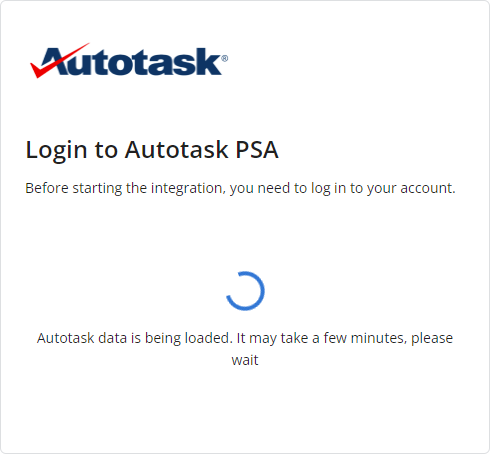
NOTE The integration configuration page does not allow more than one user at the same time. If a user attempts to access the integration page when it is already occupied by another user, access will be prevented.
Step 1: Mapping device types
In the Device Types tab, you can map VSA 10 device types to Autotask products and configuration item types.
The idea behind the device type mapping is to populate data in Autotask (ConfigurationItemType and ProductType) for each asset. It will then be possible to add dashboard charts in Autotask using these fields.
IMPORTANT If you do not map device types, you will not be able to sync assets in Step 4: Synchronizing assets.
You can map each VSA 10 device type to its corresponding Autotask type:
- Autotask Product: Refer to Adding product categories in the Autotask Help system.
- Autotask Configuration Item Type: Refer to Device types in the Autotask Help system.
NOTE In your Autotask instance, this entity may be named Device (default), Asset, Configuration Item, Installed Asset, or Installed Product.
The following functionality is available to facilitate the mapping process:
- Apply the same mapping to all devices by selecting defaults in the Default mapping settings for all device types section. From there, you can change any individual mappings using the drop-down menus in the Autotask Product and Autotask Configuration Item Type columns.
- Filter the list of device types by name using the search bar.
Once you are finished, click Save to preserve the configured mapping or Cancel to clear any changes made since you last saved the page. Then, click Next to proceed to organization mapping.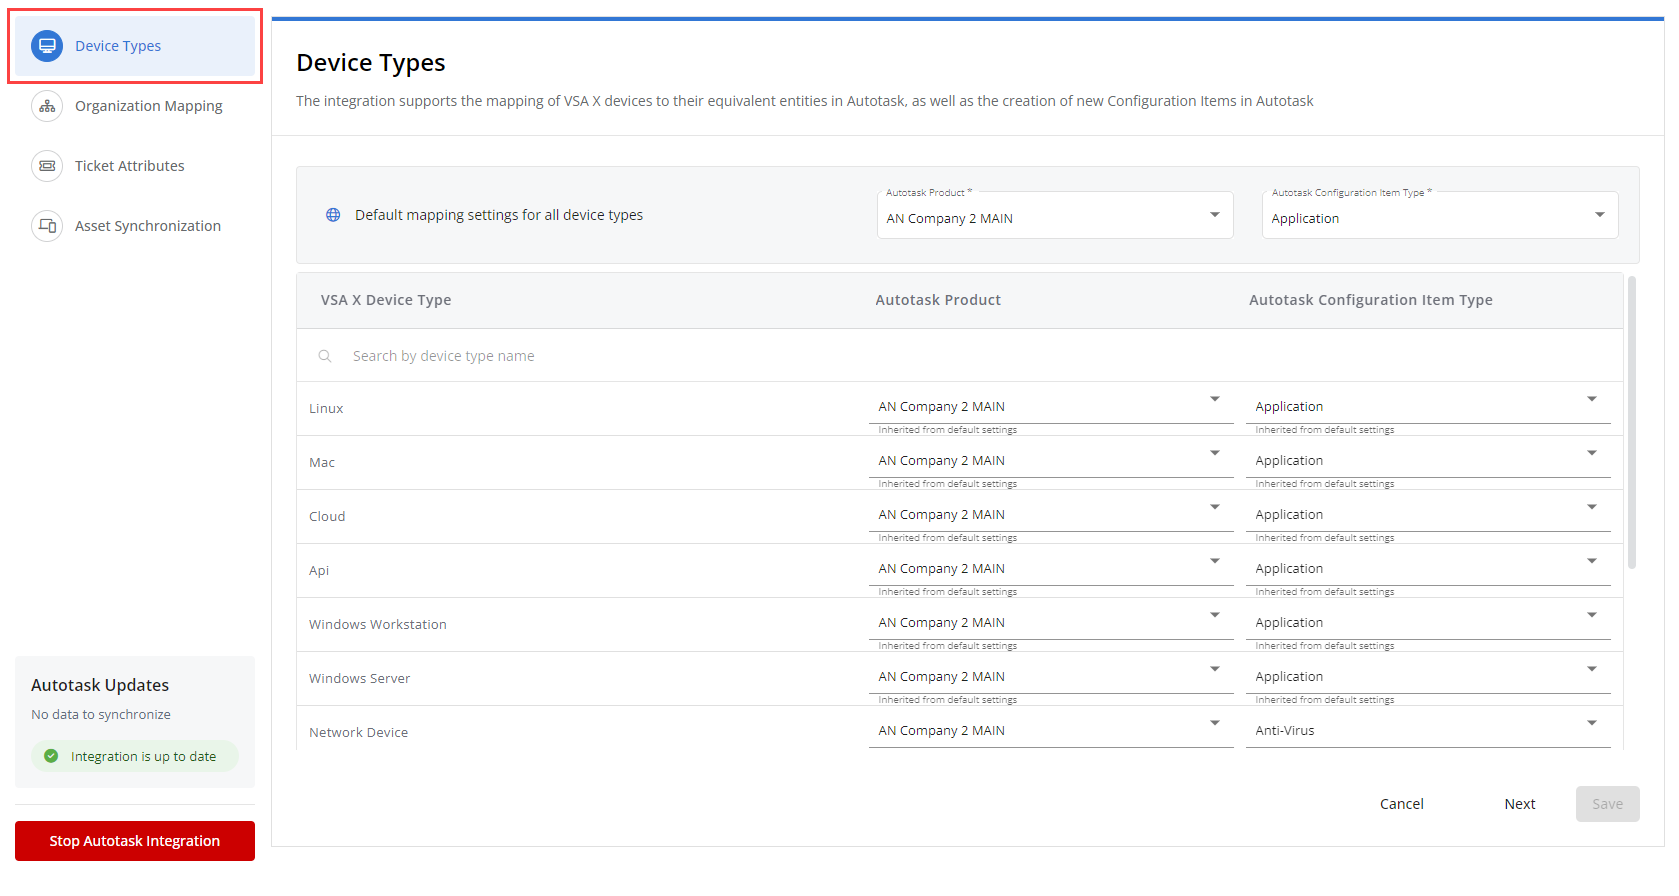
Step 2: Mapping organizations
In the Organization Mapping tab, you can map VSA 10 organizations, sites, and agent groups to Autotask companies.
NOTE When adding new VSA 10 organizations, you will have the option to Do nothing, Map to a new company, or Map to an existing company. Refer to Creating organizations.
You can map each VSA 10 item to its corresponding Autotask Organization. Refer to Overview of organizations in the Autotask Help system.
NOTE In your Autotask instance, this entity may be named Account, Business Unit, Client Company, Customer, Organization (default), or Site.
The following functionality is available to facilitate the mapping process:
- Apply the same mapping to all organizations, sites, and agent groups by selecting defaults in the Default mapping settings for all context section. From there, you can change any individual mappings using the drop-down menus in the Autotask Organization column.
- Filter the list of organizations, sites, and agent groups by name using the search bar.
- Expand an organization to manage the site(s) within that organization, and expand a site to manage the agent group(s) within that site.
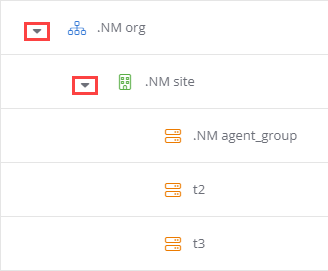
NOTE An organization or site without a drop-down icon implies that no sites or agent groups belong to that organization/site.
NOTE If you want to change the mapping for an organization or site, all device mappings associated with the changed organization will be deleted. Consequently, inherited behavior will be applied that can lead to the creation of duplicate configuration items in the selected company.
Once you are finished, click Save to preserve the configured mapping or Cancel to clear any changes made since you last saved the page. Then, click Next to proceed to ticket attribute configuration.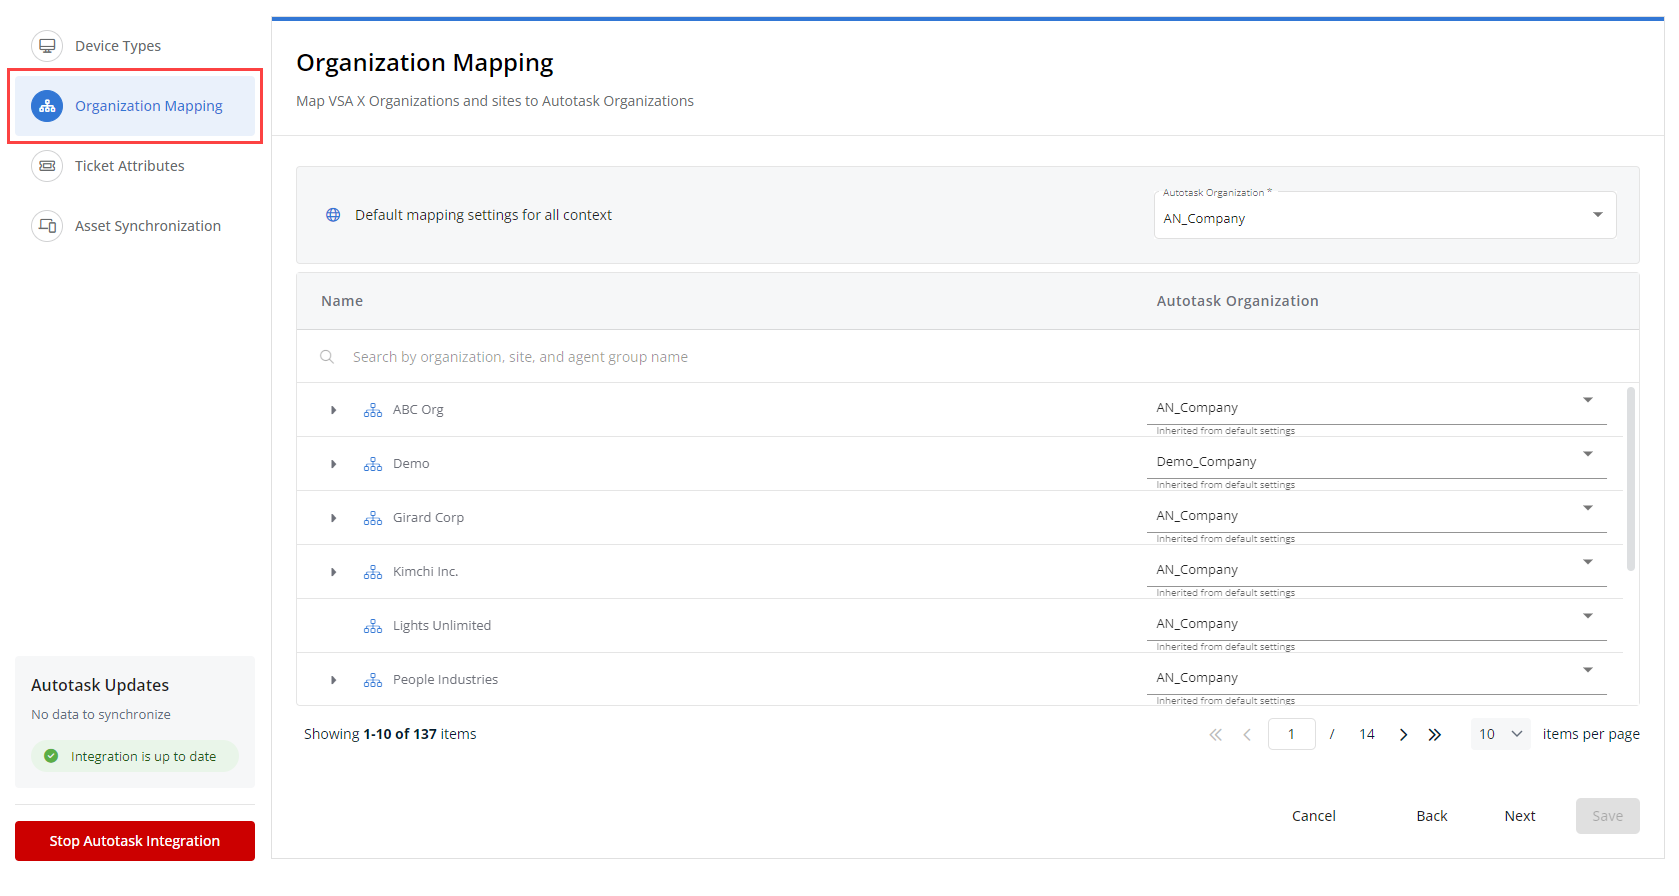
Step 3: Configuring ticket attributes
In the Ticket Attributes tab, you can configure if and how VSA 10 alerts generated in specific organizations, sites, and agent groups will be captured as Autotask tickets. Learn more about Autotask tickets in the Autotask Help system.
Alert rules allow you to handle VSA 10 alerts and their corresponding Autotask tickets:
- Queue refers to the Autotask Service Desk queue in which the triggered ticket will be created in Autotask. Refer to Service Desk queues in the Autotask Help system.
- Notification Type refers to the VSA 10 alert priority level required to trigger automatic Autotask ticket creation.
EXAMPLE You could define that only Critical VSA 10 alerts trigger Autotask ticket creation.
The following functionality is available to facilitate the mapping process:
- Apply the same mapping to all organizations, sites, and agent groups by selecting defaults in the Default mapping settings for all context section. From there, you can change any individual mappings using the drop-down menus in the Queue and Notification Type columns.
- Filter the list of organizations, sites, and agent groups (from which alerts may be generated) by name using the search bar.
- Expand an organization to manage the site(s) within that organization, and expand a site to manage the agent group(s) within that site.

NOTE An organization or site without a drop-down icon implies that no sites or agent groups belong to that organization/site.
- Click Create Test Ticket in Autotask to instantly generate a test ticket in Autotask that is routed to the selected default Autotask organization and queue.
Once you are finished, click Save to preserve the configured mapping or Cancel to clear any changes made since you last saved the page. Then, click Next to proceed to ticket attribute configuration.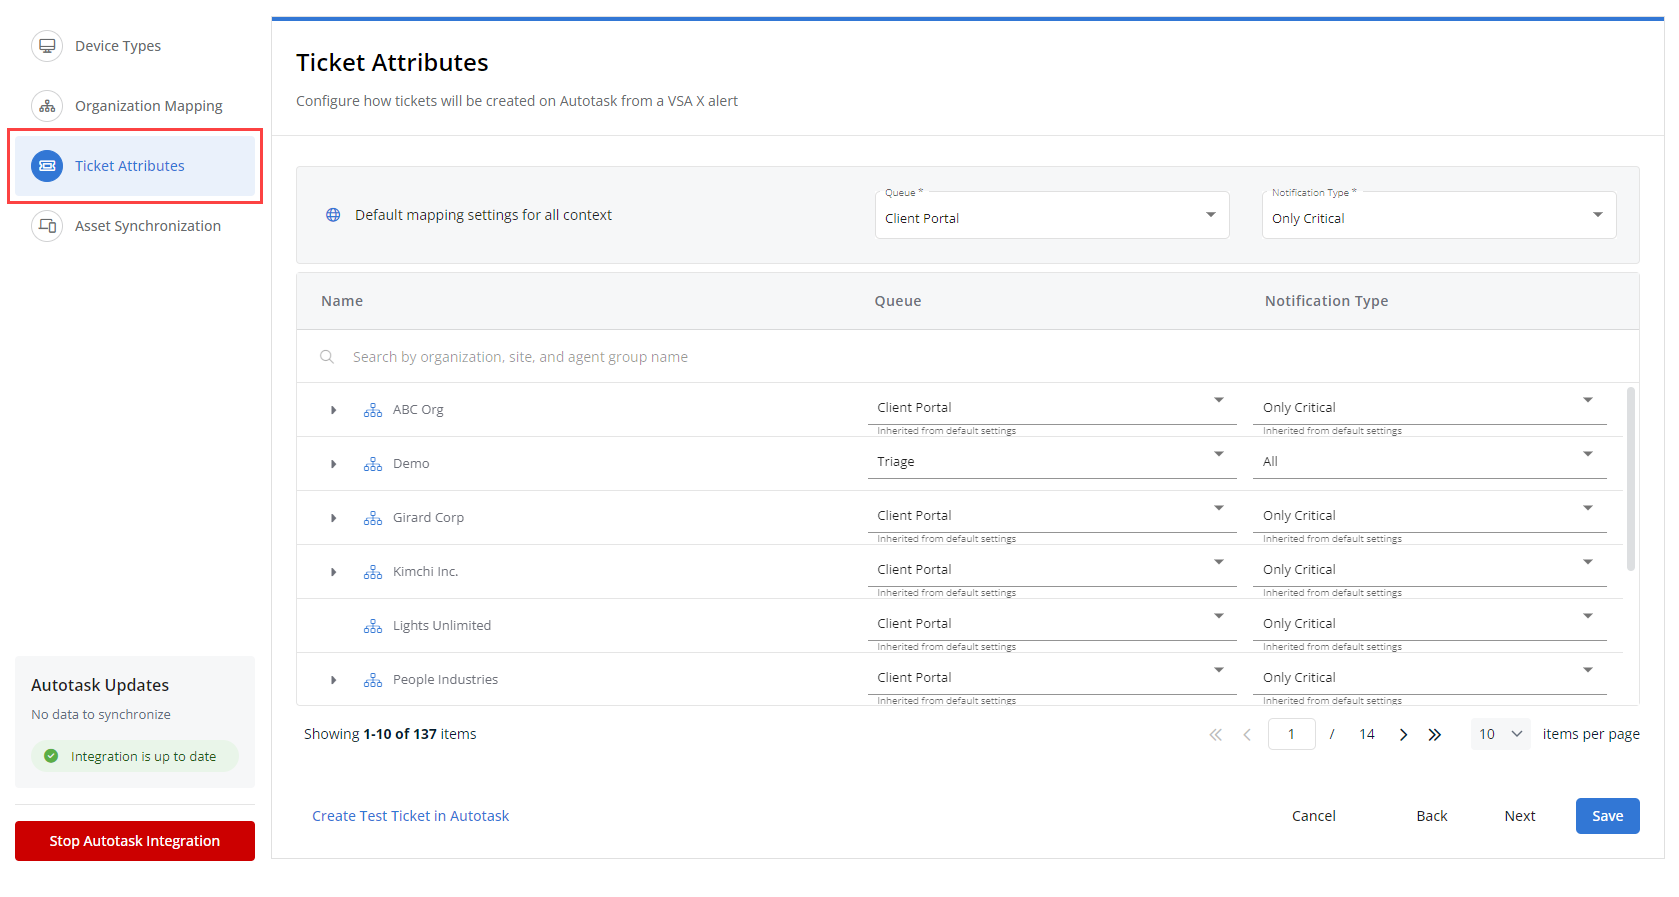
Step 4: Synchronizing assets
In the Asset Synchronization tab, you can configure the asset synchronization between VSA 10 and Autotask.
IMPORTANT If assets are not loading, ensure you've mapped you device types. Refer to Step 1: Mapping device types.
The following functionality is available to facilitate the mapping process:
- Use the Match with Autotask drop-down menu to filter the list by one of the following criterion:
- All types
- Mapped
- Unmapped: full match
- Unmapped: partially
- Unmapped: no matches
- Do not map
- Create new item
- Automatic mapping: If the Create New System And Map toggle is turned on, the integration will attempt to automatically map VSA 10 assets to existing Autotask configuration items if a full or partial match is detected:
- Partial match: The VSA 10 device and Autotask configuration item share the same name and organization.
- Full match: The VSA 10 device and Autotask configuration item share the same name, organization, and serial number.
- Filter the list of device types by name using the search bar.
- For new VSA 10 organizations and sites, you will have the option to do nothing, map to new Autotask company, or map to existing Autotask company.
NOTE If this toggle is turned on, you can still override the automatic mapping on individual asset records. With this option, whether or not a full or partial match exists, a new Autotask configuration item will be created.
For any unmatched asset, you can either accept the suggested match, search for an Autotask configuration item, or create a new configuration.
Sync behavior
- When a device is deleted in VSA 10, the corresponding Autotask configuration item will be inactivated.
- An asset sync will be triggered once every hour.
Once you are finished, click Save to preserve the configured mapping or Cancel to clear any changes made since you last saved the page.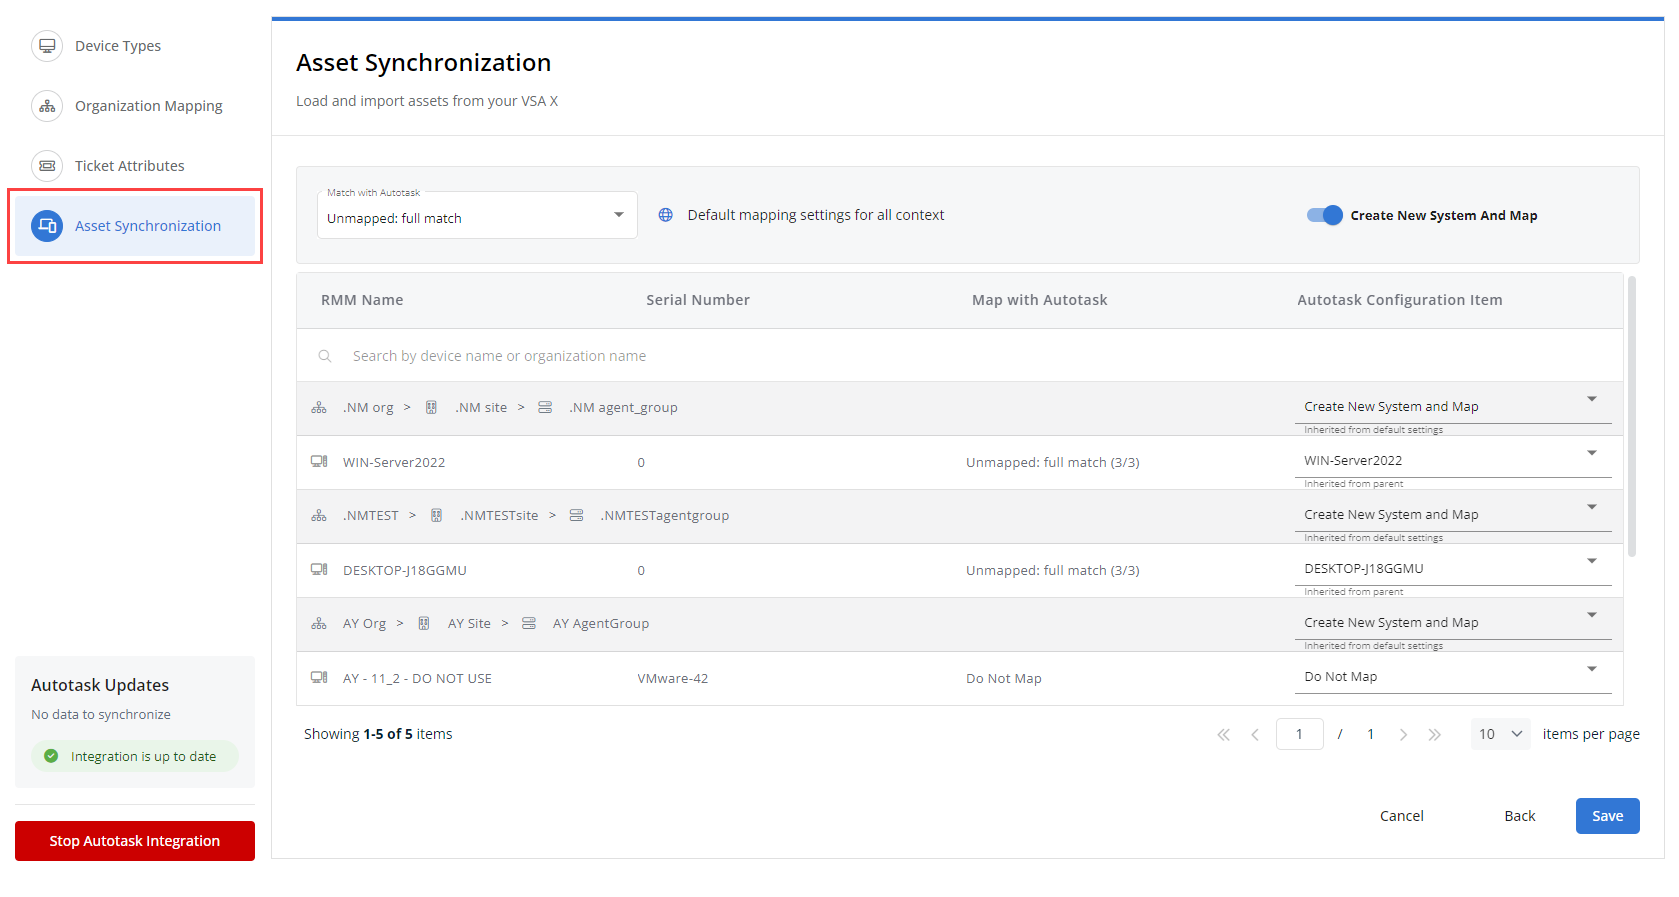
Once you complete the integration configuration, you will be redirected to the settings page automatically.
Creating tickets from agent tray
To enable users to create a support ticket, create a User Sessions profile and enable User Support Request.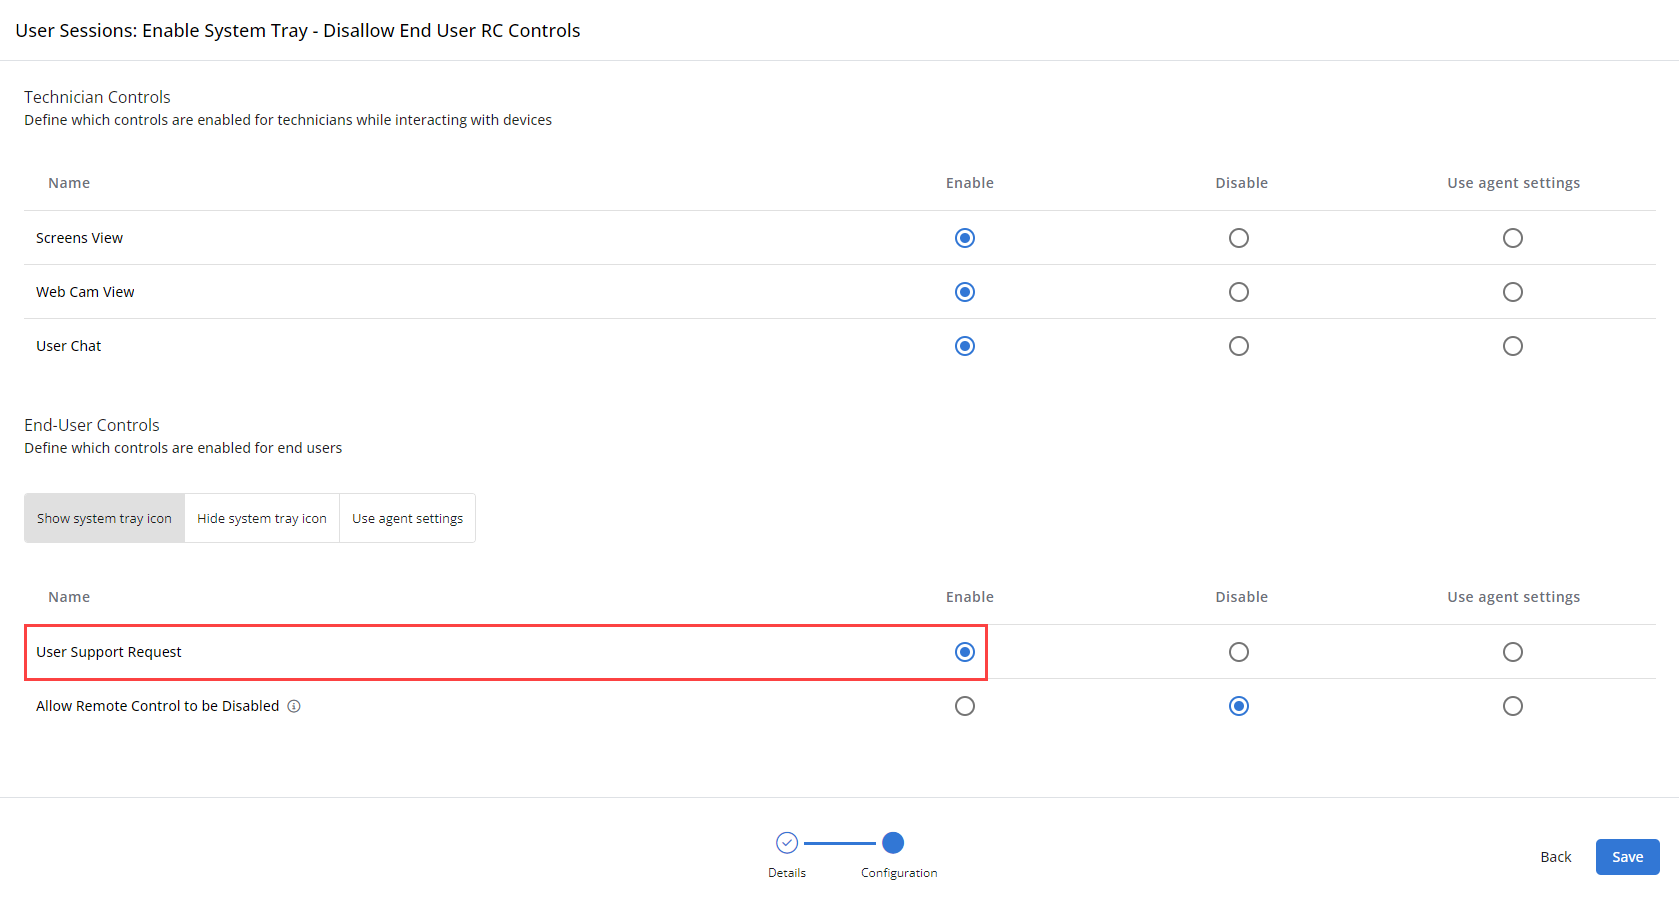
Then, apply the profile to organizations, sites, and devices via policies.
Cooper Bots Integration
Cooper Bots is a powerful Business Process Automation engine that will orchestrate workflows and facilitate the automation of manual and repetitive tasks across your IT Complete stack.
In combination with the VSA 10 and Autotask, this allows you to automate more complex responses. For example, running a script against a device in VSA10 in response to a ticket being opened for that device in Autotask.
For more information on Cooper Bots and their configuration, refer to our Cooper Bots documentation.
Integrated Customer Billing
With Integrated Customer Billing (ICB) enabled, you can accurately bill your customers for the Kaseya services you provide to them. This eliminates hours of manual reconciliation and optimizes your revenue by automatically updating Autotask contracts with each organization's usage of Kaseya products. This will also allow you to easily adopt new services without worrying about the added hassle of recovering vendor costs. For more information, refer to Integrated Customer Billing.
With ICB enabled, the following metrics are shared from VSA10 to Autotask:
| Metric | Description |
|---|---|
| Total Licensed Devices |
Total count of devices under management NOTE A device is considered under management whether it is network-enrolled, has an agent, or is mdm-enrolled. A device will only count once, even if it is enrolled through multiple methods. |
| Network Devices | Count of enrolled devices that do not have an agent installed and are not enrolled in MDM. |
| Agented Devices | Count of devices that have an agent installed. |
| MDM Devices | Count of devices that are enrolled in MDM (includes agentless and agented devices). |
| Devices with Webroot | Count of agented devices that have Webroot installed. |
| Devices with Bitdefender | Count of agented devices that have Bitdefender installed. |
| Devices with Ransomware Detection | Count of agented devices that have Ransomware Detection installed. |
| Devices with Patch Management | Count of agented devices that have an active patch management policy applied. |
| Monitored Network Devices | Count of enrolled network devices (enrolled devices that do not have an agent and are not enrolled in MDM) that have monitoring assigned directly or through a monitoring policy. |
| Monitored Agented Devices | Count of agented devices that have a monitoring policy assigned. |
| All Workstations | Count of agented devices that are listed as a Workstation. |
| All Servers | Count of agented devices that are listed as a Server. |
| All Windows Servers | Count of agented Windows devices that are listed as a Server. |
| All Windows Workstations | Count of agented Windows devices that are listed as a Workstation. |
| All Mac | Count of agented macOS devices. |
| All Linux | Count of devices Linux devices. |
| Agent - Online in Last 30 Days | Count of agented devices that were online in the last 30 days |
| Webroot Enabled | Webroot is active for at least one device in a given organization, site, or group. 1=Enabled / 0=Disabled |
| Bitdefender Enabled | Bitdefender is active for at least one device in a given organization, site, or group. 1=Enabled / 0=Disabled |
| Ransomware Detection Enabled | Ransomware Detection is active for at least one device in a given organization, site, or group. 1=Enabled / 0=Disabled |
|
3pp Enabled |
3pp is is active for at least one device in a given organization, site, or group. 1=Enabled / 0=Disabled |
Accessing Remote Control features
The Remote Control feature allows users to gain access to devices that are associated with VSA 10 directly from Autotask. This can be accomplished from the device itself or directly from a ticket that contains the associated device.
Use of the VSA 10 Remote Control feature is on an individual Autotask user basis. Any Autotask user who wants to use the remote control feature must authorize access to VSA 10 prior to using the Remote Control feature. A prompt will appear when you click the Remote Control icon.
Once the VSA 10 Integration has been enabled, you may access your VSA 10 connected devices directly from the Device or a Ticket that is associated with the device.
Visibility of the VSA 10 Device insight in Autotask
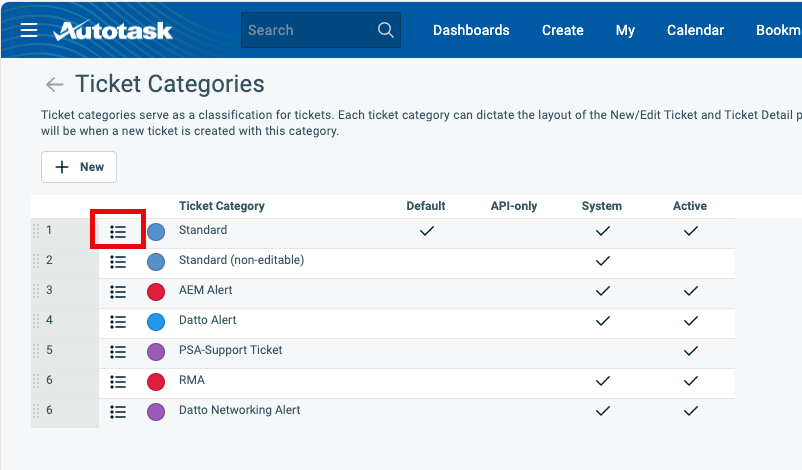
- In your Autotask account, navigate to Admin > Features & Settings > Service Desk (Tickets) > Ticket Categories.
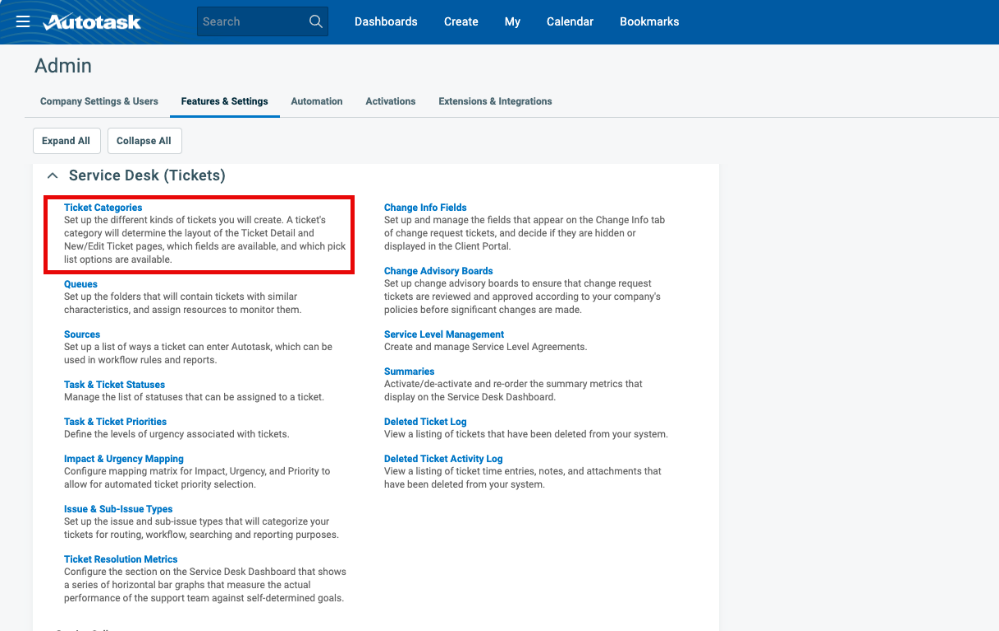
- Click to edit the Standard ticket category.
- Click the Insights tab.
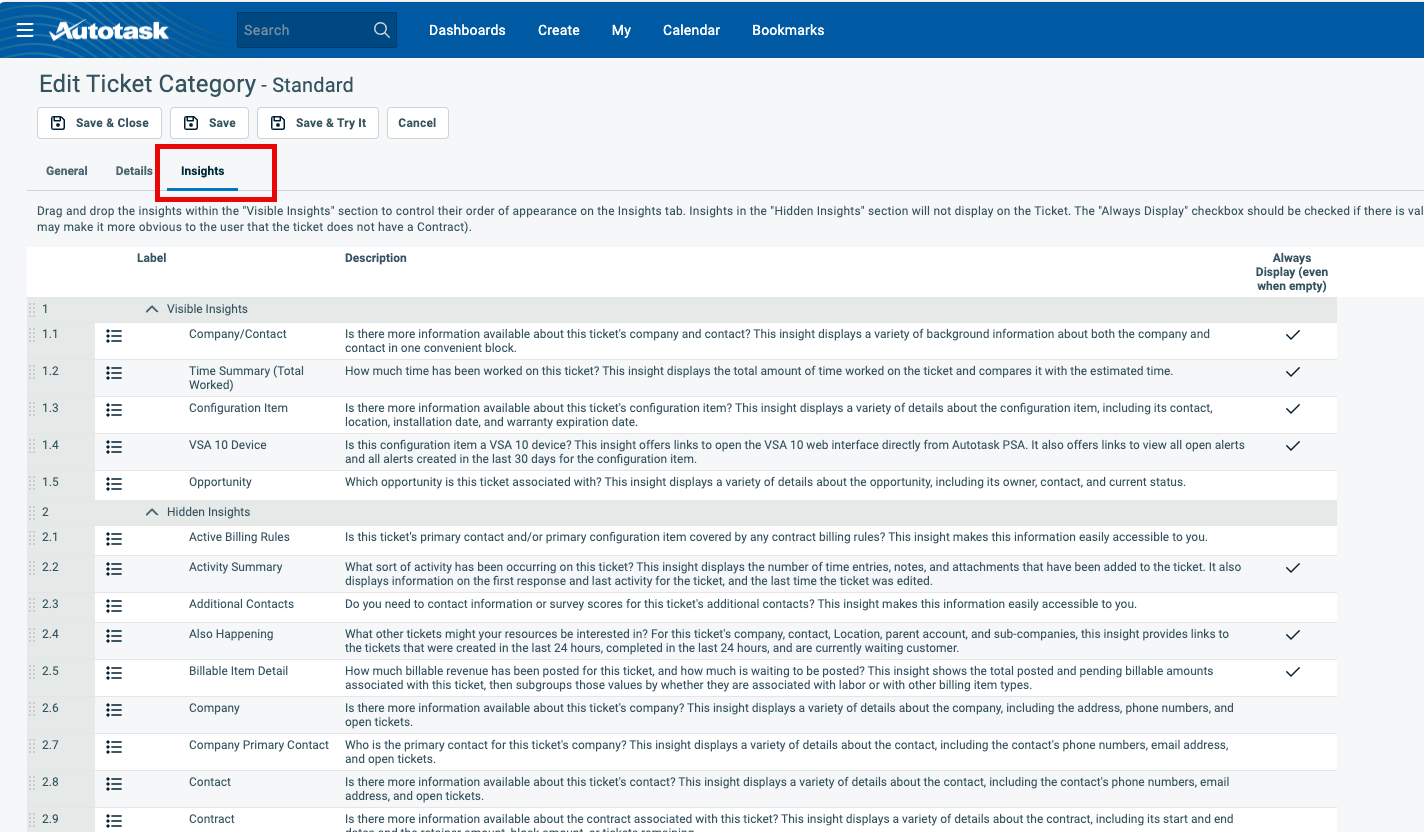
- Drag and drop the VSA 10 Device row from the Hidden Insights section to the Visible Insights section.
- Click Save & Close.
Accessing Remote Control features in Autotask
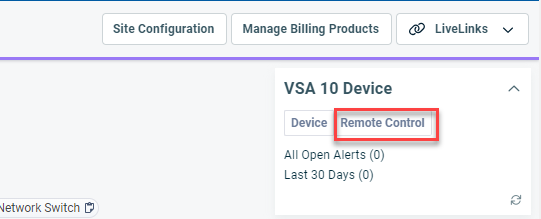
- In Autotask, navigate directly to a Device or to a Ticket that has a device that is associated with VSA 10 and click Remote Control.
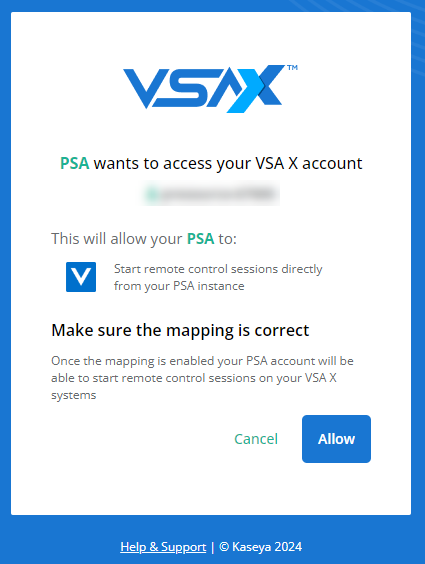
- If you have not accessed your VSA 10 account before, you will be prompted to grant authorization.
- A list of active sessions will appear. Choose an active session or click Login to begin a new session.
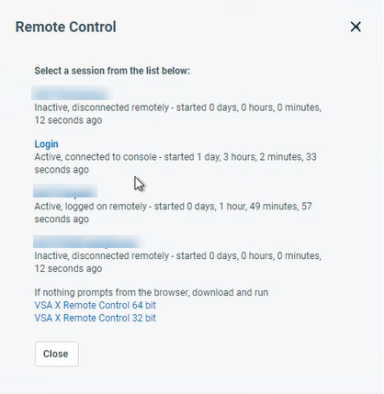
NOTE Pop-up windows must be allowed.
-
After selecting a session, Autotask will establish the connection to the selected device.
NOTE If the device is not enabled for remote control access in VSA 10, you will receive an error message. Refer to Remote Control.
Clearing the configuration
Refer to Clear Configuration in the Autotask Help system.
Troubleshooting
The following sections address the most common issues encountered when configuring and maintaining the Autotask integration, aimed to help you resolve integration problems quickly and efficiently.
This message indicates that assets failed to sync from VSA 10 to Autotask. This error originates from the Autotask API when the Autotask tenant is configured to require an InstallDate field for configuration items, but VSA 10 doesn't provide this data.
To prevent this error, work with your Autotask administrator during initial setup to identify required fields and adjust tenant settings accordingly.
If you encounter this error, complete the following steps in VSA 10:
- Navigate to Integrations > Autotask.
- Check the Integration Log tab for specific error details.
- Note which assets are affected.
- Contact an Autotask administrator to review the configuration item requirements.
- Determine if InstallDate can be made optional for VSA 10 integrations. As an alternative workaround, if InstallDate must remain required, consider manually populating this field in Autotask for affected assets.
- Re-run the integration sync after making changes.
If devices fail to sync from VSA 10 to Autotask, with integration logs showing sync failures, the likely cause is Autotask containing configuration items (assets) that no longer exist in VSA 10, causing sync conflicts.
To prevent this error, regularly audit your Autotask configuration items to prevent orphaned asset accumulation.
To resolve this issue, complete the following steps in VSA 10:
- Navigate to Integrations > Autotask.
- Check the Integration Log tab for specific asset names or IDs mentioned in error messages.
- Compare failing asset names with your current VSA 10 device list by navigating to Devices > Device List.
Then, complete the following steps in Autotask:
- Navigate to the Configuration Items section.
- Search for the specific assets mentioned in VSA 10 error logs.
- Verify these assets don't exist in VSA 10.
- Delete or deactivate the orphaned configuration items in Autotask.
IMPORTANT Ensure you're only removing assets that truly do not exist in VSA 10.
Return to VSA 10 to finish troubleshooting as follows:
- Navigate to Integrations > Autotask.
- Click Sync Now or wait for the next scheduled sync.
- Monitor integration logs for resolution.
If the Autotask integration appears as inactive or shows connection failures, complete the following steps:
- In VSA 10, navigate to Integrations > Autotask.
- Click Test Connection.
- If the test fails, verify your Autotask API credentials.
- In Autotask, ensure the API user account exists and is active in Autotask. Verify the API user has appropriate permissions for configuration item management.
- In Autotask, confirm API security level settings.
- In VSA 10, navigate to Configuration > API Access > Trusted Applications.
- Verify Autotask is listed as a trusted application. If missing, re-establish the integration from the Autotask side first.
- If credentials are correct but connection still fails, clear the current integration configuration in VSA 10.
- Re-establish the connection from Autotask to VSA 10 by reconfiguring integration settings in VSA 10.
If VSA 10 organizations are not syncing to Autotask companies, complete the following steps:
- Navigate to Integrations > Autotask > Organization Mapping in VSA 10.
- Ensure each VSA 10 organization has a corresponding Autotask company selected.
- Check for unmapped sites and groups under organizations.
- Map any unmapped VSA 10 organizations to appropriate Autotask companies.
- For new companies, create them in Autotask first, then map in VSA 10.
- After saving the mapping configuration, run a test sync to verify organization data flows correctly.
NOTE Sites and groups inherit from parent organization mapping. Override inheritance only when necessary for specific mapping requirements.
The integration page may require 30 seconds to several minutes to load, depending on the number of organizations and assets. If the integration configuration page takes excessive time to load, follow these optimization tips:
- Do not navigate away from the integration page while it is loading. This preserves loading progress and prevents restart.
- Only one user can access the integration configuration page at a time. If blocked, wait for the other user to complete their session.
- Perform integration configuration during low-usage periods. Plan organization mapping sessions during maintenance windows.
Preventive maintenance: Regular integration health checks
Recommended monthly tasks
- Review integration logs for recurring errors.
- Verify organization mappings remain accurate.
- Clean up any orphaned assets in Autotask.
- Test integration connectivity.
Recommended quarterly tasks
- Audit API user permissions in Autotask.
- Review and update device type mappings.
- Validate trusted application settings.
- Document any configuration changes.


