BMS/Vorex Integration
NAVIGATION Modules > Integrations > BMS
NAVIGATION Modules > Tickets
PERMISSIONS PSA > Read-only access to all PSA Integration pages
PERMISSIONS PSA > Full access to all PSA Integration pages
Kaseya BMS/Vorex, a professional services automation (PSA) solution, enables MSPs to provide better IT service delivery. The software integrates with many other tools, including VSA 10, to facilitate technician efficiency and productivity.
IMPORTANT To enable the BMS/Vorex Integration for VSA 10, contact your account manager and provide your BMS/Vorex company name.
Configuring the BMS/Vorex Integration in VSA 10
Once the integration is enabled for your VSA 10 account on the sales backend, the BMS/Vorex page is available within the Integrations menu. Follow the below steps to configure the integration.
First, perform the following steps in VSA 10:
-
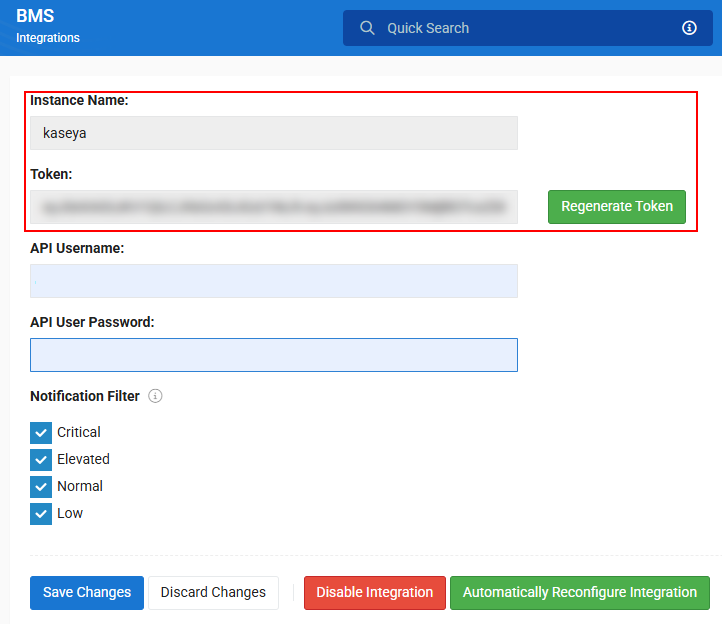
From the left navigation menu, navigate to Integrations > BMS/Vorex. In the lower-left corner of the page, click Enable Integration.
NOTE If the BMS/Vorex option is missing from your integrations menu, reach out to your account manager to have it enabled.
-
Once enabled, on the page that appears, you will see your Instance Name and a Token. Make a note of these as we will need them later on.
-
It is recommended to make full use of the integration that you generate an API username and password from BMS/Vorex. For instructions on how to create a BMS/Vorex API user, refer to our article on creating API accounts in BMS/Vorex. Please note that while you can configure the integration without a BMS/Vorex API user, functionality will be limited.
-
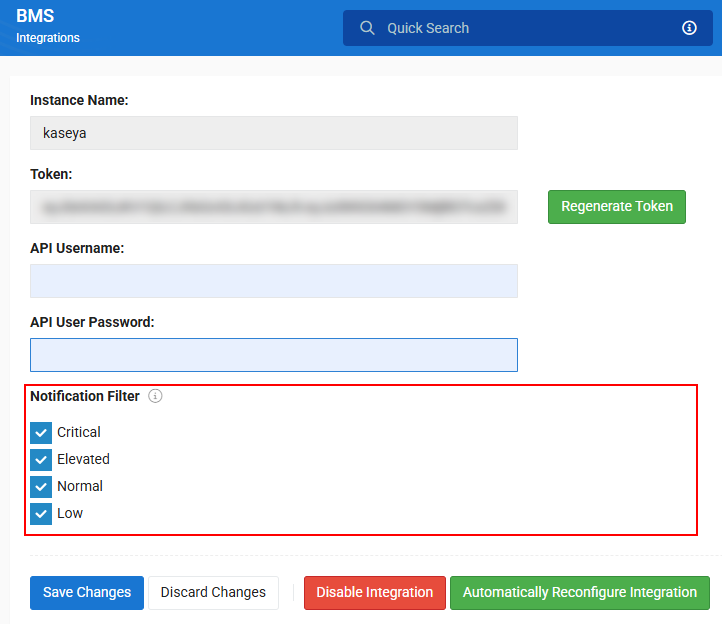
In the Notification Filter section, check the boxes next to the notification priorities that you want to create tickets in BMS/Vorex.
-
When done, click Save Changes.
Once this is done, you can review the options on this page in more detail below, or continue the configuration in BMS/Vorex.
Once the integration page is enabled, you can perform the following actions from this page:
- Regenerate Token: Click to regenerate your integration API token, which will invalidate any keys previously generated.
- Notification Filter: Select the check boxes of the alert priority levels that should trigger BMS/Vorex tickets to be created. If a check box is not selected, a notification of that priority level will not create a BMS/Vorex ticket. After changing any selections, click Save Changes or Discard Changes.
- Disable the integration: Click to disable the integration. If you do so, all of the authentication settings will be deleted. You can re-enable the integration at any time.
- Automatically Reconfigure Integration: Click to reconfigure the integration if it isn’t working properly or you regenerated the token.
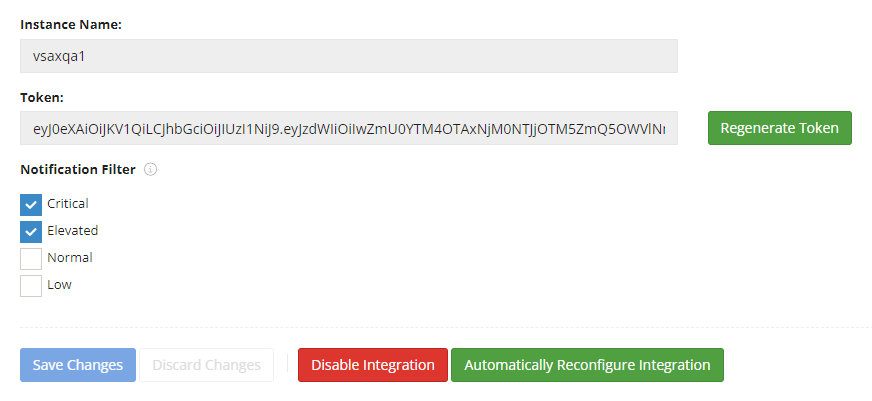
NOTE If you regenerate the token, be sure to also click Automatically Reconfigure Integration to ensure the integration continues to run correctly.
In the left navigation menu, you can click the external link icon ![]() in the BMS/Vorex menu item to open your BMS/Vorex instance in a new tab directly from VSA 10.
in the BMS/Vorex menu item to open your BMS/Vorex instance in a new tab directly from VSA 10.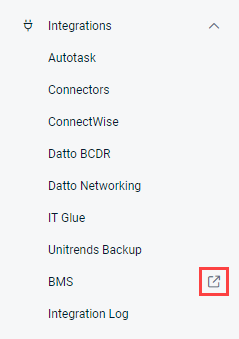
Setting up the integration in BMS/Vorex
You will perform most of the integration configuration in BMS/Vorex. Before completing these steps, ensure the integration is enabled in VSA 10.
Complete the following steps in your BMS/Vorex account:
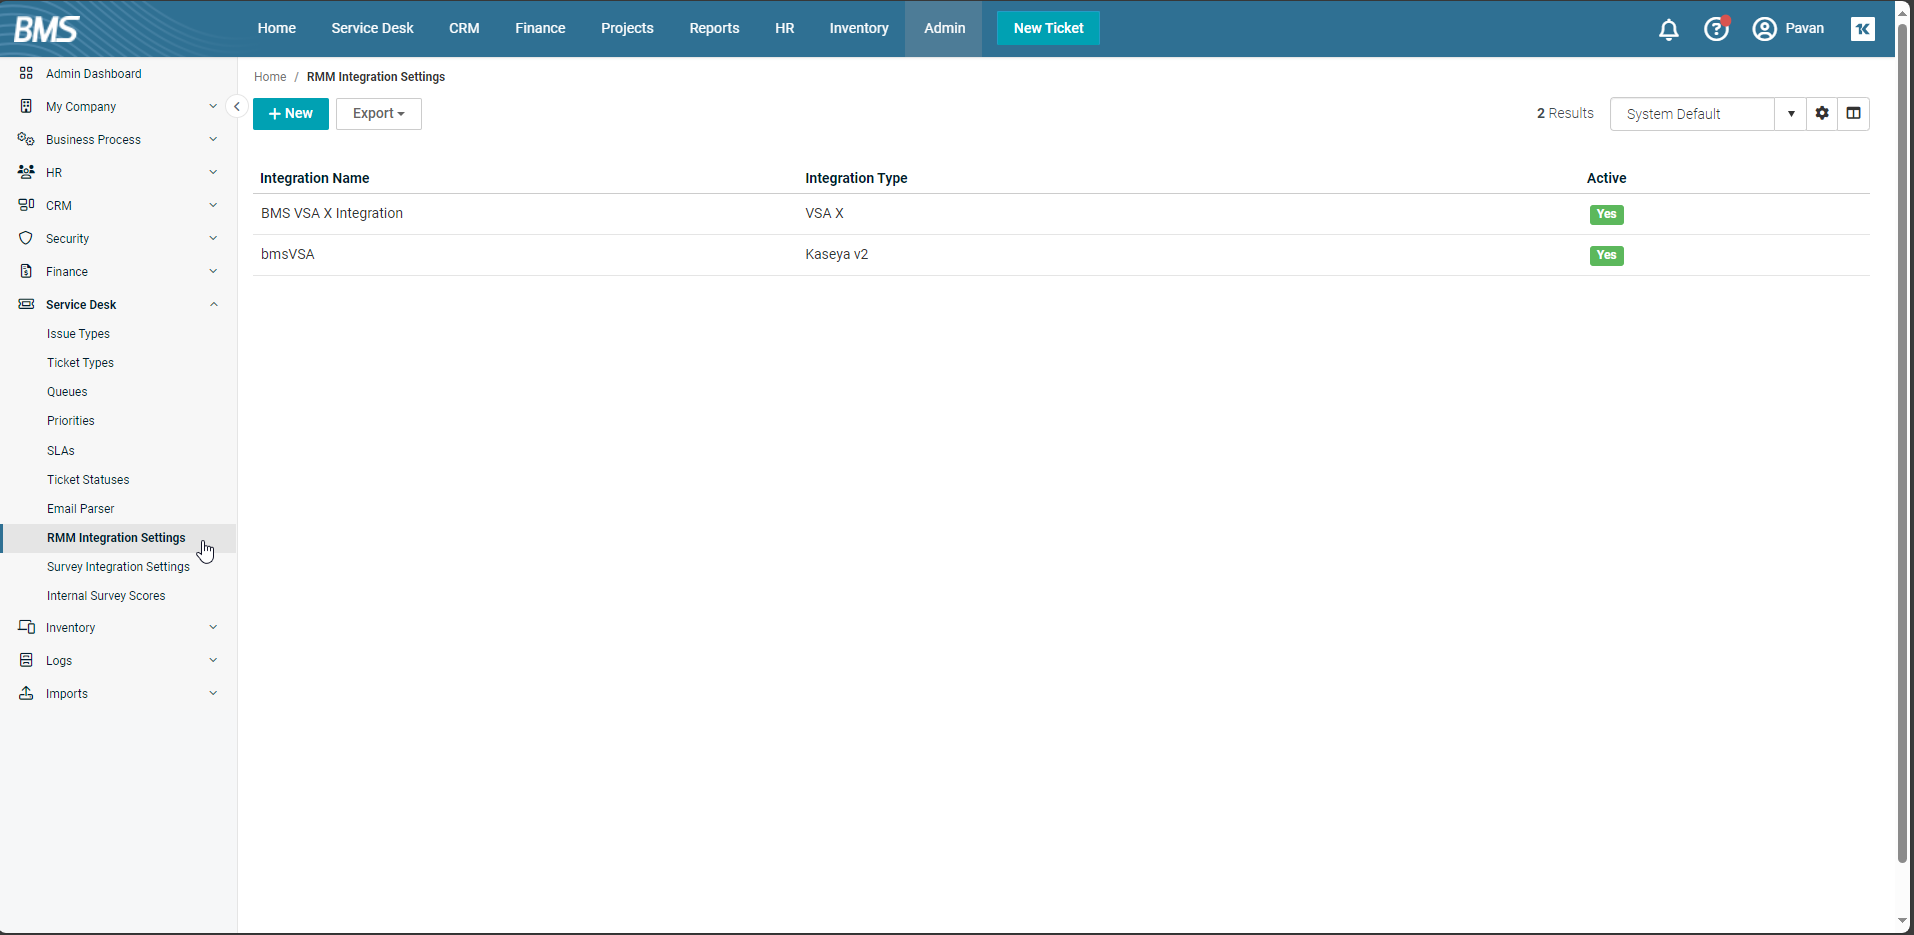
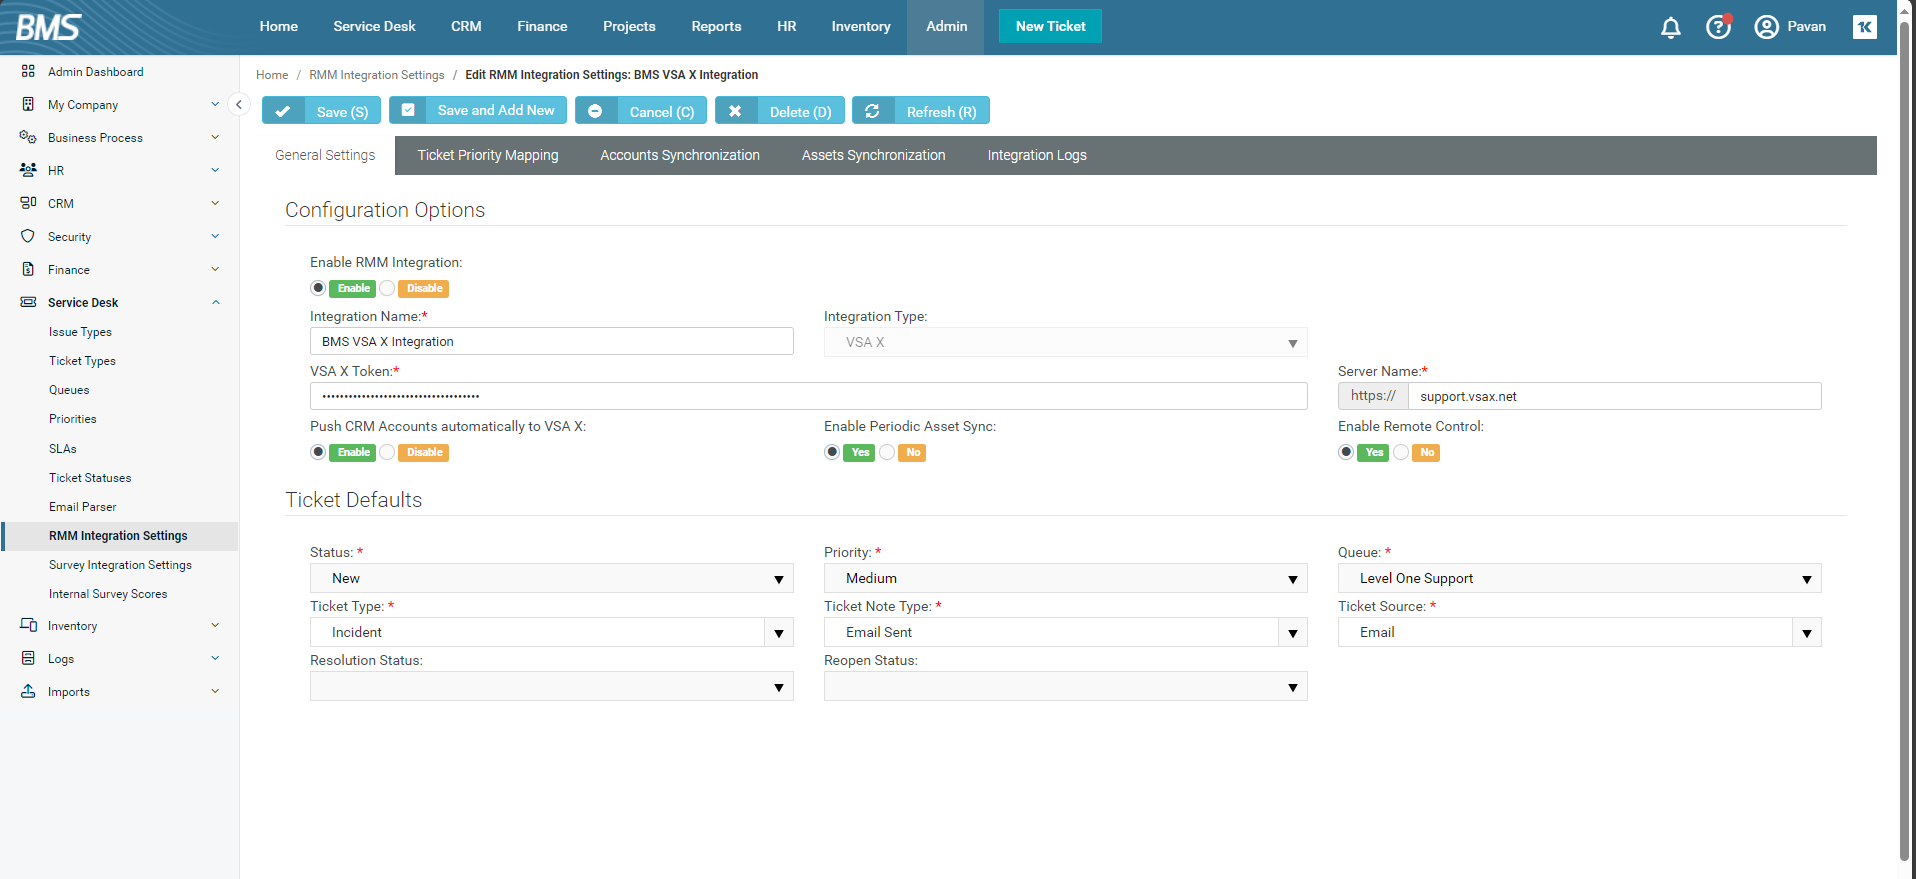
- Navigate to Admin > Integrations > RMM Integration Settings.
- Click New. A page opens with two tabs - General Settings and Asset Mapping, General Settings being the default open tab.
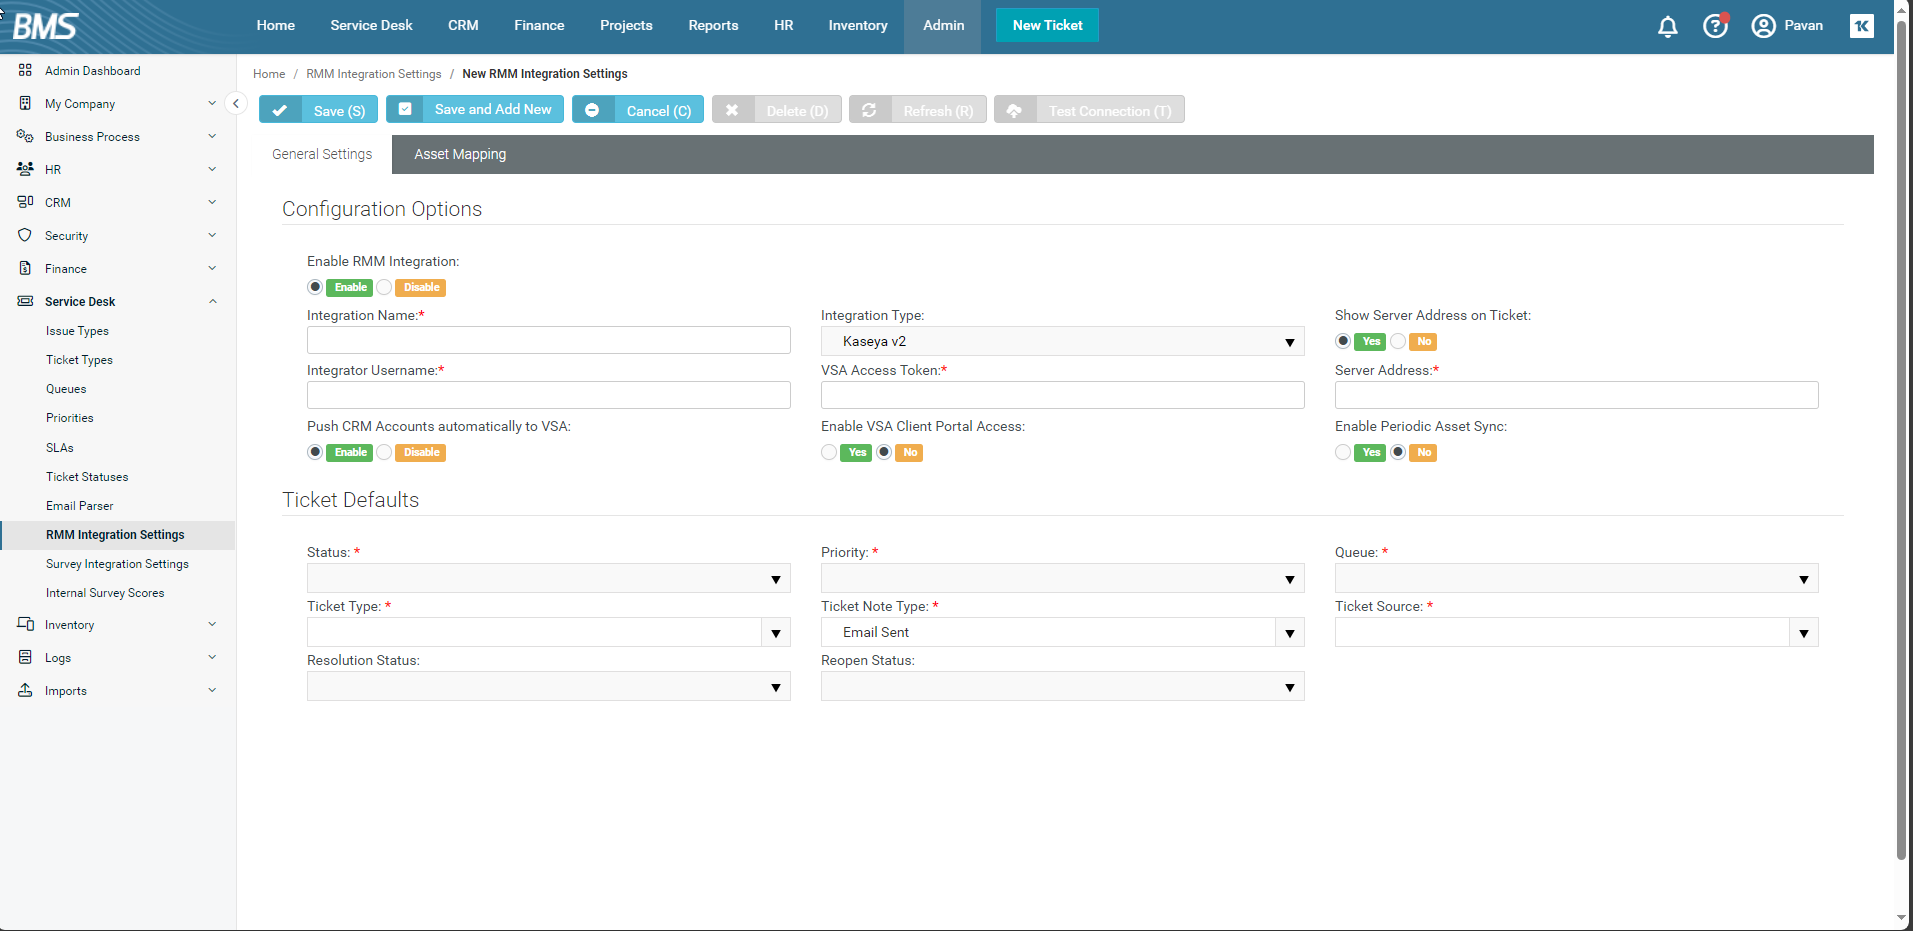
- Under RMM Integration, the Enable button is selected by default. Leave it as it is.
- Integration Name: Enter an appropriate integration name.
- Integration Type: Select VSA 10 from the dropdown.
- VSA 10 Token: Paste the token generated on the BMS/Vorex integration page.
- Under Push CRM Accounts automatically to VSA 10, click Enable.
- Under Enable Periodic Asset Sync, click Yes.
- Server Name: Enter your VSA 10 instance name. This will be in the xxxxxx.vsax.net format. Enable Remote Control should be set to Yes.
- In the Ticket Defaults section, do the following:
- Status: Select the appropriate option from the dropdown.
- Priority: Select the appropriate option from the dropdown.
- Queue: Select the appropriate option from the dropdown.
- Ticket Type: Select the appropriate option from the dropdown.
- Ticket Source: Select the appropriate option from the dropdown.
- Click Save. You will see a success message displayed on the top.
-
Once you save the integration, you will see four tabs - Ticket Priority Mapping, Accounts Synchronization, Assets Synchronization, and Integration Logs. For detailed information on these tabs, refer to Integration settings.
- Go to the Ticket Priority Mapping tab.
-
For each of the priorities on the left, select a Service Desk Priority from the drop-downs on the right. Notifications created in VSA 10 will trigger ticket creation based on what you define here.

NOTE When a notification triggers ticket creation in BMS/Vorex, a two-way link is established. This means that when a notification ticket is completed in BMS/Vorex, its corresponding notification in VSA 10 is deleted, and vice versa.
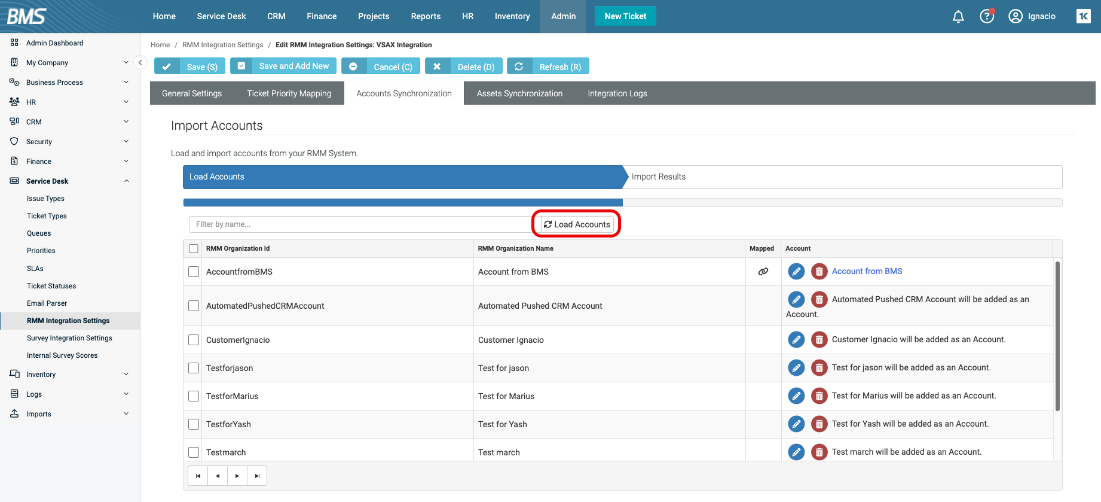
- Go to the Accounts Synchronization tab.
- By default, all accounts will appear here. You should map them one by one.
-
To import and sync organizations from VSA 10 as accounts in BMS/Vorex, check the box next to the RMM Organization id. Repeat the process for each account.
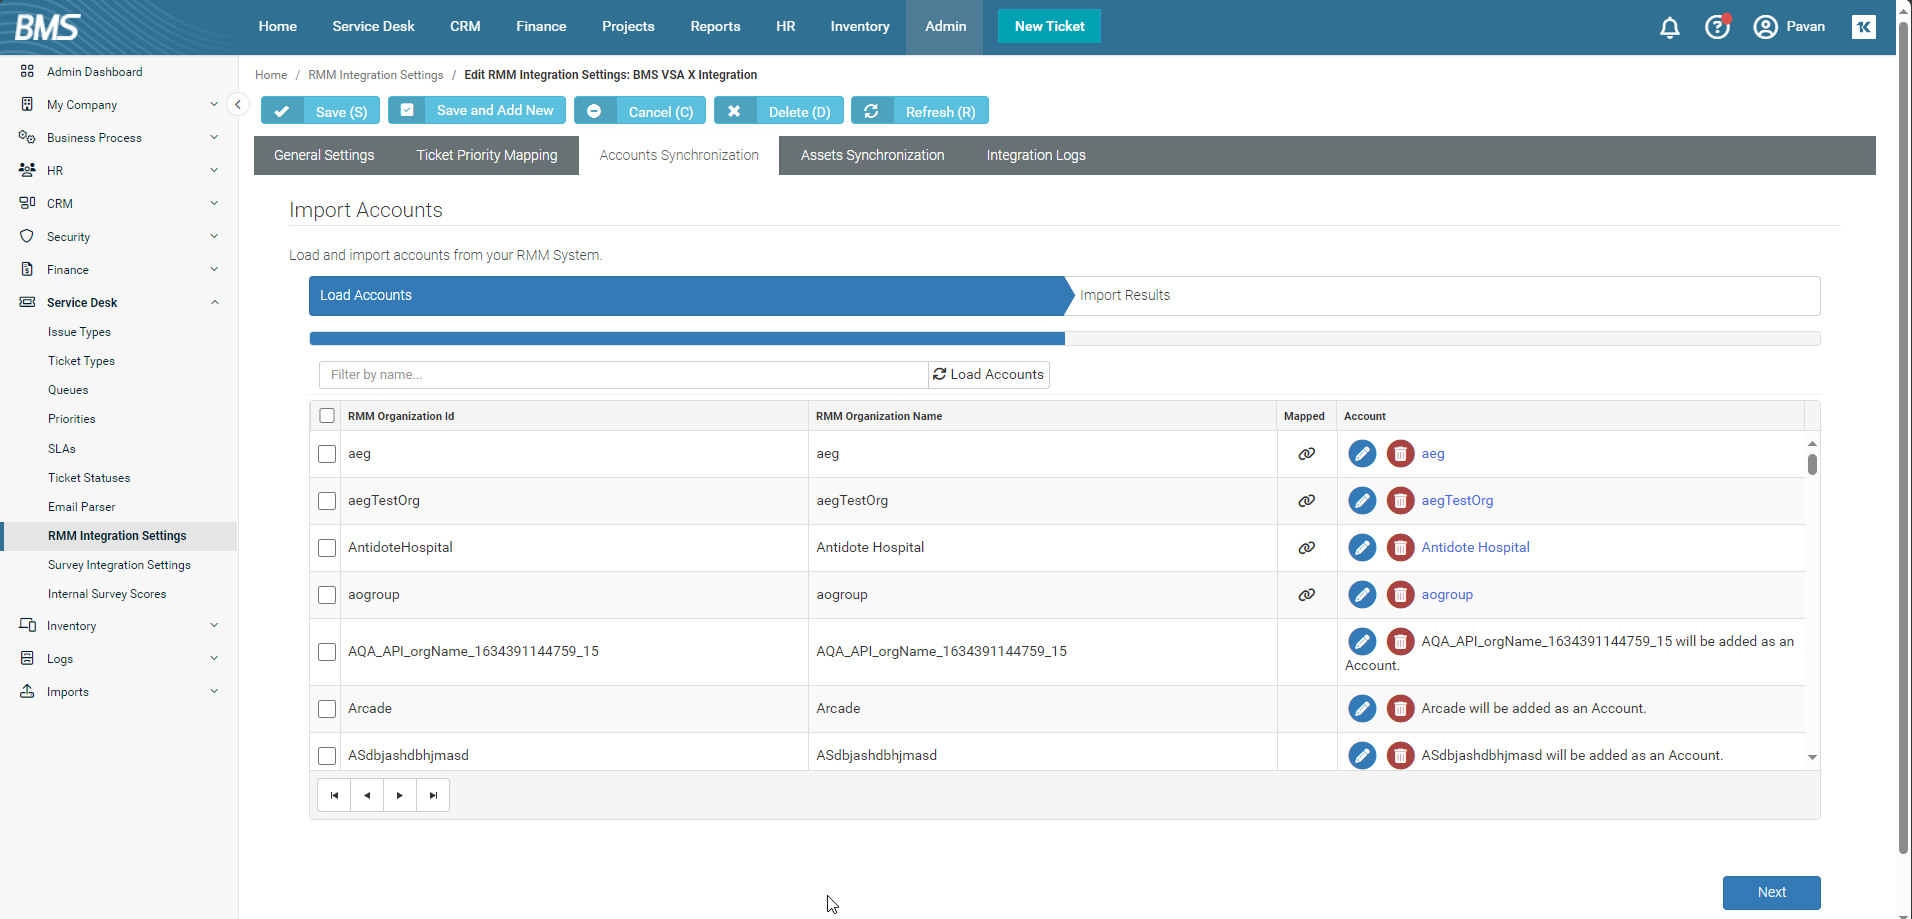
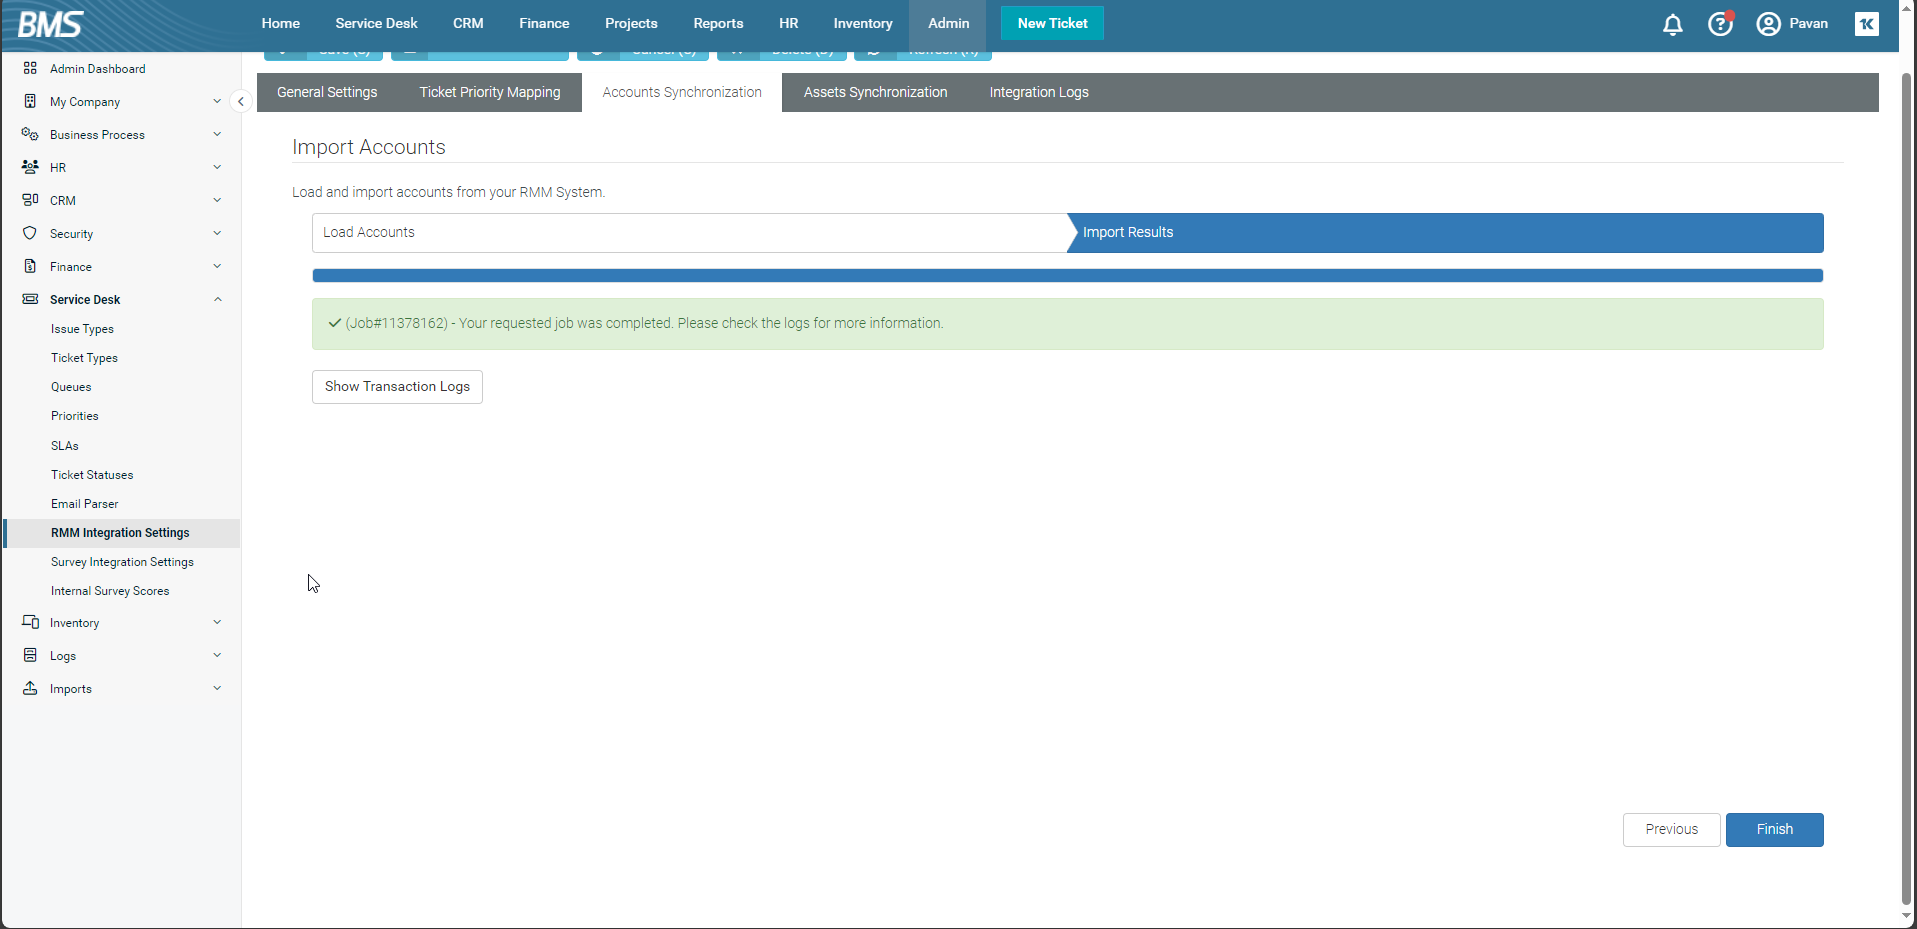
- Once the organizations you wish to import into BMS/Vorex are checked, click Next. You will see a green success message on the Import Results screen when it finishes successfully.
- Next, go to the Assets Synchronization tab.
-
To sync individual assets, check the box next to the asset name. Repeat the process for each account. Alternatively, you can click Sync All Assets to sync them all at once.
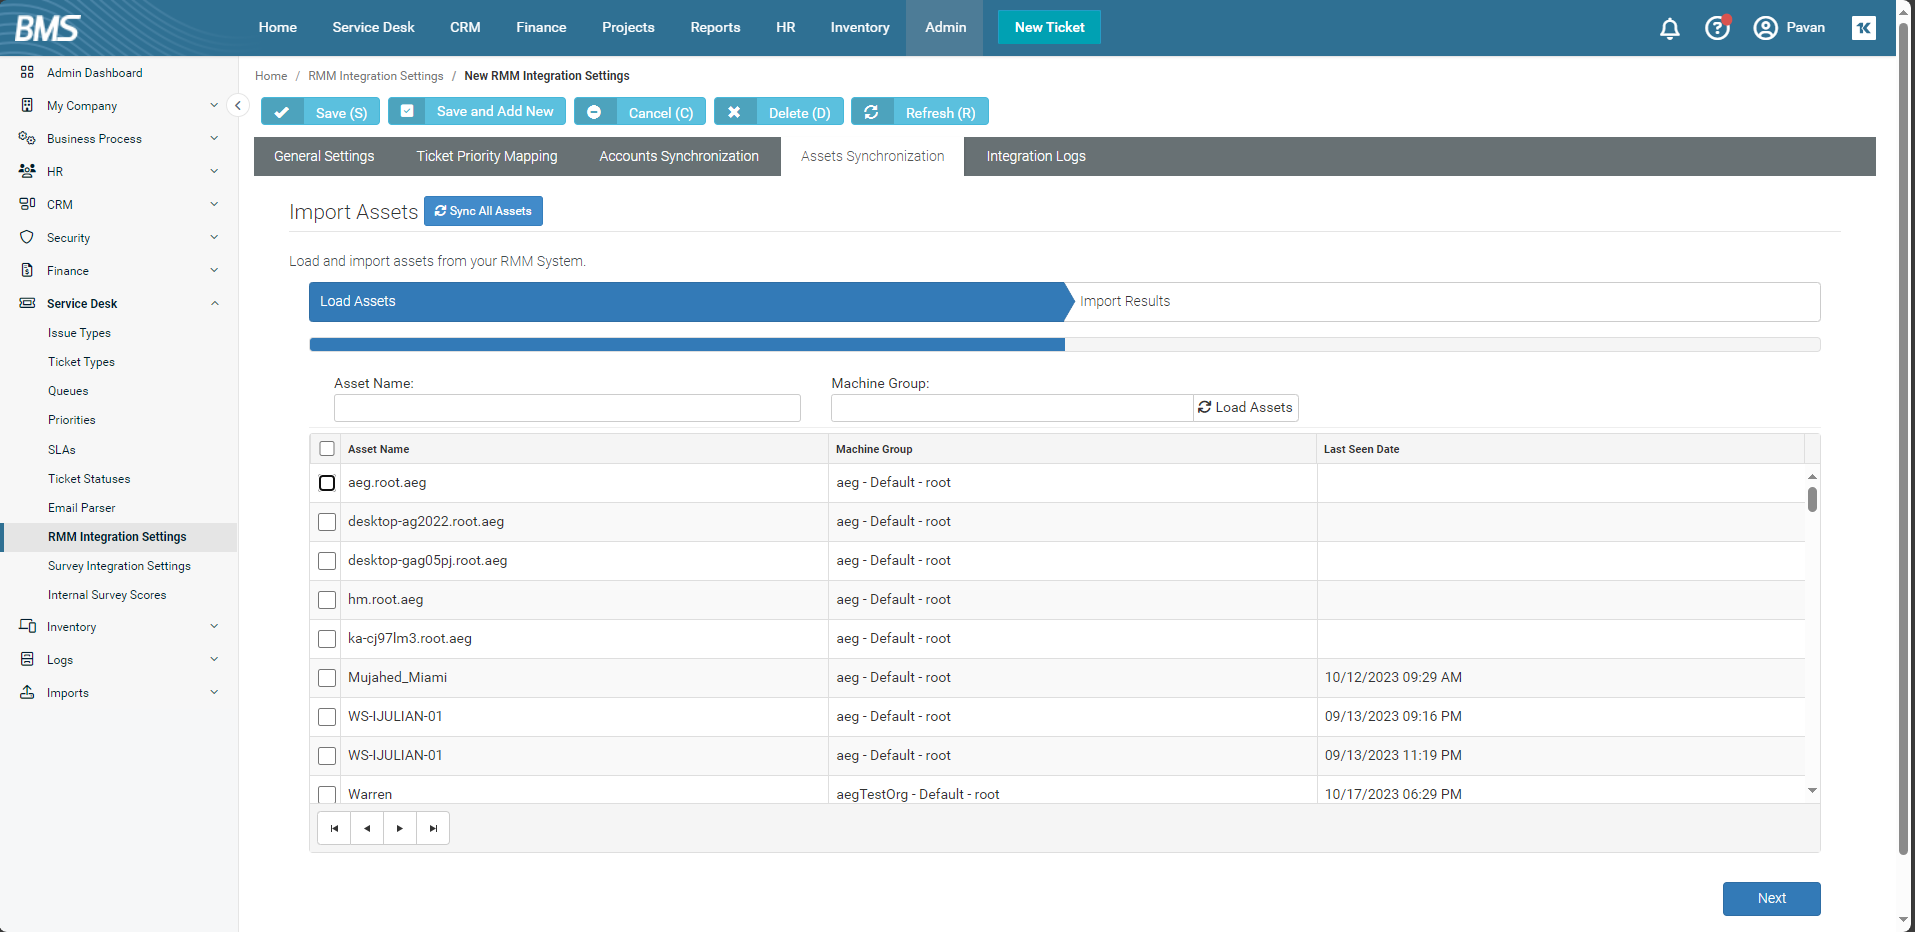
- Click Next. You will see a green success message on the Import Results screen when it finishes successfully.
-
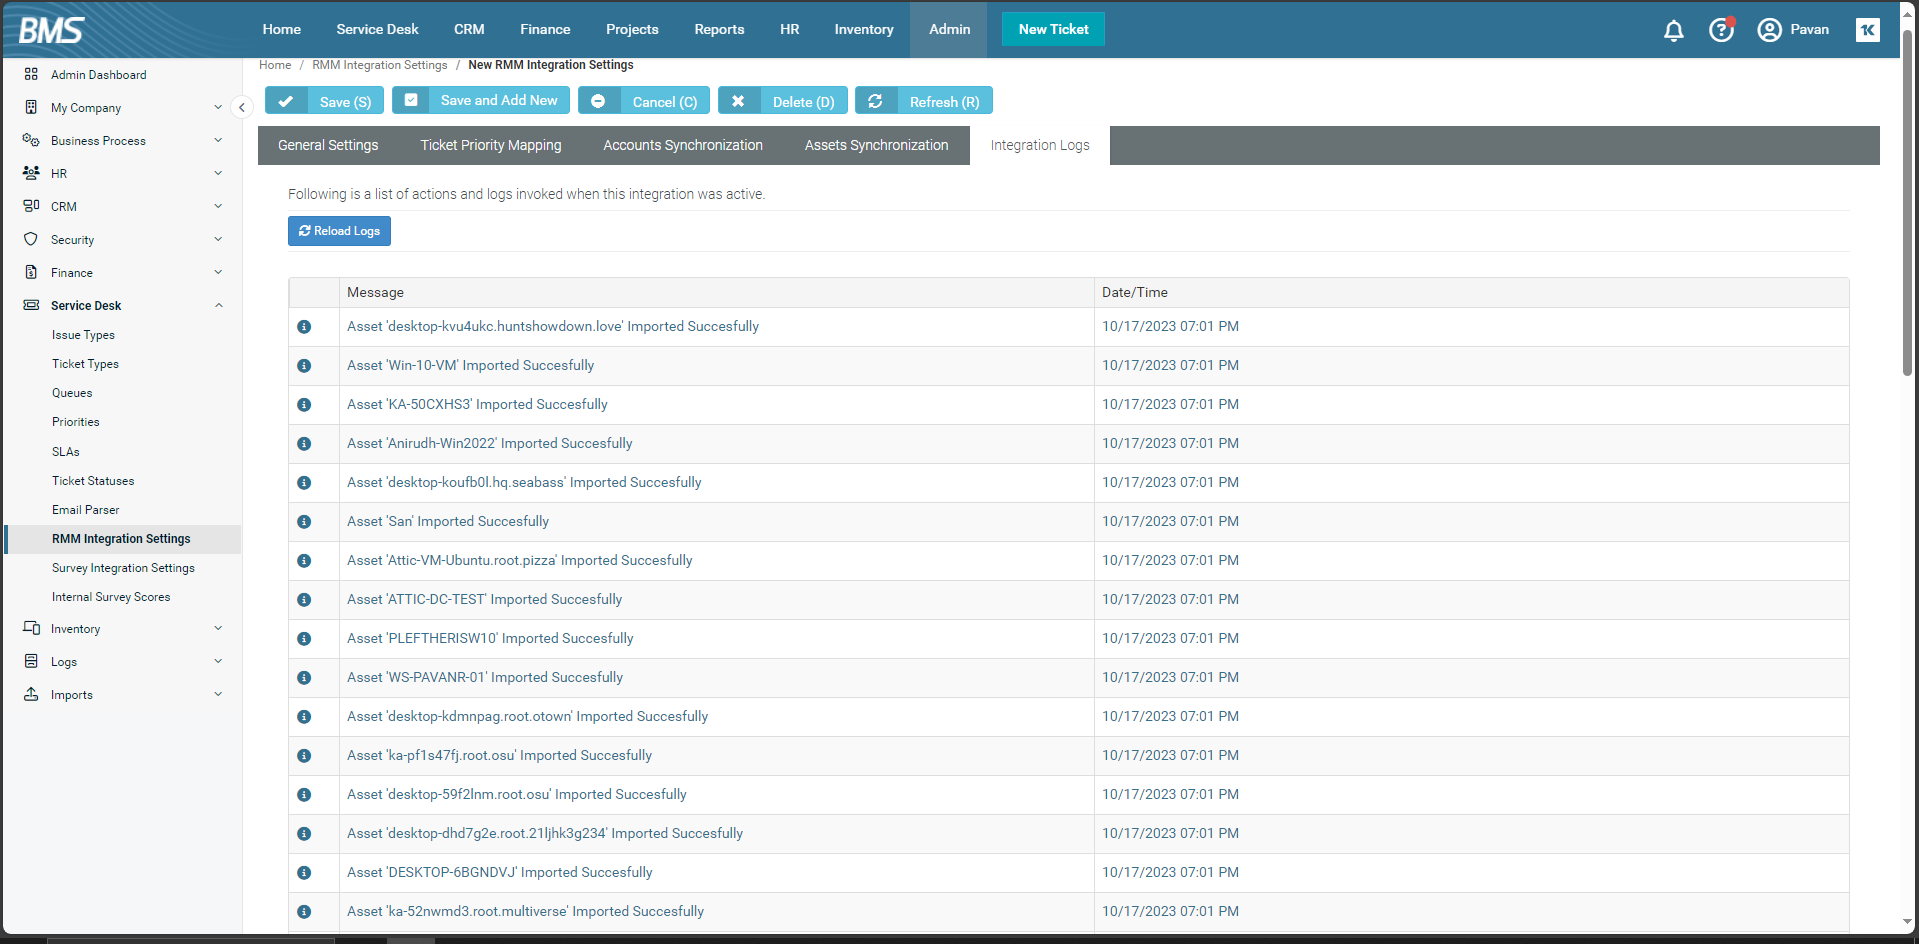
For detailed information on what was synced, you can check the logs under Integration Logs tab.
Completing the steps above, syncing organizations and devices between VSA10 and BMS/Vorex, will get the integration set up initially. for more information on the configuration options on these pages, refer to Integration settings.
Integration settings

The following settings are available to configure the integration:
From this tab, you can perform the following actions:
- Enable or disable the integration.
- Edit the server name (your VSA 10 URL), which is automatically populated when the integration is enabled.
- Push CRM accounts automatically to VSA 10.
- Enable period asset sync, which will activate a nightly synchronization that creates assets in BMS/Vorex if you enrolled new devices in VSA 10. If changes were made, asset information of all the records will be updated accordingly.
- Enable remote control, which provides the option to remotely control VSA 10 devices from the tickets.
- Configure the default settings for BMS/Vorex tickets generated from VSA 10 notifications, such as the priority, status, queue, ticket type, and more. To learn how to configure BMS/Vorex ticket creation in VSA 10, refer to Configuring the BMS/Vorex Integration in VSA 10.

NOTE If you want to automatically create a BMS/Vorex account as a VSA 10 organization, you should enable this option. That way, every time you create a CRM account, an organization with the same name will be automatically created in VSA 10.
VSA 10 can detect issues based on certain rules and monitoring configurations that exist for a set of assets. You can configure such alerts to be automatically synced to BMS/Vorex as tickets, linked to the equivalent organization (account in BMS/Vorex) and related hardware assets.
An automatic service that runs periodically in VSA 10 monitors such alerts. Once created, the alerts are automatically synced to BMS/Vorex as tickets within the Service Desk menu.
These tickets are automatically linked to the correct mapped account and the related assets from the hardware assets catalog in BMS/Vorex Service Desk.
The process initiates an automatic sync for the asset and organization in case no equivalent is found in BMS/Vorex.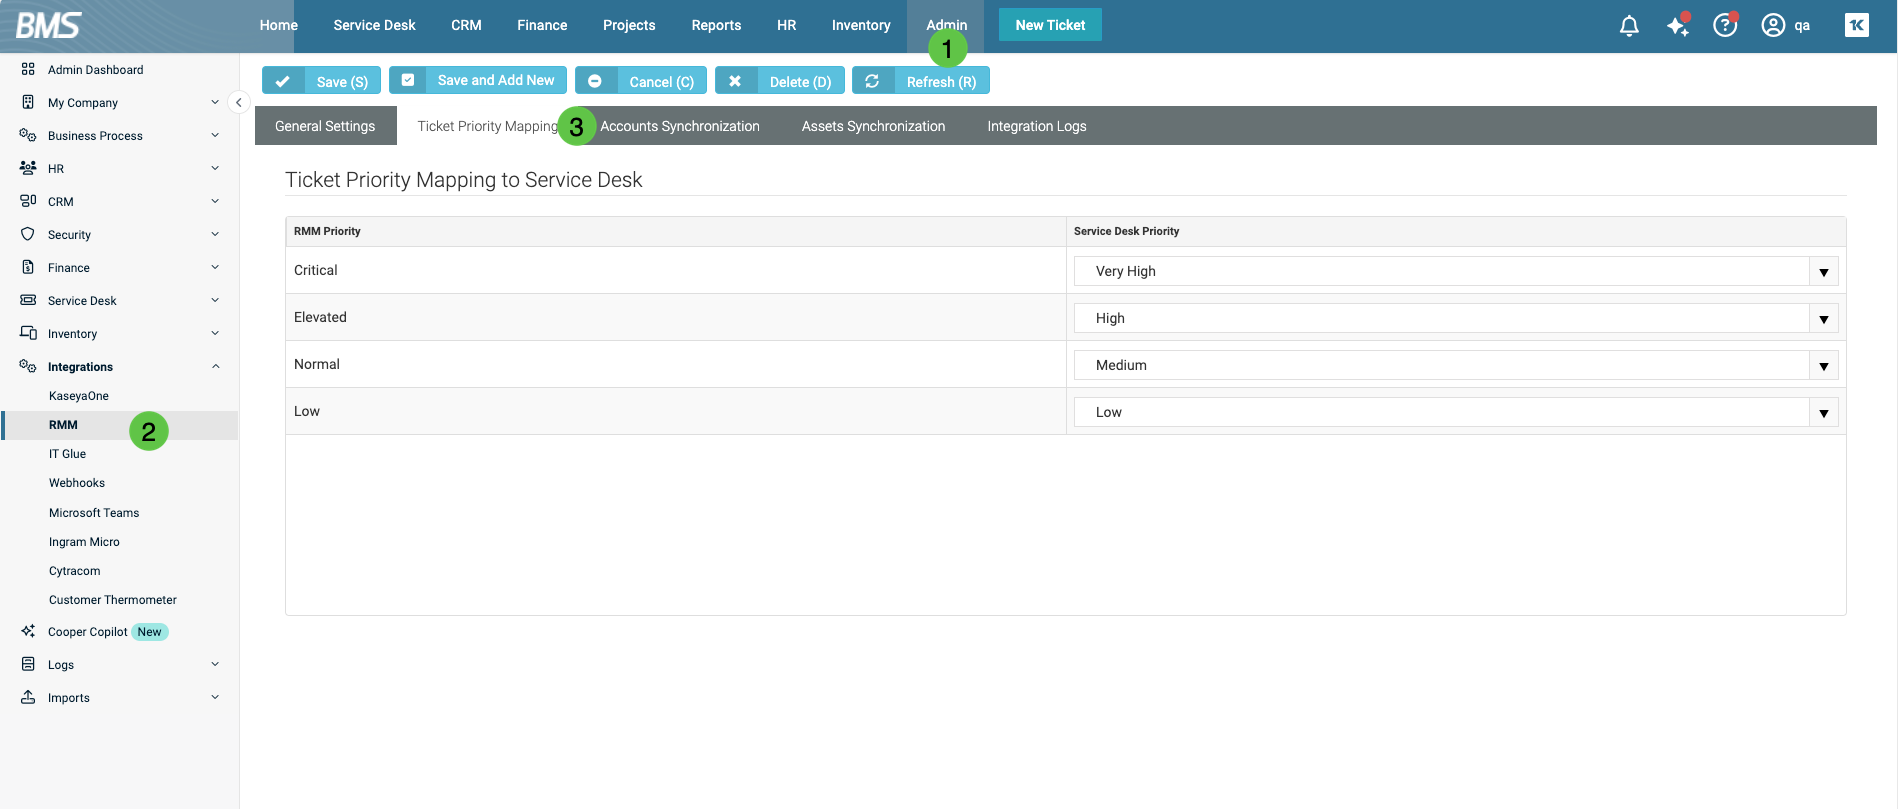
In this tab, you can map the priority of the VSA 10 alert that will generate a ticket.
EXAMPLE If you map the Critical priority in the RMM Priority column to the Very High priority in the Service Desk Priority column, VSA 10 alerts of the Critical priority will generate a ticket of the Very High priority in BMS/Vorex.
Automatic push from BMS/Vorex
If enabled, this feature will allow the system to automatically sync an account newly created in BMS/Vorex CRM accounts to VSA 10. They will be created as organizations within the organization list and will include a default department. default machine group, and other default information, such as address and website.
Manual sync
In addition to the automatic push of organizations, BMS/Vorex provides the ability to synchronize the accounts and organizations manually.
On the manual sync page, you can import organizations from VSA 10 into BMS/Vorex as accounts, and vice versa, can manually export BMS/Vorex accounts to VSA 10 as organizations.
The sync wizard provides the ability to search for specific organizations, select multiple, and then import.
When importing organizations from VSA 10 into BMS/Vorex, you can define the behavior of the mapping between the organizations in VSA 10 and BMS/Vorex. For instance, you can link an organization in VSA 10 to an existing account in BMS/Vorex without the need to create a new account with the same name, which will give you the option to maintain different names for the same entity across the two systems. 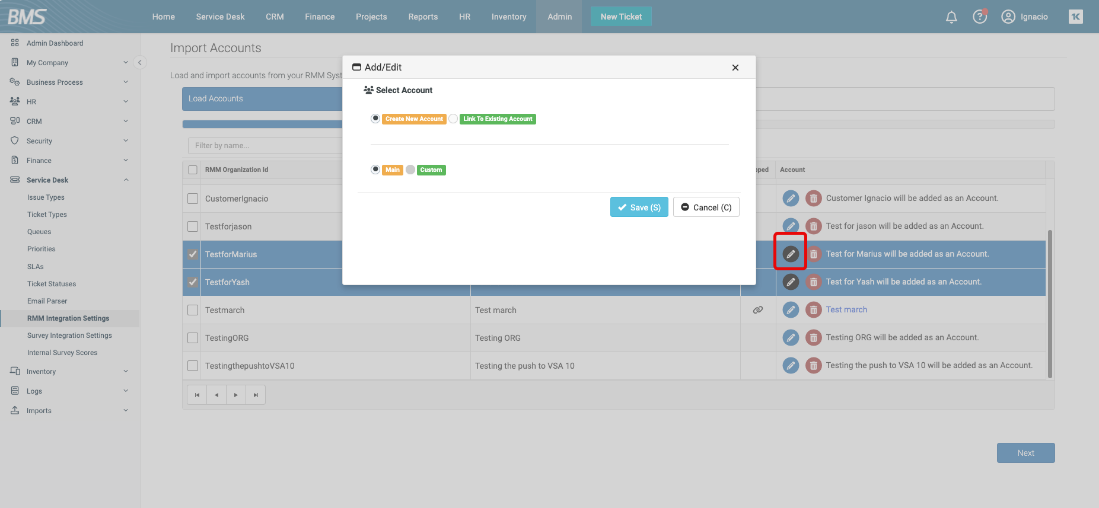
In addition to linking to an existing account, you can also customize and define how the machine groups in the VSA 10 organization can link to existing account locations or departments.
The Load accounts option will refresh the list in real time.
After accounts are mapped, you will see an icon in the Mapped column. Actions can be performed from the Account column.
NOTE Remember that if no mapped icon is visible, accounts are not synchronized.
In assets synchronization, a one-way sync allows assets to flow to BMS/Vorex from VSA 10 in multiple ways:
- Manual
- Periodic
- As part of an alert
VSA 10 asset import to BMS/Vorex is very extensive, and assets are created as Hardware assets in BMS/Vorex. When the assets are imported and updated using any of the preceding methods, several pieces of information are carried over and updated to provide more details about that asset.
Manual sync
This process is like the manual process described in the preceding section for the accounts, but it is limited to importing the data into BMS/Vorex.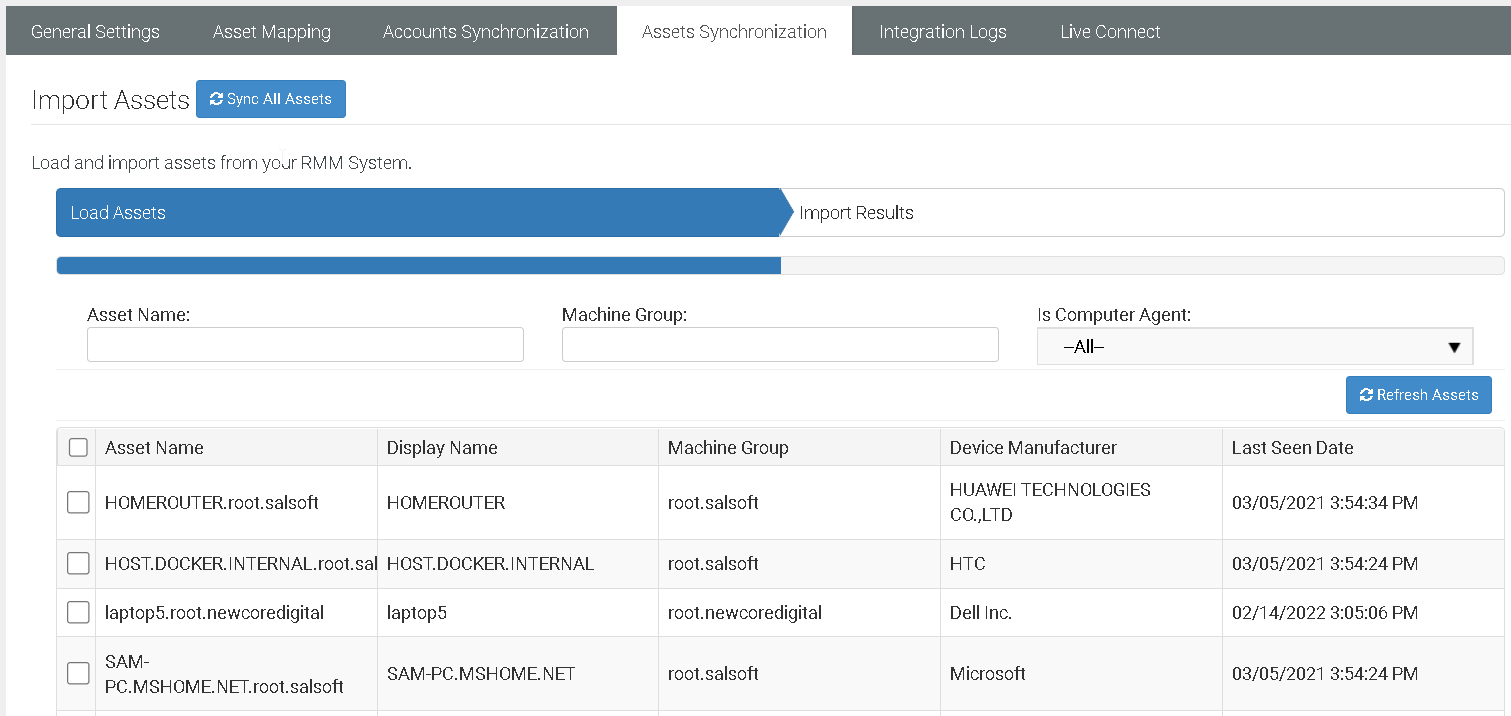
You will have the ability to filter assets by their name, machine group, and type, whether a computer agent or not.
Once satisfied with the filtration, you can select the desired assets to synchronize and import. This will trigger a process that will import the target assets data into BMS/Vorex as hardware assets.
In addition to the sync wizard, you can trigger an update for the asset directly from the asset editing page. You can click the sync button if the asset is already mapped to an asset in VSA 10.
Periodic sync
The periodic sync feature will trigger a daily VSA 10 asset synchronization at midnight.
This will keep the hardware assets catalog in BMS/Vorex synced with the latest information from VSA 10 assets.
This synchronization process can be triggered on demand manually from the asset sync wizard using the Sync All Assets button.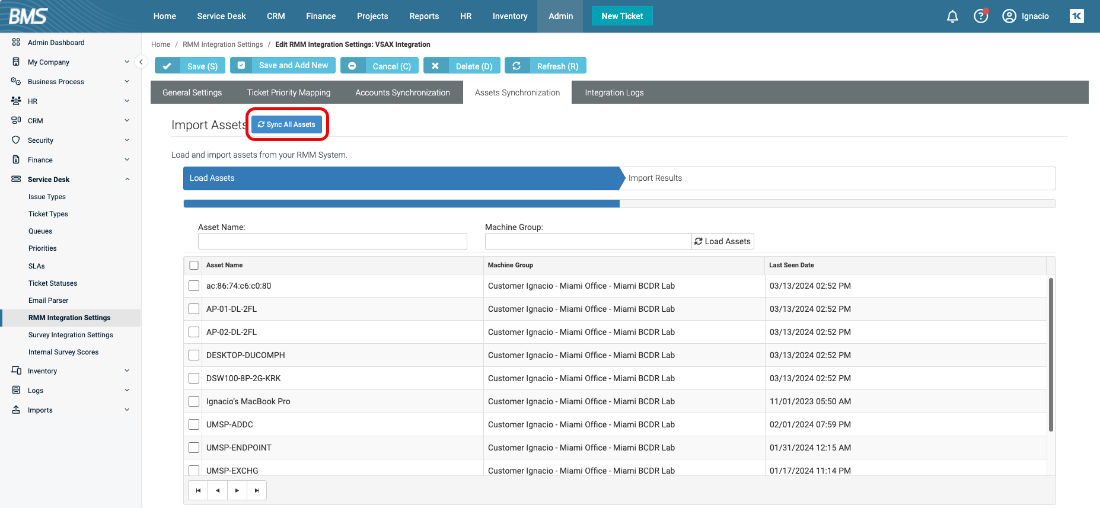
Asset deactivation
When an agent/asset in VSA 10 is deleted or disabled, the integration will track such change and send a request to BMS/Vorex to deactivate the related hardware asset.
If enabled and configured correctly, you will see a Remote Control button when viewing the target asset or when viewing a ticket that has this asset related to it. With this option, technicians can launch a VSA 10 remote session to a machine/asset that requires troubleshooting without having to leave the BMS/Vorex ticket being worked on. For more information, refer to Accessing a hardware asset through remote control from BMS.
You can allow users to create tickets from the VSA 10 Agent tray.
To enable this for users, follow the steps below:
- Create a User Session device configuration profile with User Support Request enabled. Refer to User Sessions profiles.
- Ensure that all devices where you want users to be able to submit tickets through the VSA 10 Agent are assigned to a Device Configuration policy with the profile you created.
The Request Support option is available via the VSA 10 Agent system tray icon on a device.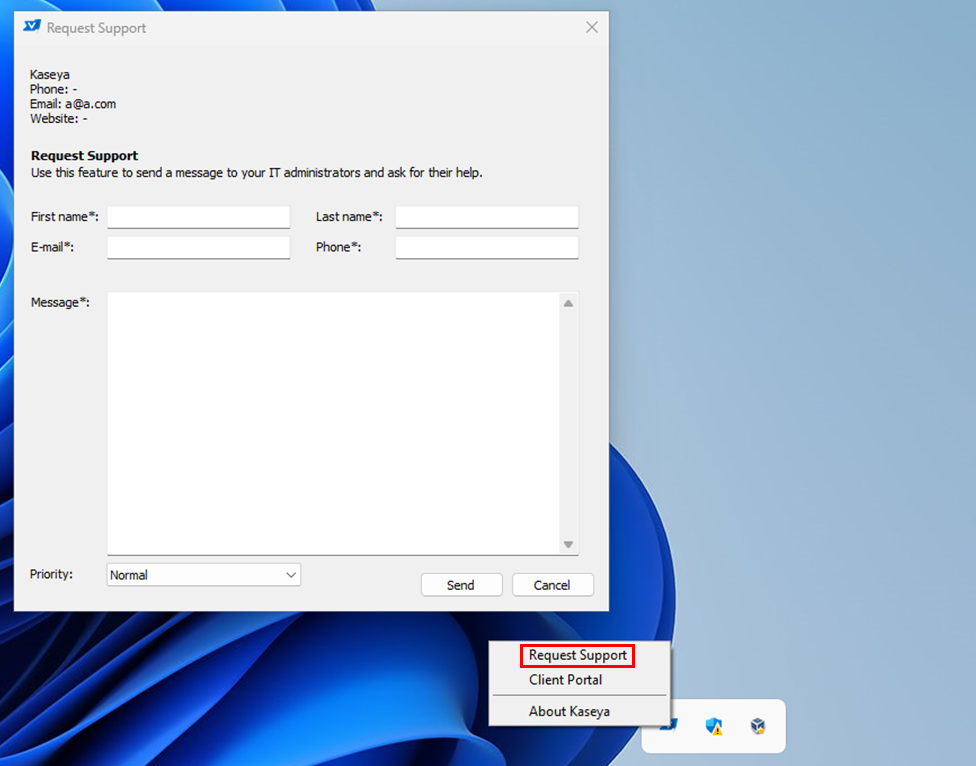
Tickets will be associated to the BMS contact who created it. The Created By field will state System User and not the contact name.
With Integrated Customer Billing (ICB) enabled, you can accurately bill your customers for the Kaseya services you provide to them. This eliminates hours of manual reconciliation and optimizes your revenue by automatically updating BMS/Vorex contracts with each organization's usage of Kaseya products. This will also allow you to easily adopt new services without worrying about the added hassle of recovering vendor costs. For more information, refer to Integrated Customer Billing.
With ICB enabled, the following metrics are shared from VSA10 to BMS/Vorex:
| Metric | Description |
|---|---|
| Total Licensed Devices |
Total count of devices under management NOTE A device is considered under management whether it is network-enrolled, has an agent, or is mdm-enrolled. A device will only count once, even if it is enrolled through multiple methods. |
| Network Devices | Count of enrolled devices that do not have an agent installed and are not enrolled in MDM. |
| Agented Devices | Count of devices that have an agent installed. |
| MDM Devices | Count of devices that are enrolled in MDM (includes agentless and agented devices). |
| Devices with Webroot | Count of agented devices that have Webroot installed. |
| Devices with Bitdefender | Count of agented devices that have Bitdefender installed. |
| Devices with Ransomware Detection | Count of agented devices that have Ransomware Detection installed. |
| Devices with Patch Management | Count of agented devices that have an active patch management policy applied. |
| Monitored Network Devices | Count of enrolled network devices (enrolled devices that do not have an agent and are not enrolled in MDM) that have monitoring assigned directly or through a monitoring policy. |
| Monitored Agented Devices | Count of agented devices that have a monitoring policy assigned. |
| All Workstations | Count of agented devices that are listed as a Workstation. |
| All Servers | Count of agented devices that are listed as a Server. |
| All Windows Servers | Count of agented Windows devices that are listed as a Server. |
| All Windows Workstations | Count of agented Windows devices that are listed as a Workstation. |
| All Mac | Count of agented macOS devices. |
| All Linux | Count of devices Linux devices. |
| Agent - Online in Last 30 Days | Count of agented devices that were online in the last 30 days |
| Webroot Enabled | Webroot is active for at least one device in a given organization, site, or group. 1=Enabled / 0=Disabled |
| Bitdefender Enabled | Bitdefender is active for at least one device in a given organization, site, or group. 1=Enabled / 0=Disabled |
| Ransomware Detection Enabled | Ransomware Detection is active for at least one device in a given organization, site, or group. 1=Enabled / 0=Disabled |
|
3pp Enabled |
3pp is is active for at least one device in a given organization, site, or group. 1=Enabled / 0=Disabled |
BMS/Vorex live ticketing
A ticketing module is available for technicians and IT teams within VSA 10. A technician who uses VSA 10 can access ticketing from either the VSA 10 web application or mobile application (iOS or Android). Refer to Using the integration on the mobile application.
With this innovation, technicians can manage tickets on the go within the same tool they will use to identify and fix the issue.
Prerequisites
- You must have the BMS/Vorex Integration enabled in VSA 10. Refer to Configuring the BMS/Vorex Integration in VSA 10.
- You must have ticketing permission in VSA 10 (Edit).
- You must have credentials for a BMS/Vorex account.
Features
Click Tickets in the left navigation menu to access the live ticketing feature. From this page, you can view, create, update, and monitor the real-time status of tickets that are being resolved.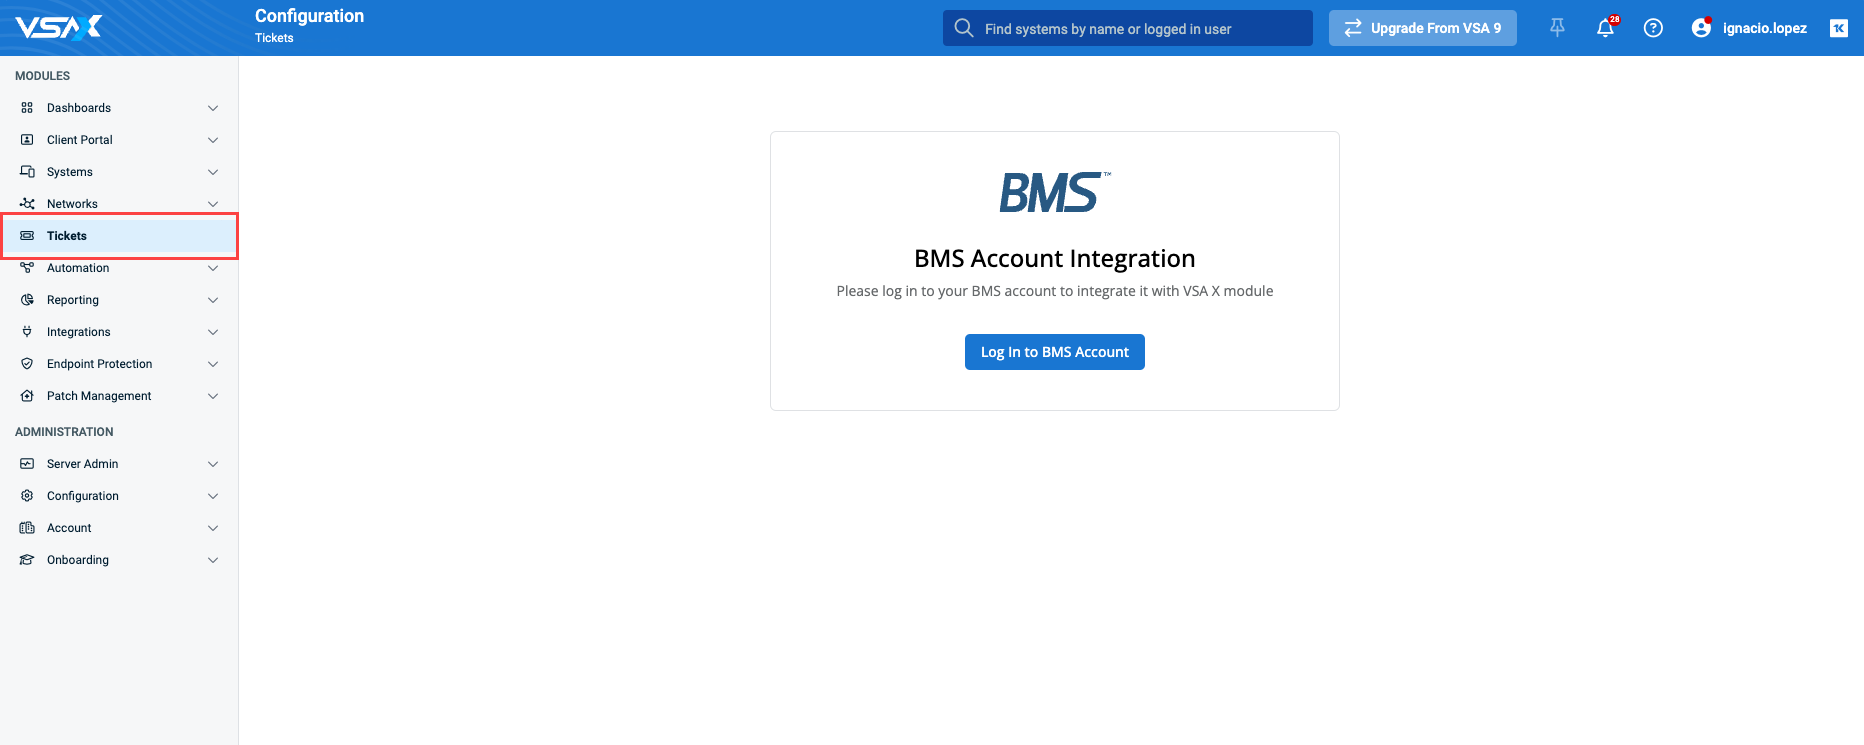
You can view and edit all the tickets you created or any ticket you have permission to view or edit.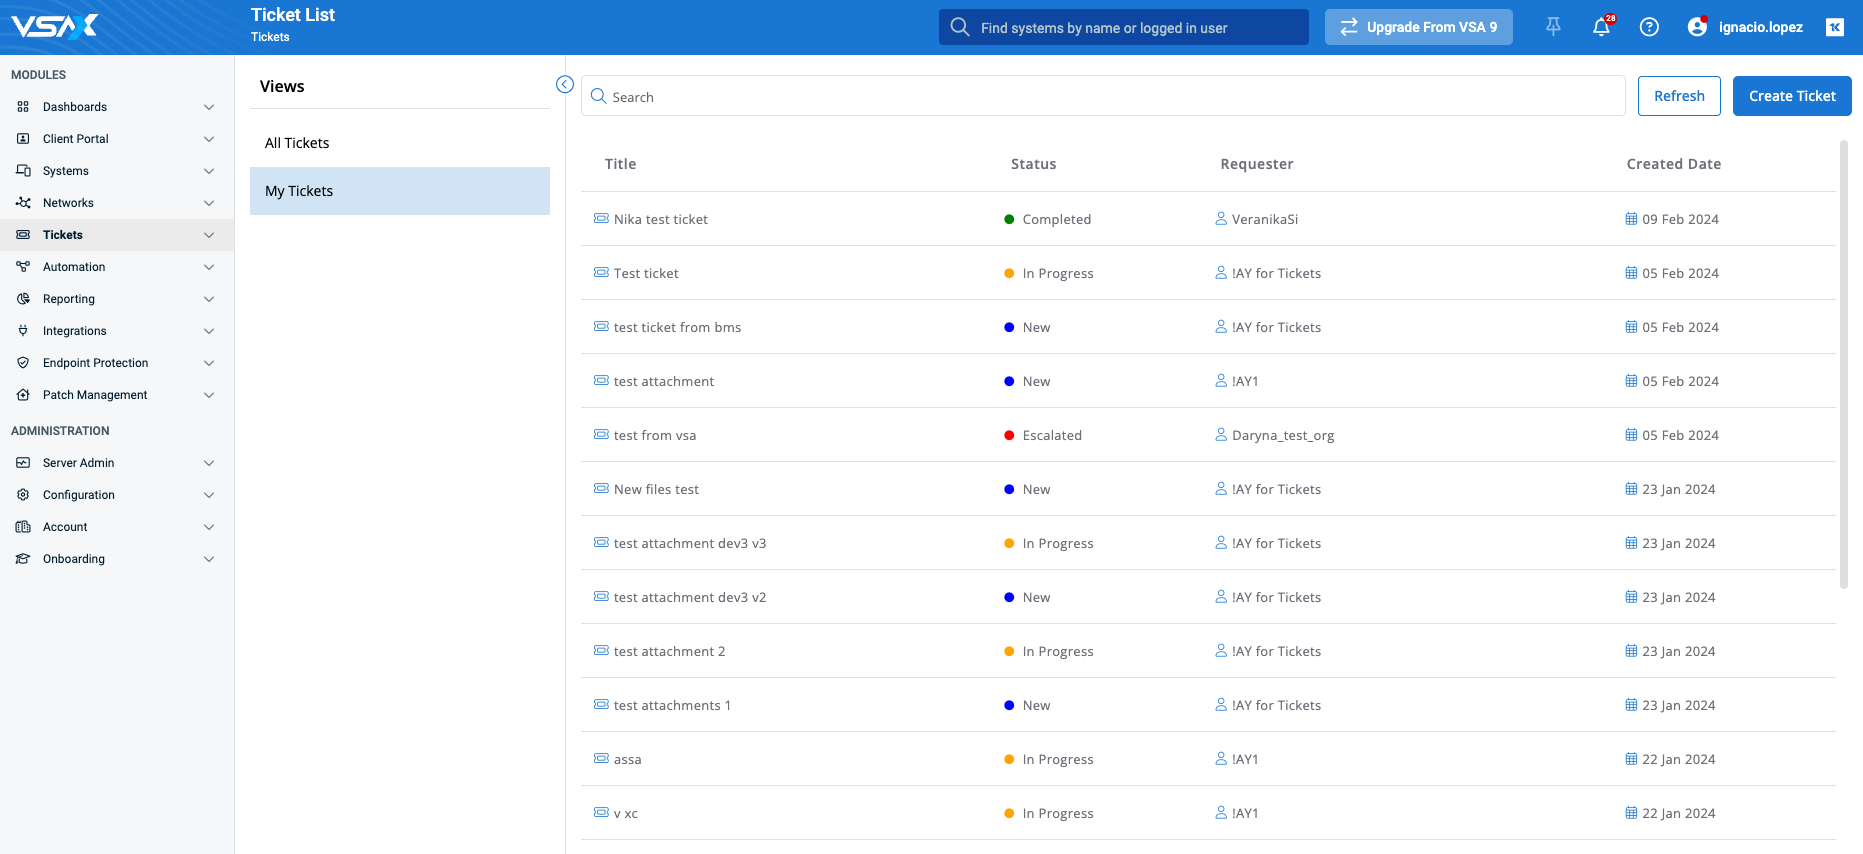

You can also create or edit a PSA ticket directly from VSA 10.
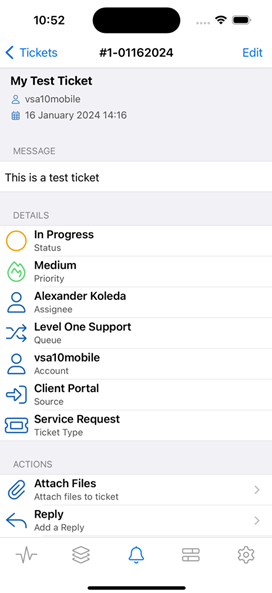
Using the integration on the mobile application
The BMS/Vorex integrated service ticketing feature is also available in the mobile application.
Access the integration screen: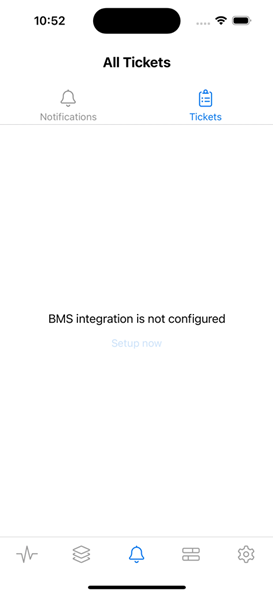
Enter your BMS/Vorex account credentials: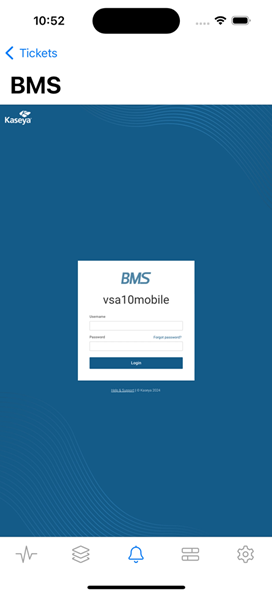
View the list of tickets in the Tickets tab: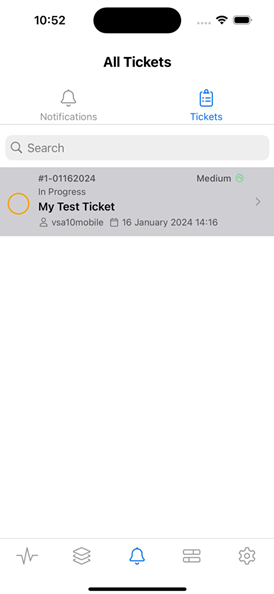
Select a ticket to view its details: